

In this article, we will explain what is get_it, check different registration methods and give an example on how to use it in a Flutter application.
What is GetIt?
To obtain clean code and to have loosely coupled system you need to use some kind of inversion of control (IOC). The get_it package is a service locator, in which you would have a central registry where you can register the classes and then obtain an instance of those class.
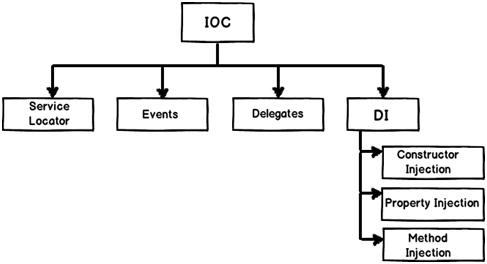
As you can see in the above image, both dependency injection and service locator are a form of IOC.
Inversion of control means an external framework will create the needed object, for example we can use an xml file to configure the objects and then the framework will create them.
Dependency Injection, is a way to achieve IOC through constructor injection, setter injection or property injection.
Service Locator, also it is a way to achieve IOC but the main difference with DI is that every class will have a dependency on the service locator while using DI the class is given the dependencies without knowing from where they came from.
The important difference between the two patterns is about how that implementation is provided to the application class. With service locator the application class asks for it explicitly by a message to the locator. With injection there is no explicit request, the service appears in the application class - hence the inversion of control.
Check Martin Fowler’s article.
Adding GetIt To Flutter
After creating a project, navigate to the pubspec.yaml file and add the following:
1
2
3
4
5
dependencies:
  cupertino_icons: ^1.0.2
  flutter:
    sdk: flutter
  get_it: ^7.1.3
Click CTRL + S to save, and you have successfully added get_it to your Flutter application!
Example Using GetIt
So first to use it in your code you need to create an instance of GetIt which can be done using two ways:
1
2
3
4
GetIt locator = GetIt.instance;

//short term
GetIt locator = GetIt.I;
Now let’s assume we have the following class:
1
2
3
class Students {
   String name = "peter";
}
and we want to use it in a different class. Therefore we can register it using get_it:
1
2
3
initLocator() {
  locator.registerFactory<Students>(() => Students());
}
Then to access the Students class you can do:
1
2
3
4
5
  @override
  Widget build(BuildContext context) {
    Students student = locator<Students>();
    print(student.name);
    return Scaffold(...
This would print peter in the terminal. Also, don’t forget to call initLocator() inside the main() method:
1
2
3
4
void main() {
  initLocator();
  runApp(MyApp());
}
In the above example we saw one registration type which is registerFactory, but there are also other registration types:
registeryFactory: Will register a type so that a new instance will be created on each call.
registerFactoryParam: It is the same as registerFactory, but the only difference is that you can pass up to 2 parameters.
registerSingleton: Will registers a type as Singleton, which means that on each call the same instance will always be returned during the app lifecycle.
registerLazySingleton: It is the same as registerSingleton, but the only difference is that in this case the singleton is registered only when it’s requested as a dependency for some other class.
Example with registerFactoryParam we can do the following:
1
2
3
4
5
6
7
8
9
10
11
12
13
14
import 'package:get_it/get_it.dart';

GetIt locator = GetIt.instance;

initLocator() {
  locator.registerFactoryParam<Students,String,String>((param1, param2) => Students(name: param1, email: param2));
}


class Students {
   String? name;
   String? email;
  Students({this.name, this.email});
}
and then to access the value of each field we can do:
1
2
3
4
5
6
  @override
  Widget build(BuildContext context) {
    Students student =
        locator<Students>(param1: "peter", param2: "example@email.com");
    print(student.email);
    return Scaffold(
Example with registerLazySingleton, we can do the following:
1
2
3
4
5
6
7
8
9
10
11
12
13
14
15
16
17
18
19
initLocator() {
  locator.registerLazySingleton<Service>(() => ServiceImpl());
}

abstract class Service {
  Map<String, dynamic> fetchData();
}

class ServiceImpl implements Service {
  @override
  Map<String, dynamic> fetchData() {
    print("fetch data");
    return Map();
  }
}

class ServicesViewModel {
  Service _service = locator<Service>();
}
So let’s say we are using a layered architecture (presentation, domain, data layer), and we don’t want the domain to know the implemenation details of the data layer then we can use an interface. Then using the get_it package we can register the implemenation class, but the ServicesViewModel class will only depend on the abstraction.
For more details check: get_it
I hope you enjoyed reading this flutter tutorial, please feel free to leave any comments or feedback on this post!