Understanding Git Part 1

Software Developer | Technical Writer | Actively helping users with their questions on Stack Overflow.

Git is a free and open source distributed version control system designed to handle everything from small to very large projects with speed and efficiency. Git can be used to track old versions of files and to check all the different changes.
Installing Git
You can check part 2 article in the below links:
First you need to install Git to be able to use it. Since not everyone prefers to use the terminal, then you are able to install a Git Gui and a Git Bash from git-scm. After finishing the installation, if you are using windows operating system then you can right click and click Git Gui to open the graphical user interface.
In the below tutorial, I will give comparison between the Git Gui and Git Bash.
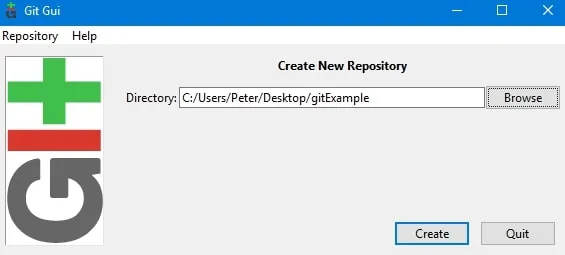
Initializing a Repository and Using it
First you need to navigate to the location where you want to create a new repository, then do the following:
Git Bash
cd Desktop/gitExample
git init
Git GUI
This will create a new hidden file called .git inside the folder gitExample, thus making it a local repository with a branch called master.
Adding files to the repository
First create a file inside the folder newfile.txt and write some text inside of it. Then you need to add this file to the staging area(index), to be able to commit it later on. You can also use git status that will inform you in which branch you currently reside in and if you have any untracked files.
Git Bash
git add newfile.txt #tracks the file and adds it to the staging area
git commit -m "initial commit" #adds tracked files to the local repo
Note: If you want to add all files in the folder to the staging area then use git add -A (the option -A)
So as you can see git add adds the files to the staging area or index and then git commit adds the files to the local repository.
If you did a mistake you can execute git reset newfile.txt and it will remove the staged file from the local repository. If you want to add multiple files then do the following git add <file-name-1> <file-name-2> <file-name-3> or if you want to add a file then do git add 'fileName/'.
Git GUI
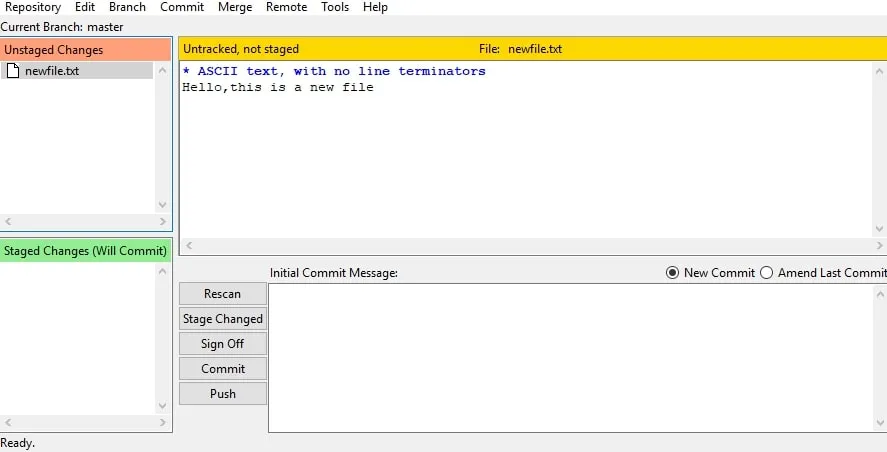
Here you need to click on Stage Changed which will add the files to the stage area and then write a message and click Commit.
Pushing files to the repository
After you commit the files, you are now ready to push them! You need to push the files to the server so your team members, or the community if you are pushing to GitHub, can access the code.
But, first you need to add the remote repository. Remote refers to any repository that is not in your local machine. Example, if you want to use Github you need to first create an account there and then create a repository to be able to push and pull. After adding a remote, you will be able to push the file to the repository.
Git Bash
git remote add origin https://github.com/<userName>/<repoName>.git
git push -u origin masterNote: origin is an alias to the URL of the remote repository, which means you do not have to write the url everytime you want to do a pull or push operation. Also master is your local branch.
If you execute git branch -a then you will get the following output:
master remotes/origin/master
remotes/origin/master is a remote tracking branch which is located inside .git/refs. Its purpose is to keep track of the current state of a remote branch, git status will also give you information about the remote tracking branch.
Git GUI
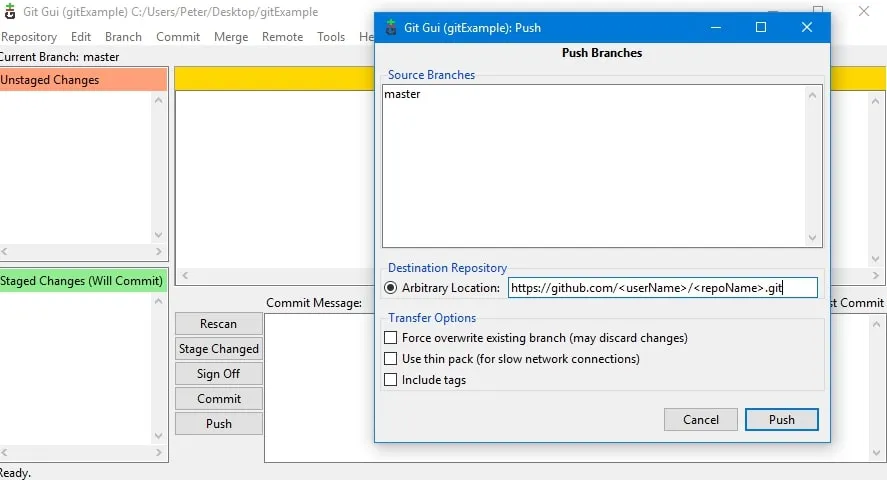
Here you need to click on Push and then add the remote url in the Arbitrary Location.
Pull the Changes
Now if any changes were added to the file in the remote repository, then you need to pull first and then push your local changes to the repository. git pull does a git fetch origin master followed by a git merge origin/master. Basically git fetch will fetch all the commits from the remote repository but it will not merge them with your local branch(safe command). After doing git fetch you can execute git status to see if your branch is up to date with the remote branch. You can also execute git log --all to see the latest commits and the authors or git show origin/master to see the latest changes in the commits done.
Note:
origin: is the remote branch.master: is the local branch.origin/master: is a representation or a pointer to the remote branch, basically it is a local copy of the branchmasterin the remoteorigin.git fetch origin master: fetches changes from origin to master (local branch) but does not merge, it creates a local copy calledorigin/mastergit merge origin/master: merges the changes that were fetched.
Git Bash
git pull origin masterGit GUI
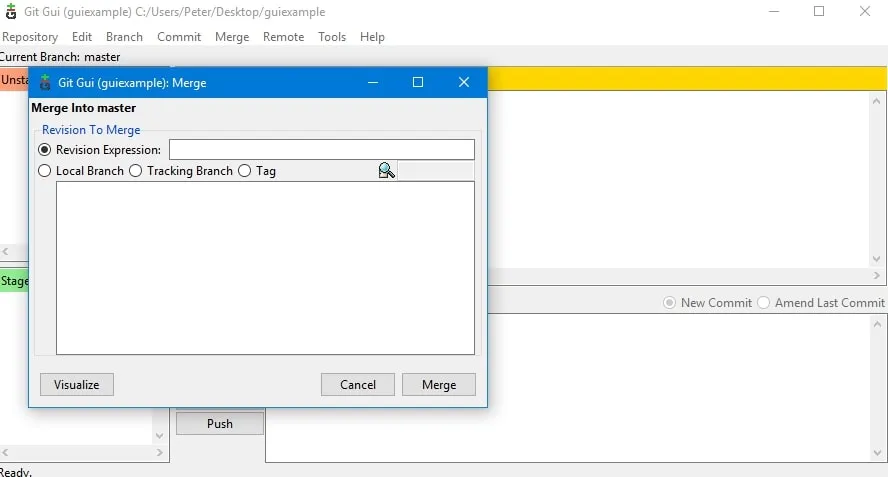
Here you need to first add the remote url after clicking Remote/Add, then click Fetch From and Merge. Also refer to this answer pull in git gui.
Cloning a Repository
If there is a repository in github, then you want to use locally in your computer then you need to clone it(copy).
Git Bash
git clone https://github.com/<userName>/<repositoryName>Now if you execute git branch -a, you will get the following output:
- master remotes/origin/HEAD -> origin/master remotes/origin/master
master is the current branch you are reside in and it is the local branch, the second line is a symbolic branch referenced by the remote repository. The third line is the remote tracking branch.
Git GUI
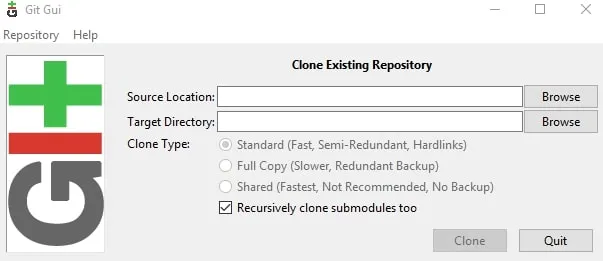
To clone a repository, simply click on Clone new repository, the Source location field should contain the remote url and the target directory should contain a folder.
Working With Branches
Branches in Git are nothing but pointers to a specific commit. Whenever a new branch is created, Git creates a new pointer while keeping the original code base untouched. Basically, what this means is that when you create a new branch, all the latest content of branch master or a different branch will be copied to the new branch and you can start modifying it without affecting branch master.
So, Let’s say there are three developers working on one project, and developerA assigned to do taskA while developerB was assigned to do taskB. Each of them already have the local repository since they cloned it:
git clone https://github.com/<userName>/<repositoryName>Now the owner of the repository wants everyone to create a branch for each task so he/she can later review the changes before accepting the pull request and merging with the master branch. So the two other developers will create a branch by executing:
git branch taskA #git branch taskBAnd then executing:
git checkout taskAwhich will enable them to start working on that branch. Another way is to execute one command:
git checkout -b taskAYou can also delete a branch by executing:
git branch -d taskANote:
git checkout: Updates files in the working tree to match the version in the index or the specified tree.working tree: are the files that you are currently working on.index: is where you place files you want commit to the git repository (staging area).
So basically, git checkout <branch> will write the contents of <branch> to the working tree. You can also use git checkout to overwrite the changes that you did in the local repository. So first execute git fetch which will fetch the latest commits without mergiing and then fo git checkout which will update the files in the local repository matching the files in the index.
You can also do git checkout master -b taskB, which will write the content of master to the working tree and git then creates a branch called taskB.
Now, you can start working on branch taskA, let’s say the branch contains a README.md file with some content and you changed the content to the following:
# task A

Hi, Im task A
Now you have to do the following:
git add README.md
git commit -m "feat: added new text for taskA"
git push -u origin taskA
The above will commit the changes and publish the taskA branch to the remote repository. Finally, the owner of the repository can compare the branch and create a pull request. Then the owner can merge the pull request with the main branch, and delete the taskA branch.
Merge Conflicts
So, let’s say someone in the team added their changes to the staging area, and then commited to their local repository and pushed those changes to the remote repository. But both you and the other developer are working on the same file, and if you have done some changes on the file but didnt push you will get some problems.. so let’s see what will happen.
First, you do:
git fetch origin masterAs I said before this will fetch the changes done but it will not merge. Now if you do git status, you will get the following:
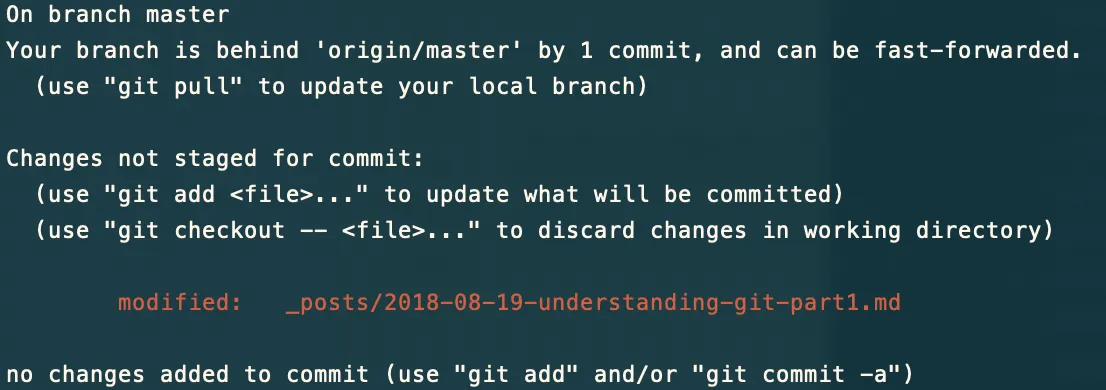
So, as you can see I modified the file understading-git-part1, but the changes are not staged. But before staging, first we executed git fetch origin master, now we have to do git merge origin/master to add the changes to our local repository. So if we execute that we get the following:
error: Your local changes to the following files would be overwritten by merge:
	_posts/2018-08-19-understanding-git-part1.md
Please commit your changes or stash them before you merge.
Aborting
Unfortunately git is not able to merge the changes, because I have changed the content of this file and the remote repository contains some changes also.
So, now if I want my changes that are not staged to be in the remote repository and I want to be able to merge the changes in the remote repository to my local repository, I have to do the following:
git add <file_name>
git commit -m "my changes"
Now my changes are inside the local repository, if I execute:
git merge origin/master ## or git pull origin masterI will have a merge conflict, I can fix the conflict by opening an IDE or editor like vscode, merging the changes from the repository to my file, keeping my local changes and then I can do git push origin master to send my file with changes to the repository.
Second way to solve the following error:
error: Your local changes to the following files would be overwritten by merge.is to execute git reset --hard and then git pull origin master, but note git reset will override all your local changes, so basically all your work will be gone, you can do git reset --hard when you just want the changes in the repository and don’t want your local changes. Or instead of reset you can do:
git checkout -- <file>When executing this command, git will take the version of this file that is in the index to the working tree, thus overwriting your local changes. But before doing that make sure that file is not staged via git reset HEAD <file>, this command will remove that file from your staging area.
Third way is to stash your changes, so basically this will save your uncommited changes in a stash, removing all your changes from the repository but keeping them hidden. So after you do git fetch and git merge and get the error, you can then do:
 git stash
 git pull
 git stash pop
After doing git pull the changes will be added to your local repository and then when you do git stash pop, git will add your saved changes back to the working tree which may lead to a merge conflict, if you click save on vscode, you will get the following:
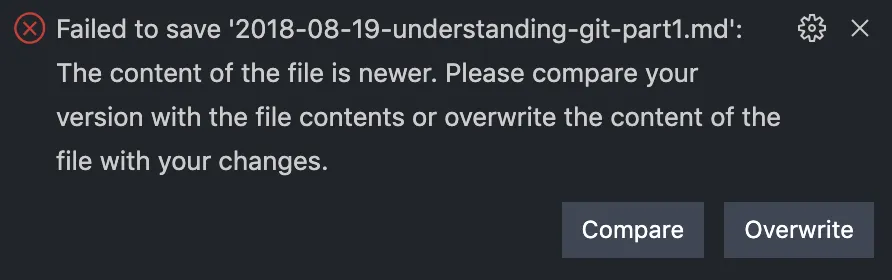
Then you have to click compare, add the changes, and commit/push. Usually git stash is used when you want to hide your changes but don’t want to commit, if you actually want to commit then it’s better to just use the first way specified in this article. Also in git stash you can either pop or apply. git stash pop will throw away the stash after applying it, whereas git stash apply leaves it in the stash list for possible later reuse. You can also delete the applied stash later by executing git stash drop.
I hope you enjoyed reading this git tutorial about how to push/pull, please feel free to leave any comments or feedback on this post!!