Http Request In Ionic

Software Developer | Technical Writer | Actively helping users with their questions on Stack Overflow.
Http Request is a packet of information that one computer sends to another computer to communicate something. Http contains different requests methods to perform certain actions. When you visit a website, and that websites shows you some data or you post some data, thats done using http requests.
Http Request Methods
Before discussing how to do http requests in ionic, I’m going to give a brief summary about http requests.
Http has many request methods that are used to perform a desired action on a resource. The request methods are sometimes referred to as Http verbs. The most common Http verbs are:
GET, which is used for retrieving dataPOST, which is used to submit data on the serverDELETE, which is used to delete the specified resourcePUT, which is used to replace the specified resourceOPTIONS, which is used in preflight requests
Types of Http Request
Http request contains two types simple request and preflight request. But, first let me explain what CORS is which will make it easier to understand these requests.
Cross-Origin Resource Sharing (CORS) is when one website wants access to resources from a different website. Example, if john.com wants access to data that is inside coding.com, then it will be a cross-origin request, in this case coding.com needs to add additional request header to allow john.com to access the resources.
Simple Request
Simple request don’t trigger a CORS preflight. To be able to perform a simple request, you need to meet the following conditions:
The Http methods should be one of the following:
GETHEADPOST
The headers should only have the following options:
- Accept
- Accept Language
- Content-Language
- Content-Type
The Content Type should only allow the following value:
- application/x-www-form-urlencoded
- multipart/form-data
- text/plain
So now let’s say cat.com wants to access resources in dog.com, then the header of the request might be like this:
GET /data
Host: dog.com
User-Agent: Mozilla/5.0 (Macintosh; Intel Mac OS X 10.14; rv:71.0) Gecko/20100101 Firefox/71.0
Origin: https://cat.com
The request header will add an Origin that will contain the domain/protocol/port of the request url. Then the server will check the Origin and if it agrees to accept this request, it adds the header Access-Control-Allow-Origin. This header must either contain a star * or the origin https://cat.com.
Preflight Request
If the request does not meet the above conditions, then it will be a preflight request, which will be done automically by the browser using the OPTIONS method. This preflight request will determine if the request is safe to send, if the result of OPTIONS returns failed, then the actual request to the server will not be executed.
First a preflight request will be done with OPTIONS method
OPTIONS /cors HTTP/1.1
Origin: http://cat.com
Access-Control-Request-Method: POST
Access-Control-Request-Headers: Content-Type
Host: dog.com
Accept-Language: en-US
Connection: keep-alive
User-Agent: Mozilla/5.0 (Macintosh; Intel Mac OS X 10.14; rv:71.0) Gecko/20100101 Firefox/71.0
Preflight response:
Access-Control-Allow-Origin: *
Access-Control-Allow-Methods: GET,HEAD,PUT,PATCH,POST,DELETE
Vary: Accept-Encoding, Origin
Access-Control-Allow-Headers: Content-Type
Content-Length: 0
Connection: keep-alive
Same as the simple request, the response will contain Access-Control-Allow-Origin in the header. The header will also have Access-Control-Allow-Methods that specify all accepeted Http methods, and Access-Control-Allow-Headers with the value Content-Type to confirm that this Http header is allowed. Then the actual POST request will occur.
Http Request in Ionic 4
First, we need to create a service class. To be able to do that open an ionic project and execute the following command:
ionic generate service services/dataThis will generate a folder and inside of it you will find the service class:
import { Injectable } from '@angular/core';

@Injectable({
  providedIn: 'root'
})
export class DataService {

  constructor() { }
}
The Injectable decorator is used to mark that this class is available to be provided and injected as a dependency.
First to do an Http request, we need to use the class HttpClient, navigate to the typescripe file app,module.ts, and add import HttpClientModule:
import { HttpClientModule } from '@angular/common/http';and then add it to the imports array:
imports: [BrowserModule, IonicModule.forRoot(), AppRoutingModule, HttpClientModule],After adding HttpClientModule to the imports array, we can now inject the HttpClient to an application class. Therefore navigate to the data.service.ts file, import the HttpClient and add then inject it to the class:
import { HttpClient } from '@angular/common/http';

export class DataService {

  constructor(private http : HttpClient) { }

}
Now after injecting it, we have an instance of HttpClient, therefore we can do a request. But before doing a request, let us create some sample data. Therefore navigate to the assets folder, add a folder called data and inside of add names.json, providing it the following data:
[
    {
        "name" : "peter",
        "title" : "developer"
    },
    {
        "name" : "john",
        "title" : "accountant"
    }
]
Now inside the data.services.ts file create the following method:
  getNames(){
    return this.http.get("assets/data/names.json");
  }
Here, we are performing a GET request, then inside the home.page.ts component class we can subscribe to this GET request:
import { Component } from '@angular/core';
import { DataService } from '../services/data.service';

@Component({
  selector: 'app-home',
  templateUrl: 'home.page.html',
  styleUrls: ['home.page.scss'],
})
export class HomePage
{

  constructor(private dataService : DataService) {}

  ngOnInit() {
  this.dataService.getNames().subscribe(data =>
  {
    console.log(data);
  });
  }
}
So, first we import the DataService class, and inject it, then we call the method getNames() and since it returns an Observable we can subscribe to it and get the data, then we can display this data using ngFor, first create an instance variable and assign it to data:
export class HomePage
private result;
  constructor(private dataService : DataService) {}

  ngOnInit() {
  this.dataService.getNames().subscribe(data =>
  {
    console.log(data);
    this.result = data;
  });
Then since this is an array, we can use ngFor to loop inside of it and access the data:
  <ion-list *ngFor="let dt of result">
    <ion-item>
      <ion-label>
        <h2>{% raw %}{{dt.name}}{% endraw %}</h2>
        <h4>{% raw %}{{dt.title}}{% endraw %}</h4>
      </ion-label>
  </ion-item>
  </ion-list>
Observables In Angular
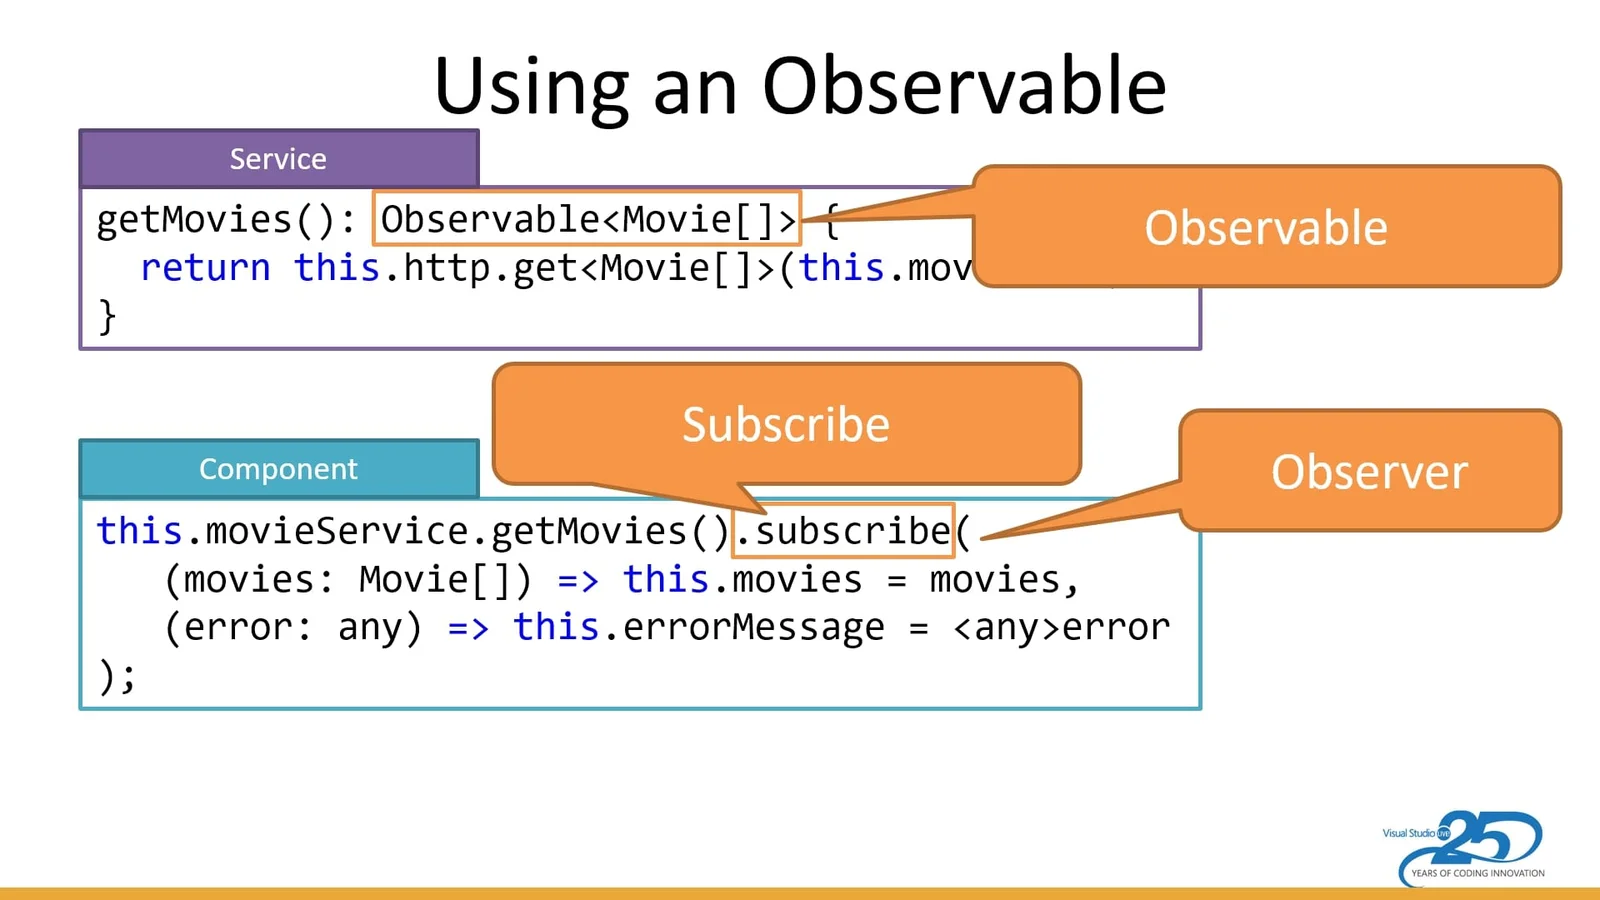
As you can see the get() method in HttpClient returns an Observable. An Observable is a stream of events or data, observables are used in event handling, asynchronous programming..
Observables do not emit the values until a consumer subscribers to it, the subscribed function then recieves the data until the function completes, or until they unsubscribe. The subscribe method takes an Observer, which has three methods:
next, A handler for each delivered value. Called zero or more times after execution startserror, A handler for an error notification. An error halts execution of the observable instance.complete, handler for the execution-complete notification. Delayed values can continue to be delivered to the next handler after execution is complete
For Example, when we subscribe to getNames(), we can do the following:
  this.dataService.getNames().subscribe(data =>
  {
    console.log(data);
    this.result = data;
  },error =>
  {
    console.log(error);
  },() =>
  {
    console.log('complete!');
  });
Thus, here we can handle the error and when it completes.

The above image demonstrates how observables work. The image can be found here.
You can also use the RxJS (Reactive Extensions for JavaScript) library that uses observables thus making it easier to compose asynchronous code. RxJS provider operators that are functions that build on the observables foundation to enable sophisticated manipulation of collections. Check the RxJS docs. For example we can use the map() operator in our function:
First import the map operator:
import { map } from 'rxjs/operators'; getNames(){
return this.http.get("assets/data/names.json")
.pipe(
map((response : any) => response.find(elem => elem.name == "peter"))
);
}As you can see in the above function, first we use the pipe operator that takes an infinite amount of arguments and each argument is an operator you want to apply to the Observable. Also every operator added inside the pipe will execute in the order you pass them. Then we use the map() operator to manipulate the array and return the object that contains the attribute name equal to peter.
I hope you enjoyed reading this ionic tutorial, please feel free to leave any comments or feedback on this post!