Using Floor Plugin In Flutter

Software Developer | Technical Writer | Actively helping users with their questions on Stack Overflow.

In this article, we will use the floor plugin which is an SQLite abstraction. This plugin will enable us to perform different operations on a database(create, read, update, and delete).
Creating a Flutter Project
You can check other Flutter articles that use null safety in the below links:
First we need to create a Flutter project, after following the documentation and installing the Flutter SDK. You can then open vscode or android studio and execute in the terminal the following command:
flutter create floor_tutorialßAlso I’m using latest Flutter version 2.0 with null safety enabled, you can enable null safety by executing:
dart migrate --apply-changesNote: To understand the full benefit of this plugin, you can check the previous article where I used the sqflite plugin.
Adding Floor Plugin to Flutter
To be able to use this plugin in Flutter, you need to add the plugin floor. So to add it you need to navigate to the pubspec.yaml file, and write the following:
dependencies:
  floor: ^1.5.0
  flutter:
    sdk: flutter

dev_dependencies:
  build_runner: ^2.4.12
  cupertino_icons: ^1.0.8
  floor_generator: ^1.5.0
  flutter_test:
    sdk: flutter
Now you can start using Floor in the Flutter project! In the following sections we will create a list of users and add those users to the database.
As you can see in the above code, to use the floor plugin we need to add the build_runner. Now first we add it under dev_dependencies since we will only use it in development phase and since we don’t need the build_runner to be included when compiling the application.
Now the build_runner is used to generate code, many plugins use the build_runner example like floor, freezed, json_serializable. All of those plugins use build_runner so the developer will write less code thus avoiding repeating the same thing over and over again. We will see in the following sections how we can use the build_runner.
Creating the Model Class
Before creating a model class, I will explain a bit about the DAO pattern.
The floor plugin uses the architecture pattern Data Access Objects or DAO.
If you are working on a project then you might seperate it into layers, for example presentation layer contains UI, then domain layer contains business logic, then we have the data access layer which would be the layer communicating with the database. Therefore in that layer one can use the DAO pattern.
The DAO is basically an interface (in other programming languages) or abstract class in which you declare different methods that will add, delete, update or read from the database, without using the DAO pattern, you would have to manually write the code to perform those operations which could be error-prone.
Before creating the abstract class, we need to create a model class or an entity class. The entity class would represent a table in the database, therefore the class name will be the table name and the fields will be the columns in the table. For example:
@entity
class User {
  @PrimaryKey(autoGenerate: true)
  final int? id;
  final String name;
  final int age;
  final String country;
  final String? email;

  User({ this.id,
      required this.name,
      required this.age,
      required this.country,
      this.email});
}
As you can see to mark a class as an entity class we use the annotation @entity above the class declaration. Since every table has a primary key, therefore we add the annotation @PrimaryKey(autoGenerate: true) above the field id. If you check the previous sqflite tutorial you would notice that we manually created methods to map the fields to the database, for example:
  User.fromMap(Map<String, dynamic> res)
      : id = res["id"],
        name = res["name"],
        age = res["age"],
        country = res["country"],
        email = res["email"];

  Map<String, Object?> toMap() {
    return {'id':id,'name': name, 'age': age, 'country': country, 'email': email};
  }
Creating the Data Access Object
After creating the entity class, we now need to create the DAO abstract class, for example:
import 'package:floor/floor.dart';
import 'package:floor_tutorial/database/user.dart';

@dao
abstract class UserDAO {
  @insert
  Future<List<int>> inserUser(List<User> user);

  @Query('SELECT * FROM User')
  Future<List<User>> retrieveUsers();

  @Query('DELETE FROM User WHERE id = :id')
  Future<User?> deleteUser(int id);
}
As you can see we use the annotation @dao to mark the abstract class as a data access object. Then to be able to insert users in the database, all we have to do is annotate the method with the @insert annotation. For different queries we can use the annotation @Query(sql_queries).
Create the Database
Now since we created the entity class and the DAO abstract class, the only thing left to do is to create the database which we can do using the following example:
import 'dart:async';
import 'package:floor/floor.dart';
import 'package:floor_tutorial/database/user.dart';
import 'package:floor_tutorial/database/user_dao.dart';
import 'package:sqflite/sqflite.dart' as sqflite;


part 'user_database.g.dart'; // the generated code will be there

@Database(version: 1, entities: [User])
abstract class UserDatabase extends FloorDatabase {
   UserDAO get userDAO;
}
As you can see we annotate the class with the @Database annotation, which we also provide a list of entities. Now to be able to access the methods declared in the UserDAO abstract class, we create an abstract getter method:
UserDAO get userDAO;Generating Code
Now for all of this to work, we need to generate some code using the build_runner which I explained about before. So navigate to the terminal and execute:
flutter packages pub run build_runner buildwhich will generate a file called user-database.g.dart. You shouldn’t change anything in that file, but if you check the file you will see that it is creating the table User and performing the other operations specified in the DAO abstract class.
Display Data From The Database
Navigate to the main.dart file, and remove all the code related to the counter Flutter application, and inside the _MyHomePageState add the following:
class _MyHomePageState extends State<MyHomePage> {
  late UserDatabase database;

  @override
  void initState() {
    super.initState();
    $FloorUserDatabase
        .databaseBuilder('user_database.db')
        .build()
        .then((value) async {
      this.database = value;
      await this.addUsers(this.database);
      setState(() {});
    });
  }
So here we use the generated class $FloorUserDatabase to be able to create the database under the file name user_database.db. Since the build() method is asynchronous therefore we use then() which registers callbacks to be called when this future completes. After the future finishes we call addUsers() which will insert users to the database and then call setState() to be able to rebuild the tree again:
  Future<List<int>> addUsers(UserDatabase db) async {
    User firstUser = User(name: "peter", age: 24, country: "Lebanon");
    User secondUser = User(name: "john", age: 31, country: "United Kingdom");
    return await db.userDAO.inserUser([firstUser, secondUser]);
  }
Now we need to fetch the users to display them on the screen, we can do the following:
Future<List<User>> retrieveUsers() async {
    return await this.database.userDAO.retrieveUsers();
}

  @override
  Widget build(BuildContext context) {
    return Scaffold(
      appBar: AppBar(
        title: Text(widget.title!),
      ),
      body: FutureBuilder(
        future: this.retrieveUsers(),
        builder: (BuildContext context, AsyncSnapshot<List<User>> snapshot) {
          if (snapshot.hasData) {
            return ListView.builder(
              itemCount: snapshot.data?.length,
              itemBuilder: (BuildContext context, int index) {
                return Dismissible(
                  direction: DismissDirection.endToStart,
                  background: Container(
                    color: Colors.red,
                    alignment: Alignment.centerRight,
                    padding: EdgeInsets.symmetric(horizontal: 10.0),
                    child: Icon(Icons.delete_forever),
                  ),
                  key: ValueKey<int>(snapshot.data![index].id!),
                  onDismissed: (DismissDirection direction) async {
                    await this
                        .database
                        .userDAO
                        .deleteUser(snapshot.data![index].id!);
                    setState(() {
                      snapshot.data!.remove(snapshot.data![index]);
                    });
                  },
                  child: Card(
                      child: ListTile(
                    contentPadding: EdgeInsets.all(8.0),
                    title: Text(snapshot.data![index].name),
                    subtitle: Text(snapshot.data![index].age.toString()),
                  )),
                );
              },
            );
          } else {
            return Center(child: CircularProgressIndicator());
          }
        },
      ),
    );
  }
The above build() method will give us the following:
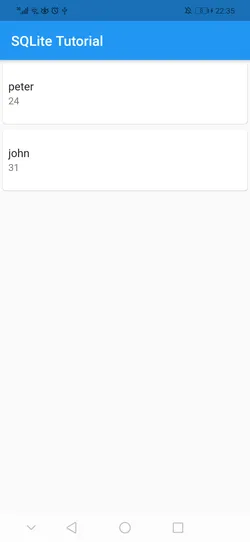
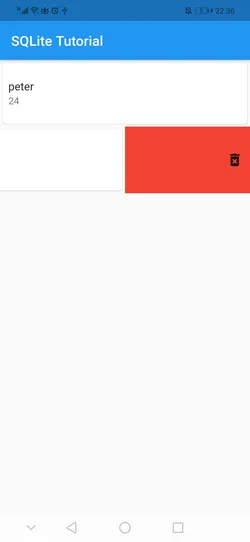
To delete a user, we can use the Dismissible widget to swipe to the right, which will remove the item from the list and delete the user from the database by calling the method deleteUser():
I hope you enjoyed reading this flutter tutorial, please feel free to leave any comments or feedback on this post!