Creating a Timeline Component in Flutter

Software Developer | Technical Writer | Actively helping users with their questions on Stack Overflow.

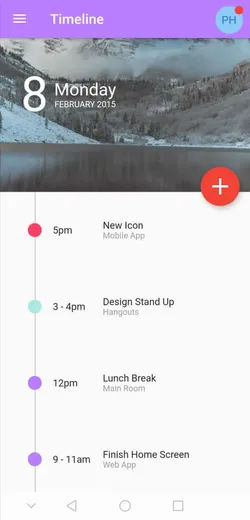
In this article, we will use the Stack widget and other Flutter widgets to create a timeline user interface.
Creating the Timeline UI Design
The following is the user interface:
So first let’s create the app bar, before adding the code you need to create a new flutter project by executing:
flutter create timeline_widgetCreating The App Bar
First create a file called constants.dart which will contain the following:
import 'package:flutter/material.dart';

class Constants {
  static const kPurpleColor = Color(0xFFB97DFE);
  static const kRedColor = Color(0xFFFE4067);
  static const kGreenColor = Color(0xFFADE9E3);
}
we will use those colors in the timeline user interface. Next remove all the comments from the main.dart file and click format document. Then assign kPurpleColor to the primaryColor property in ThemeData:
void main() {
  runApp(MyApp());
}

class MyApp extends StatelessWidget {
  @override
  Widget build(BuildContext context) {
    return MaterialApp(
      debugShowCheckedModeBanner: false,
      title: 'Timeline',
      theme: ThemeData(
        primaryColor: Constants.kPurpleColor,
      ),
      home: TimelineComponent(title: 'Timeline'),
    );
  }
}
The TimelineComponent will extend the StatelessWidget, which means we need to override the build method. Now, inside the build method do the following:
return Scaffold(
  drawer: Drawer(),
    appBar: AppBar(title: Text(this.title!), actions: [
    Padding(
        padding: const EdgeInsets.fromLTRB(0, 10, 10, 0),
        child: Stack(
        children: [
            CircleAvatar(
            backgroundColor: Colors.blue.shade200,
            child: const Text('PH'),
            ),
            new Positioned(
            right: 0,
            top: 0,
            child: new Container(
                padding: EdgeInsets.all(1),
                decoration: new BoxDecoration(
                color: Colors.red,
                borderRadius: BorderRadius.circular(6),
                ),
                constraints: BoxConstraints(
                minWidth: 12,
                minHeight: 12,
                ),
            ),
            )
        ],
        ),
    ),
    ]),
As you can see, we use the actions property which takes a list of widgets. Then we use the Stack widget which is used to overlap several children in a simple way. So, here first we have the CircleAvatar widget at the bottom and then we use a Container widget to create a red circle. Then we use the Positioned widget to position the red circle at the top right of the CircleAvatar.
Creating The Timeline
So now according to the image, the body property of the Scaffold will contain a Column widget. The upper part of the body will contain an image, some text on top of it, and a floating action button while the bottom part will contain the timeline ui.
Therefore, regarding the upper part we can do the following:
body: Column(
  crossAxisAlignment: CrossAxisAlignment.stretch,
  children: [
    Stack(
      clipBehavior: Clip.none,
      children: [
        Container(
          height: size.height * 0.3,
          width: double.infinity,
          child: Image.asset("assets/images/background.jpeg",
              fit: BoxFit.fitWidth),
        ),
        Positioned(
          top: 40,
          left: 30,
          child: Row(children: <Widget>[
            Text("8",
                style: style.copyWith(fontSize: 70.0)),
            Padding(
              padding: const EdgeInsets.all(8.0),
              child: Column(
                children: [
                  Text("Monday",
                      style: style.copyWith(fontSize: 25.0)),
                  Text("February 2015".toUpperCase(),
                      style: style.copyWith(fontSize: 12.0)),
                ],
              ),
            ),
          ]),
        ),
        Positioned(
          bottom: -20,
          right: 15,
          child: FloatingActionButton(
            onPressed: null,
            child: IconButton(
              icon: Icon(Icons.add, color: Colors.white),
              onPressed: null,
              iconSize: 40.0,
            ),
            backgroundColor: Colors.red,
          ),
        )
      ],
    ),
We use a Stack widget and inside of it we add the image. Then we use a Row and a Column and wrap them in a Positioned widget, to position the Text widget correctly. We also create a global TextStyle object:
TextStyle style = TextStyle(color: Colors.white);and then use the copyWith() method which creates a copy of this text style but with the given fields replaced with the new values.
Then we create a FloatingActionButton and position it correctly using the Postioned property and we use Clip.none to prevent clipping the floating action button.
Before creating the timeline ui, we need to create some sample data. Therefore create a class called Events:
class Events {
  final String time;
  final String eventName;
  final String description;

  Events({required this.time, required this.eventName, required this.description});

}
and create some sample data:
  final List<Events> listOfEvents = [
    Events(time: "5pm", eventName: "New Icon", description: "Mobile App"),
    Events(time: "3 - 4pm", eventName: "Design Stand Up", description: "Hangouts"),
    Events(time: "12pm", eventName: "Lunch Break", description: "Main Room"),
    Events(time: "9 - 11am", eventName: "Finish Home Screen", description: "Web App"),
  ];
Now regarding the timeline ui, we can do the following:
Flexible(
  child: ListView.builder(
      shrinkWrap: true,
      itemCount: listOfEvents.length,
      itemBuilder: (context, i) {
        return Stack(
          children: [
            Padding(
              padding: EdgeInsets.all(40),
              child: Row(
                children: [
                  SizedBox(width: size.width * 0.1),
                  SizedBox(child: Text(listOfEvents[i].time),
                    width: size.width * 0.2,
                  ),
                  SizedBox(
                    child: Column(
                      crossAxisAlignment: CrossAxisAlignment.start,
                      children: [
                        Text(listOfEvents[i].eventName),
                        Text(
                          listOfEvents[i].description,
                          style: TextStyle(
                              color: Colors.grey, fontSize: 12),
                        )
                      ],
                    ),
                  )
                ],
              ),
            ),
            Positioned(
              left: 50,
              child: new Container(
                height: size.height * 0.7,
                width: 1.0,
                color: Colors.grey.shade400,
              ),
            ),
            Positioned(
              bottom: 5,
              child: Padding(
                padding: const EdgeInsets.all(40.0),
                child: Container(
                  height: 20.0,
                  width: 20.0,
                  decoration: new BoxDecoration(
                    color: listOfColors[random.nextInt(3)],
                    borderRadius: BorderRadius.circular(20),
                  ),
                ),
              ),
            ),
          ],
        );
      }),
),
First, since we are using the listview inside a Column and since both widgets expands to the maximum size vertically therefore we wrap it with a Flexible widget to constraint the height of the listview. Then inside the itemBuilder return a Stack widget. The Stack widget will contain a Row widget, that will also contain the sample data.
Then create a Container widget with width: 1.0, this widget will be the straight line in the timeline, while the other Container containing the BorderRadius.circular(20) will be bullet points in the timeline.
Full Code
main.dart:
import 'dart:math';

import 'package:flutter/material.dart';

import 'constants.dart';
import 'events.dart';

void main() {
  runApp(MyApp());
}

TextStyle style =  TextStyle(color: Colors.white);

class MyApp extends StatelessWidget {
  @override
  Widget build(BuildContext context) {
    return MaterialApp(
      debugShowCheckedModeBanner: false,
      title: 'Timeline',
      theme: ThemeData(
        primaryColor: Constants.kPurpleColor,
      ),
      home: TimelineComponent(title: 'Timeline'),
    );
  }
}

class TimelineComponent extends StatelessWidget {
  TimelineComponent({Key? key, this.title}) : super(key: key);

  final String? title;

  final List<Events> listOfEvents = [
    Events(time: "5pm", eventName: "New Icon", description: "Mobile App"),
    Events(time: "3 - 4pm", eventName: "Design Stand Up", description: "Hangouts"),
    Events(time: "12pm", eventName: "Lunch Break", description: "Main Room"),
    Events(time: "9 - 11am", eventName: "Finish Home Screen", description: "Web App"),
  ];

  final List<Color> listOfColors = [Constants.kPurpleColor,Constants.kGreenColor,Constants.kRedColor];

  @override
  Widget build(BuildContext context) {
    Size size = MediaQuery.of(context).size;
    Random random = new Random();
    return Scaffold(
      drawer: Drawer(),
      appBar: AppBar(title: Text(this.title!), actions: [
        Padding(
          padding: const EdgeInsets.fromLTRB(0, 10, 10, 0),
          child: Stack(
            children: [
              CircleAvatar(
                backgroundColor: Colors.blue.shade200,
                child: const Text('PH'),
              ),
              new Positioned(
                right: 0,
                top: 0,
                child: new Container(
                  padding: EdgeInsets.all(1),
                  decoration: new BoxDecoration(
                    color: Colors.red,
                    borderRadius: BorderRadius.circular(6),
                  ),
                  constraints: BoxConstraints(
                    minWidth: 12,
                    minHeight: 12,
                  ),
                ),
              )
            ],
          ),
        ),
      ]),
      body: Column(
        crossAxisAlignment: CrossAxisAlignment.stretch,
        children: [
          Stack(
            clipBehavior: Clip.none,
            children: [
              Container(
                height: size.height * 0.3,
                width: double.infinity,
                child: Image.asset("assets/images/background.jpeg",
                    fit: BoxFit.fitWidth),
              ),
              Positioned(
                top: 40,
                left: 30,
                child: Row(children: <Widget>[
                  Text("8",
                      style: style.copyWith(fontSize: 70.0)),
                  Padding(
                    padding: const EdgeInsets.all(8.0),
                    child: Column(
                      children: [
                        Text("Monday",
                            style: style.copyWith(fontSize: 25.0)),
                        Text("February 2015".toUpperCase(),
                            style: style.copyWith(fontSize: 12.0)),
                      ],
                    ),
                  ),
                ]),
              ),
              Positioned(
                bottom: -20,
                right: 15,
                child: FloatingActionButton(
                  onPressed: null,
                  child: IconButton(
                    icon: Icon(Icons.add, color: Colors.white),
                    onPressed: null,
                    iconSize: 40.0,
                  ),
                  backgroundColor: Colors.red,
                ),
              )
            ],
          ),
          Flexible(
            child: ListView.builder(
                shrinkWrap: true,
                itemCount: listOfEvents.length,
                itemBuilder: (context, i) {
                  return Stack(
                    children: [
                      Padding(
                        padding: EdgeInsets.all(40),
                        child: Row(
                          children: [
                            SizedBox(width: size.width * 0.1),
                            SizedBox(
                              child: Text(listOfEvents[i].time),
                              width: size.width * 0.2,
                            ),
                            SizedBox(
                              child: Column(
                                crossAxisAlignment: CrossAxisAlignment.start,
                                children: [
                                  Text(listOfEvents[i].eventName),
                                  Text(
                                    listOfEvents[i].description,
                                    style: TextStyle(
                                        color: Colors.grey, fontSize: 12),
                                  )
                                ],
                              ),
                            )
                          ],
                        ),
                      ),
                      Positioned(
                        left: 50,
                        child: new Container(
                          height: size.height * 0.7,
                          width: 1.0,
                          color: Colors.grey.shade400,
                        ),
                      ),
                      Positioned(
                        bottom: 5,
                        child: Padding(
                          padding: const EdgeInsets.all(40.0),
                          child: Container(
                            height: 20.0,
                            width: 20.0,
                            decoration: new BoxDecoration(
                              color: listOfColors[random.nextInt(3)],
                              borderRadius: BorderRadius.circular(20),
                            ),
                          ),
                        ),
                      ),
                    ],
                  );
                }),
          ),
        ],
      ),
    );
  }
}
events.dart
class Events {
  final String time;
  final String eventName;
  final String description;

  Events({required this.time, required this.eventName, required this.description});
}
constants.dart
import 'package:flutter/material.dart';

class Constants {
  static const kPurpleColor = Color(0xFFB97DFE);
  static const kRedColor = Color(0xFFFE4067);
  static const kGreenColor = Color(0xFFADE9E3);
}