Using Phone Authentication With Firebase In Flutter

Software Developer | Technical Writer | Actively helping users with their questions on Stack Overflow.
In this article, we will use Phone Authentication in a Flutter application, in which we will authenticate a user by logging in using the phone number and then we will retrieve user information in the home page.
Get Started With Phone Authentication
This is the tenth article related to Firebase in Flutter, you can check the previous articles in the below links:
- Get Started With Firebase in Flutter
- Using Firebase Queries In Flutter
- Using Firebase Auth In Flutter
- Using Firebase Storage In Flutter
- Using Cloud Firestore In Flutter
- Using Firebase Cloud Messaging In Flutter
- Using Google Sign-in With Firebase In Flutter
- Using Twitter Authentication With Firebase In Flutter
- Using Facebook Authentication With Firebase In Flutter
To know how to integrate Firebase with Flutter, you can check the first article in the above list. In the other two articles, I created a form using Flutter performed queries for the realtime database and authenticated users with Firebase, in the cloud firestore article, it was different code snippet related to Firestore and explaining each one. In the last three articles I demonstrated how to use twitter_login, google_sign_in and flutter_facebook_auth. This article is aimed for the android phones.
Adding Firebase Auth To Flutter
As I said before, to check how to create a flutter project and add Firebase, then please check this article Get Started With Firebase in Flutter.
Next, you need to add the following dependency to the pubspec.yaml file:
dependencies:
  cupertino_icons: ^1.0.8
  firebase_auth: ^5.1.4
  firebase_core: ^3.3.0
  flutter:
    sdk: flutter
  flutter_facebook_auth: ^7.1.0
  font_awesome_flutter: ^10.7.0
  google_sign_in: ^6.2.1
  twitter_login: ^4.4.2
Click CTRL + S to save, and you have successfully added the above dependencies to your Flutter application!
- This article is a followup to the previous three articles:
that’s why google_sign_in, twitter_login, and flutter_facebook_auth is added as a dependency also.
- If you only want to use Phone Auth then all you have to add is
firebase_auth.
Enable Phone Authentication in Firebase
First, before using phone authentication we need to do the following three steps:
Enable SafetyNet, when you navigate to the link you will see the following:
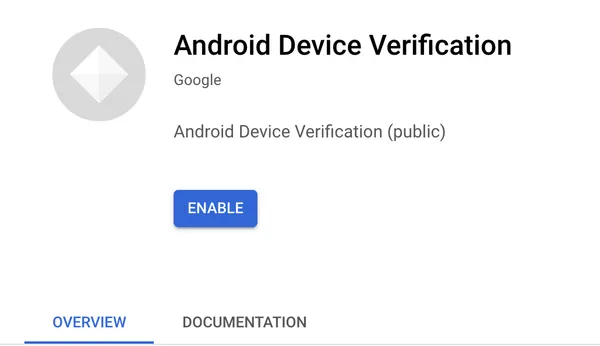
All you have to do is click enabled.
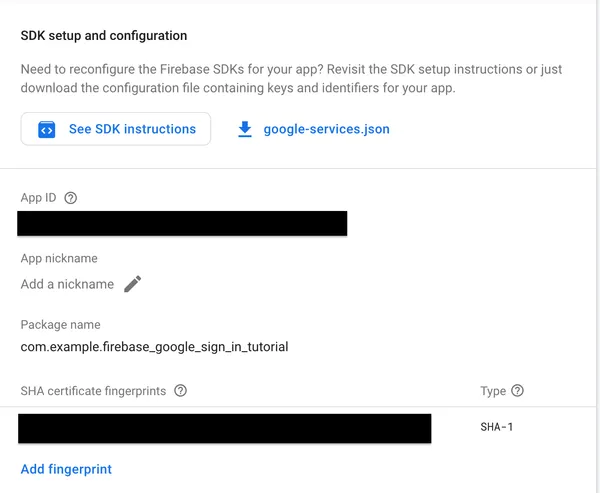
Next, you need to get the SHA-1 and SHA-256 key, you can do that by executing:
cd android
./gradlew signingReport
which will give you the following output:
> Task :app:signingReport
Variant: debug
Config: debug
Store: /Users/peter/.android/debug.keystore
Alias: AndroidDebugKey
MD5: <md5-key>
SHA1: <sha1-key>
SHA-256: <sha256-key>
Valid until: Tuesday, December 1, 2048
Copy the SHA-1 and SHA-256 key, then navigate to the Firebase console, go to the Project settings, and add the key as shown in the image below:
Then download the google-services.json file again, and add it the project under android/app.
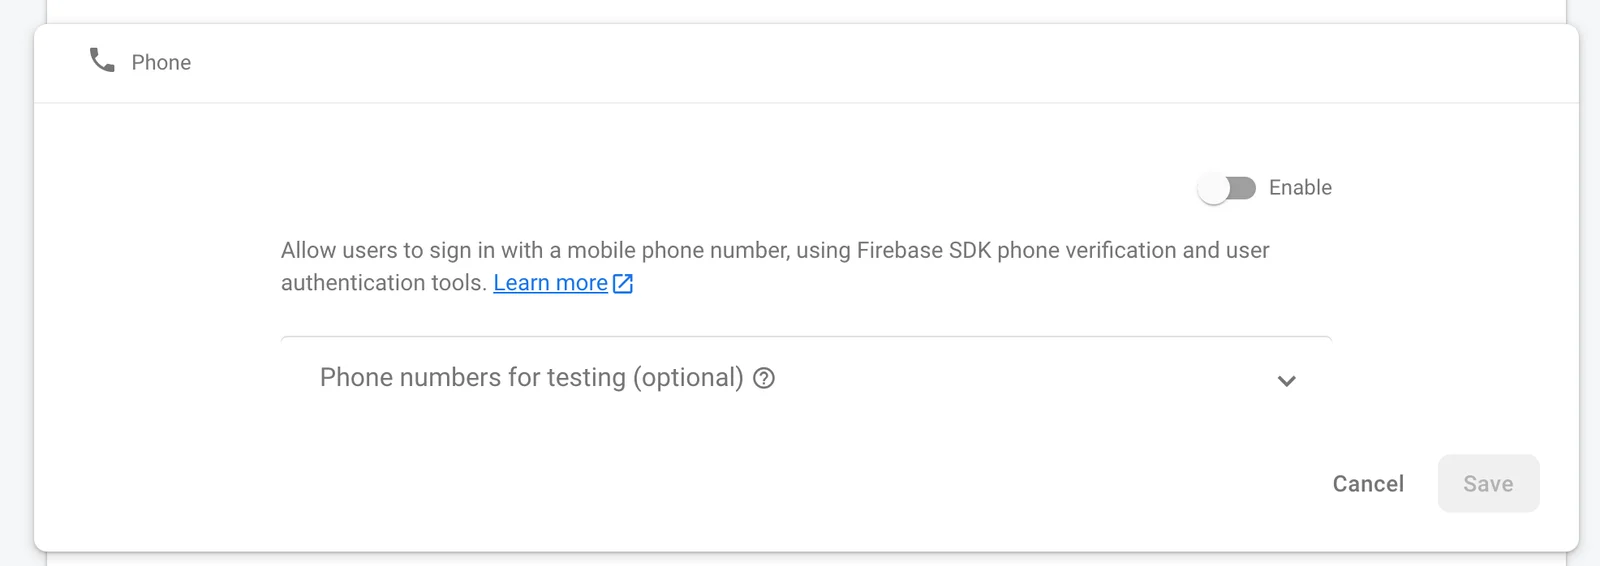
Finally, you need to navigate to the Firebase console and enable phone authentication. Therefore navigate to the Authentication tab and then click Sign-in method. You will find multiple providers, but for this tutorial you need to enable the Phone provider:
Note: If you want to authenticate using email/password then check this tutorial: Using Firebase Auth In Flutter.
Creating the Phone Authentication Form
The design of this application is based on this dribbble design by Ashlee Mckay. Creating the auth providers buttons, is explained here.
Regarding the phone authentication, I created a class called PhoneAuthForm:
class PhoneAuthForm extends StatefulWidget {
  PhoneAuthForm({Key? key}) : super(key: key);

  @override
  _PhoneAuthFormState createState() => _PhoneAuthFormState();
}

class _PhoneAuthFormState extends State<PhoneAuthForm> {
  final FirebaseAuth _auth = FirebaseAuth.instance;
  GlobalKey<FormState> _formKey = GlobalKey<FormState>();
  TextEditingController phoneNumber = TextEditingController();
  TextEditingController otpCode = TextEditingController();

  OutlineInputBorder border = OutlineInputBorder(
      borderSide: BorderSide(color: Constants.kBorderColor, width: 3.0));

  bool isLoading = false;

  String? verificationId;
  @override
  Widget build(BuildContext context) {
    Size size = MediaQuery.of(context).size;
    return Scaffold(
      appBar: AppBar(title: Text("Verify OTP"),
                backwardsCompatibility: false,
          systemOverlayStyle: SystemUiOverlayStyle(statusBarColor: Colors.blue),),
      backgroundColor: Constants.kPrimaryColor,
      body:  Center(
        child: Form(
              key: _formKey,
              child: Column(
                mainAxisAlignment: MainAxisAlignment.center,
                children: [
                  SizedBox(
                    width: size.width * 0.8,
                    child: TextFormField(
                        keyboardType: TextInputType.phone,
                        controller: phoneNumber,
                        decoration: InputDecoration(
                          labelText: "Enter Phone",
                          contentPadding: EdgeInsets.symmetric(
                              vertical: 15.0, horizontal: 10.0),
                          border: border,
                        )),
                  ),
                  SizedBox(
                    height: size.height * 0.01,
                  ),
                  SizedBox(
                    width: size.width * 0.8,
                    child: TextFormField(
                      keyboardType: TextInputType.number,
                      controller: otpCode,
                      obscureText: true,
                      decoration: InputDecoration(
                        labelText: "Enter Otp",
                        contentPadding: EdgeInsets.symmetric(
                            vertical: 15.0, horizontal: 10.0),
                        border: border,
                        suffixIcon: Padding(
                          child: FaIcon(
                            FontAwesomeIcons.eye,
                            size: 15,
                          ),
                          padding: EdgeInsets.only(top: 15, left: 15),
                        ),
                      ),
                    ),
                  ),
                  Padding(padding: EdgeInsets.only(bottom: size.height * 0.05)),
                  !isLoading
                      ? SizedBox(
                          width: size.width * 0.8,
                          child: OutlinedButton(
                            onPressed: () async {
                              if (_formKey.currentState!.validate()) {
                                setState(() {
                                  isLoading = true;
                                });
                                await phoneSignIn(phoneNumber: phoneNumber.text);
                              }
                            },
                            child: Text(Constants.textSignIn),
                            style: ButtonStyle(
                                foregroundColor: WidgetStateProperty.all<Color>(
                                    Constants.kPrimaryColor),
                                backgroundColor: WidgetStateProperty.all<Color>(
                                    Constants.kBlackColor),
                                side: WidgetStateProperty.all<BorderSide>(
                                    BorderSide.none)),
                          ),
                        )
                      : CircularProgressIndicator(),
                ],
              ),
            ),
      ));
  }
As you can see above we use the Form widget and assign it a GlobalKey of type FormState. Then we create two TextFormFields and use the TextEditingController to get the input text later using the text property. So we will have the following two screens:

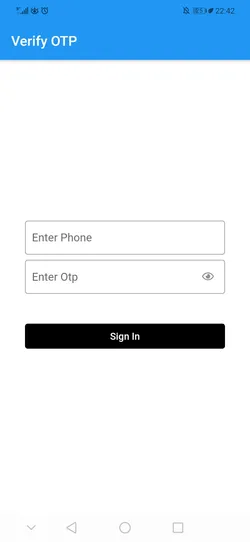
Therefore, after clicking sign in on any provider, the user will navigate to the verify otp screen.
Performing Phone Authentication
As you can see in the previous code, inside the onPressed callback, we first validate the form state, then change the isLoading value to true so a CircularProgressIndicator() will replace the button and then we call phoneSignIn(), which has the following implementation:
  Future<void> phoneSignIn({required String phoneNumber}) async {
    await _auth.verifyPhoneNumber(
        phoneNumber: phoneNumber,
        verificationCompleted: _onVerificationCompleted,
        verificationFailed: _onVerificationFailed,
        codeSent: _onCodeSent,
        codeAutoRetrievalTimeout: _onCodeTimeout);
  }

  _onVerificationCompleted(PhoneAuthCredential authCredential) async {
    print("verification completed ${authCredential.smsCode}");
    User? user = FirebaseAuth.instance.currentUser;
    setState(() {
          this.otpCode.text = authCredential.smsCode!;
        });
    if (authCredential.smsCode != null) {
      try{
        await user!.linkWithCredential(authCredential);
      }on FirebaseAuthException catch(e){
          if(e.code == 'provider-already-linked'){
            await _auth.signInWithCredential(authCredential);
          }
      }
      setState(() {
        isLoading = false;
      });
      Navigator.pushNamedAndRemoveUntil(
          context, Constants.homeNavigate, (route) => false);
    }
  }

  _onVerificationFailed(FirebaseAuthException exception) {
    if (exception.code == 'invalid-phone-number') {
      showMessage("The phone number entered is invalid!");
    }
  }

  _onCodeSent(String verificationId, int? forceResendingToken) {
    this.verificationId = verificationId;
    print(forceResendingToken);
    print("code sent");
  }

  _onCodeTimeout(String timeout) {
    return null;
  }

    void showMessage(String errorMessage) {
    showDialog(
        context: context,
        builder: (BuildContext builderContext) {
          return AlertDialog(
            title: Text("Error"),
            content: Text(errorMessage),
            actions: [
              TextButton(
                child: Text("Ok"),
                onPressed: () async {
                  Navigator.of(builderContext).pop();
                },
              )
            ],
          );
        }).then((value) {
      setState(() {
        isLoading = false;
      });
    });
  }
The verifyPhoneNumber() method that is inside the firebase_auth dependency will generate the otp and send it to the device. It takes multiple callbacks, first verificationCompleted will be invoked in the following two cases:
1 - Instant verification. In some cases the phone number can be instantly verified without needing to send or enter a verification code.
2 - Auto-retrieval. On some devices Google Play services can automatically detect the incoming verification SMS and perform verification without user action.
The callback will take a PhoneAuthCredential as an argument, which will contain the smsCode, then using setState() we update the value of the TextFormField containing the otp.
Then since the user is already signed in, we use linkWithCredential() to link both phone and other provider credential, and if it throws the error e.code == 'provider-already-linked' then the phone will already be linked therefore we just sign in and navigate to the HomePage().
The verificationFailed callback will be called whenever an error occurs, therefore we use the showMessage() to show the error to the user.
The codeSent callback will get called when the SMS verification code has been sent to the provided phone number. Then we save the verificationId so we can construct a credential later by combining the code with a verification ID.
Retrieve User Information
Now, we create another file called home_page.dart which will contain the HomePage class. Inside the class, we need to retrieve the current user by calling:
User? user = FirebaseAuth.instance.currentUser;Then inside the Column widget, we add the following widgets:
        body: Center(
            child: Column(
          mainAxisAlignment: MainAxisAlignment.center,
          children: <Widget>[
            Text(user!.email!),
            Text(user!.displayName!),
            CircleAvatar(
              backgroundImage: NetworkImage(user!.photoURL!),
              radius: 20,
            )
          ],
        )))
Here we retrieve the email, name and the photo url of the user. The above code will give us the following screen:
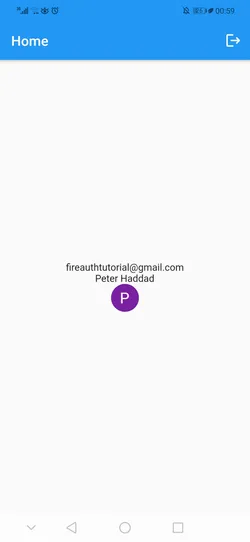
As you can see from the image, the app bar will also contain a logout button in which we will call the method service.signOutFromGoogle(); which is inside the FirebaseService class.
I hope you enjoyed reading this flutter tutorial, please feel free to leave any comments or feedback on this post!