Using Sliver Widgets In Flutter

Software Developer | Technical Writer | Actively helping users with their questions on Stack Overflow.
In this article, we will learn about the Sliver Widgets and how to use them in a Flutter application.
What are Slivers
We have seen previously the use of ListView, ListView.builder, and the GridView all of these widgets provide a way for us to scroll through a list of items. But, there is also a different set of widgets called the sliver widgets. The sliver widgets are also used for scrolling, but they give us more control compared to the simpler widgets. For example, using sliver widgets, you can expand and pin the app bar, and have more control on the scrolling of a list.
To use the sliver widgets, you cannot directly use them as a child of a Scaffold or a Container widget, you have to use a widget called CustomScrollView. If you do use them under a Scaffold widget, you will get an error like below:
The following assertion was thrown building SliverPersistentHeader(delegate: _SliverAppBarDelegate#d9319(topPadding: 0.0, bottomHeight: 0.0, …), mode: [normal]): A RenderCustomMultiChildLayoutBox expected a child of type RenderBox but received a child of type _RenderSliverScrollingPersistentHeaderForWidgets. RenderObjects expect specific types of children because they coordinate with their children during layout and paint. For example, a RenderSliver cannot be the child of a RenderBox because a RenderSliver does not understand the RenderBox layout protocol.
This basically means that the slivers are rendered using the RenderSliver while other widgets are rendered using the RenderBox, thus both of thos layout cannot be used together. Therefore, to use any sliver widget you need to use the CustomScrollView widget which has a property called slivers that will take a list of slivers as children.
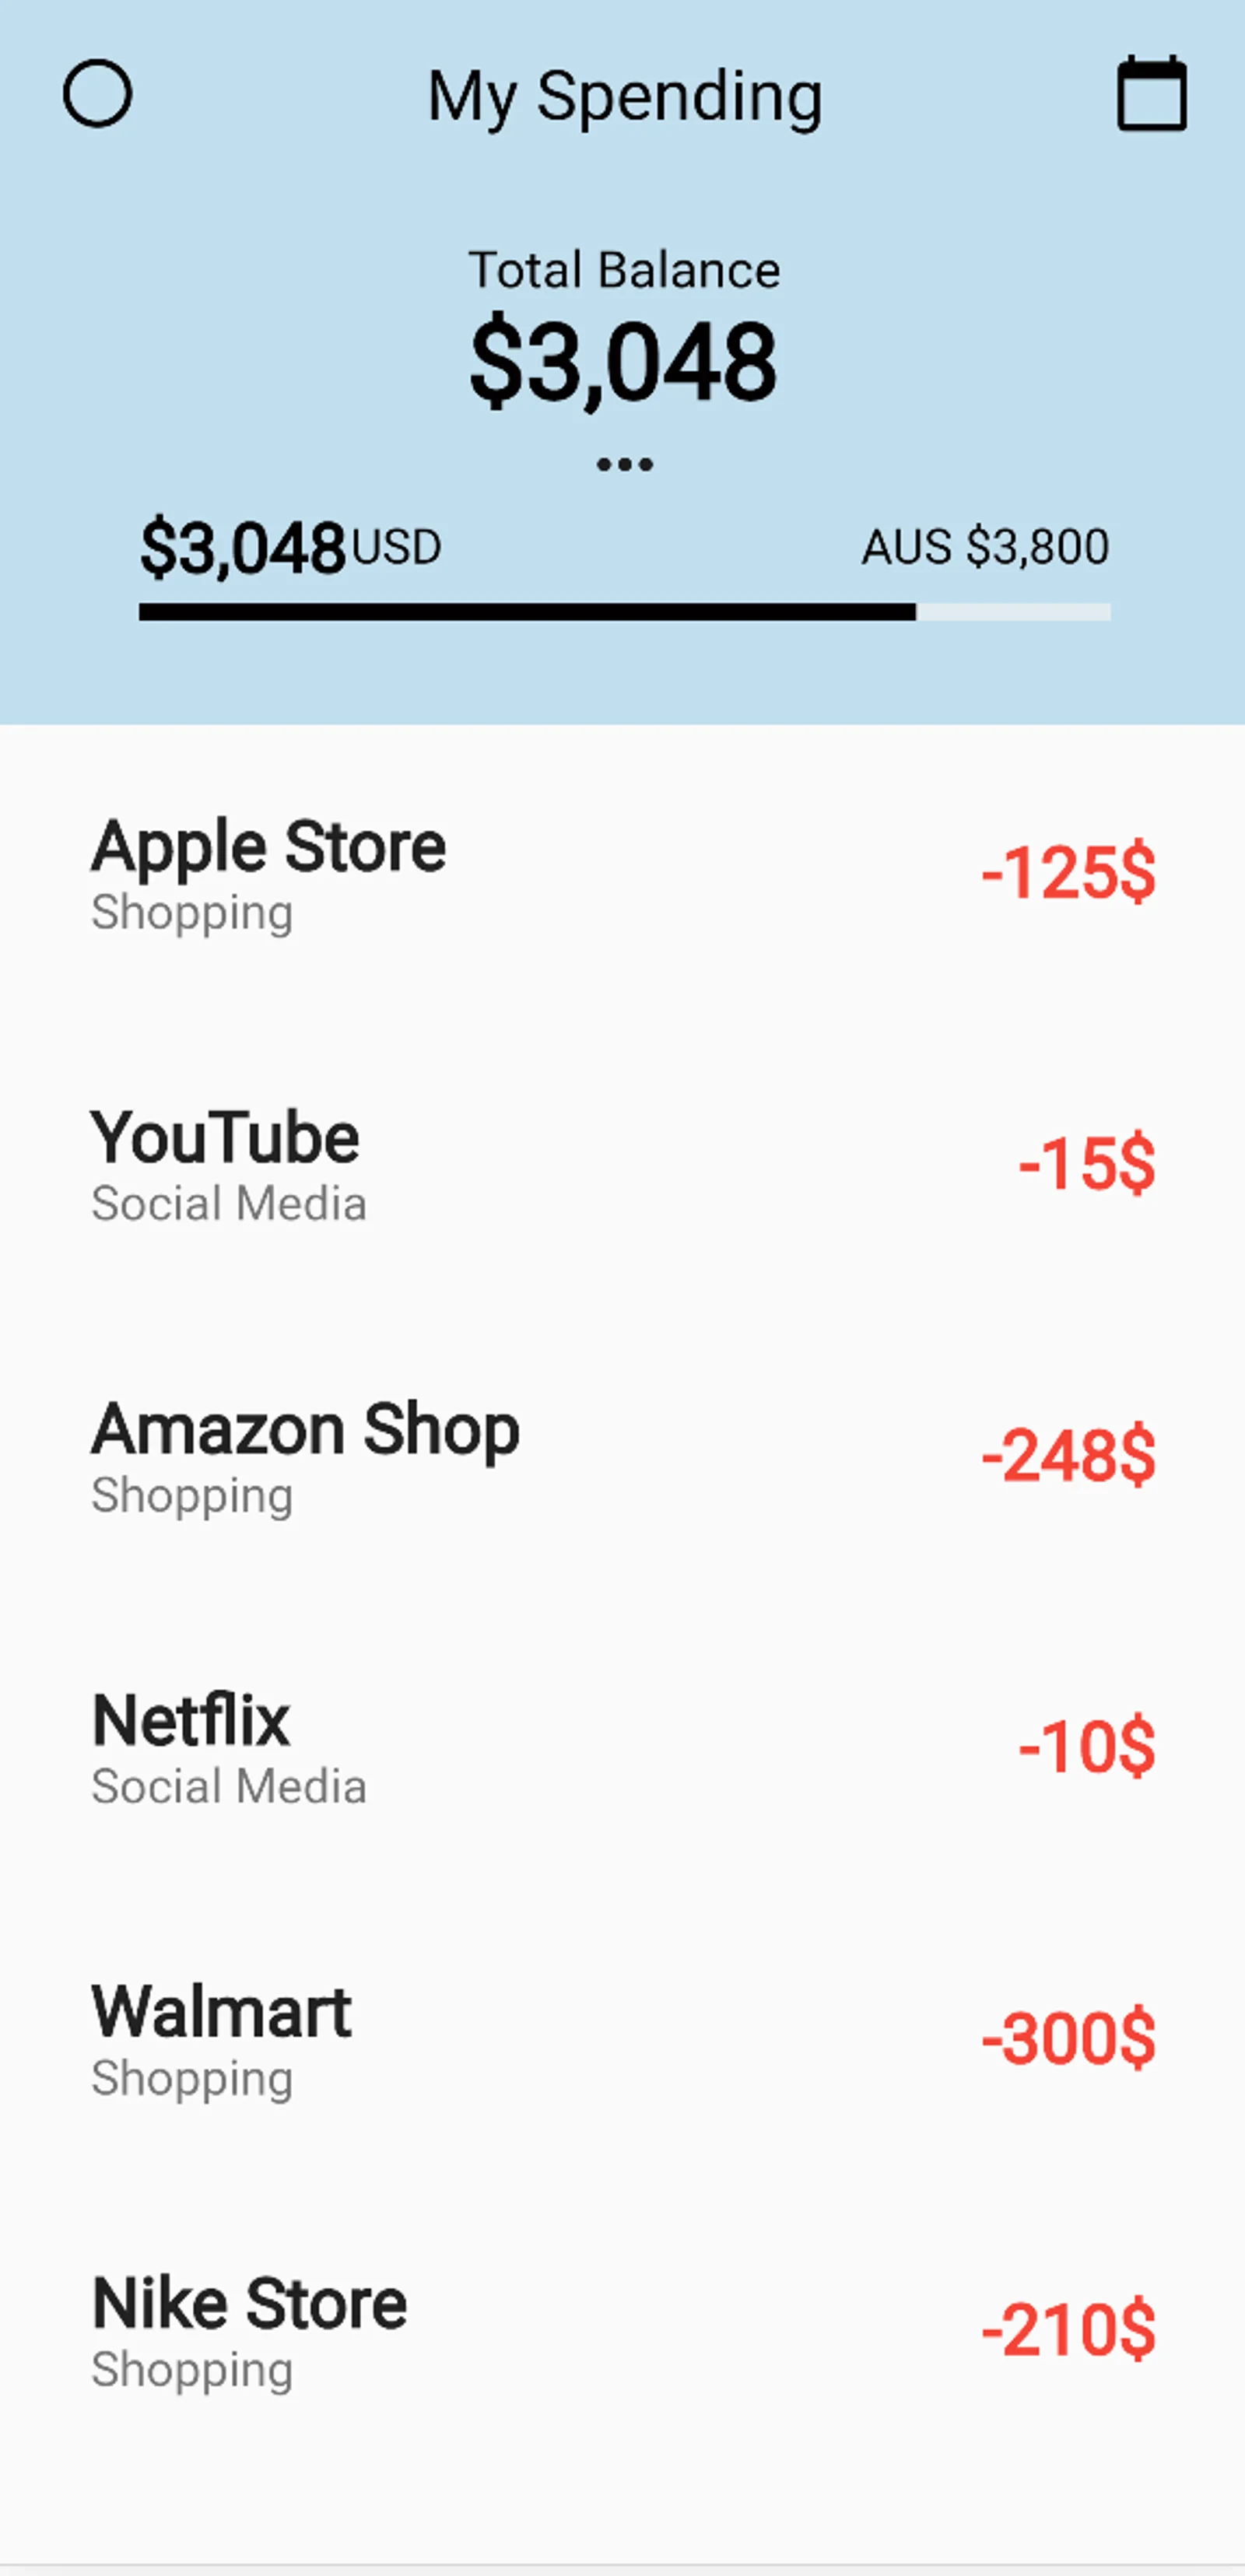
In the following sections, we will implement the following screen:
which is based on this design.
Fetching data from JSON
Before adding the sliver widgets, first in the main.dart create the normal Stateful widget:
void main() => runApp(const MyApp());

class MyApp extends StatelessWidget {
  const MyApp({Key? key}) : super(key: key);


  @override
  Widget build(BuildContext context) {
    return const MaterialApp(
      debugShowCheckedModeBanner: false,
      title: "Sliver Tutorial",
      home: SliverTutorial(),
    );
  }
}

class SliverTutorial extends StatefulWidget {
  const SliverTutorial({Key? key}) : super(key: key);

  @override
  State<SliverTutorial> createState() => _SliverTutorialState();
}
Now we need to fetch the data from a json file. Therefore, for the transactions that you saw in the video. I created a sample json file called transactions.json under the directory assets/data/ with the following data:
{
    "balance" : "3,048",
    "transactions" : [
        {
            "name" : "Apple Store",
            "type" : "Shopping",
            "amount": -125
        },
        {
            "name" : "YouTube",
            "type" : "Social Media",
            "amount": -15
        },
        {
            "name" : "Amazon Shop ",
            "type" : "Shopping",
            "amount": -248
        },
        {
            "name" : "Netflix",
            "type" : "Social Media",
            "amount": -10
        },
        {
            "name" : "Walmart",
            "type" : "Shopping",
            "amount": -300
        },
        {
            "name" : "Nike Store",
            "type" : "Shopping",
            "amount": -210
        },
        {
            "name" : "Starbucks",
            "type" : "Drinking",
            "amount": -30
        },
        {
            "name" : "Costa Coffee",
            "type" : "Drinking",
            "amount": -15
        },
        {
            "name" : "Bubble Shop",
            "type" : "Shopping",
            "amount": -112
        },
        {
            "name" : "Bubbles Shop",
            "type" : "Shopping",
            "amount": -112
        },
        {
            "name" : "Clothing Shop",
            "type" : "Shopping",
            "amount": -102
        },
        {
            "name" : "Market Shop",
            "type" : "Shopping",
            "amount": -22
        },
        {
            "name" : "Food Shop",
            "type" : "Shopping",
            "amount": -132
        },
        {
            "name" : "Shoes Shop",
            "type" : "Shopping",
            "amount": -31
        },
        {
            "name" : "ShopX",
            "type" : "Shopping",
            "amount": -391
        },
        {
            "name" : "ShopY",
            "type" : "Shopping",
            "amount": -51
        },
        {
            "name" : "ShopZ",
            "type" : "Shopping",
            "amount": -31
        }
    ]
}
Then in the pubspec.yaml file declared the assets and added the json_serializable as a dependency:
dependencies:
  cupertino_icons: ^1.0.8
  flutter:
    sdk: flutter
  json_annotation: ^4.9.0

dev_dependencies:
  build_runner: ^2.4.12
  json_serializable: ^6.8.0
  flutter_lints: ^4.0.0
  flutter_test:
    sdk: flutter

flutter:
  assets:
    - assets/data/transactions.json
Then I created the model classes called TransactionResponse and Transactions:
TransactionResponse:
import 'package:json_annotation/json_annotation.dart';
import 'package:sliver_tutorial/transactions.dart';


part 'transaction_response.g.dart';


@JsonSerializable()
class TransactionResponse {
  String balance;
  @JsonKey(name: 'transactions')
  List<Transactions> transactionsList;
  TransactionResponse({required this.balance,required this.transactionsList});

      factory TransactionResponse.fromJson(Map<String, dynamic> json) =>
      _$TransactionResponseFromJson(json);
  Map<String, dynamic> toJson() => _$TransactionResponseToJson(this);
}Transactions:
import 'package:json_annotation/json_annotation.dart';

part 'transactions.g.dart';


@JsonSerializable()
class Transactions {
  String name;
  String type;
  double amount;
  Transactions({required this.name,required this.type,required this.amount});

    factory Transactions.fromJson(Map<String, dynamic> json) =>
      _$TransactionsFromJson(json);
  Map<String, dynamic> toJson() => _$TransactionsToJson(this);
}
and run the command:
flutter pub run build_runner buildwhich will generate JSON serialization code for the models. Then navigate to the main.dart file and declare an instance variable called Future<TransactionResponse>? response; inside the class _SliverTutorialState.
Then inside the initState assign the value of this future:
  @override
  void initState() {
    super.initState();
    response = fetchTransactions();
  }

    Future<TransactionResponse> fetchTransactions() async {
    String resultJson = await rootBundle.loadString(Constants.transactionsURL);
    Map<String, dynamic> result = jsonDecode(resultJson);
    TransactionResponse transactionResponse =
        TransactionResponse.fromJson(result);
    return transactionResponse;
  }
We assign it inside the initState() because if we do that inside the build() method then everytime the build() is called (configuration changes), the future also will be called while the initState() is only called once.
Inside the fetchTransactions() we read from the json file using loadString, and then use jsonDecode() which will parse the string and returns the resulting Json object. Finally, we assign it to the object of type TransactionResponse.
Using SliverAppBar
If we want to have an expanded app bar then we can use the widget SliverAppBar. To do that first we need to add the CustomScrollView widget inside the build() method. For example:
  @override
  Widget build(BuildContext context) {
    return Scaffold(
      body: CustomScrollView(
        slivers: <Widget>[
          const SliverAppBar(
            title: AppBarRow(),
            backgroundColor: Constants.appBarBackgroundColor,
            pinned: true,
            floating: true,
            snap: true,
            expandedHeight: 210.0,
            flexibleSpace: FlexibleSpaceBar(
              background: FlexibleBar(),
            ),
          ),
Here the SliverAppBar would be the first child inside the CustomScrollView. The expandedHeight determines how long will this appbar expand. The pinned property determines whether the app bar should remain visible at the start of the scroll view, while the floating property determines whether the app bar should become visible as soon as the user scrolls towards the app bar.
The title property will contain the main widget that will be shown when the appbar is shrinked or expanded. The background property inside the FlexibleSpaceBar() will add a widget behind the widget that is used in the title property. In both the title and the background property I created two custom widgets.
First the AppBarRow is a stateless widget with the following code:
import 'package:flutter/material.dart';
import 'package:sliver_tutorial/constants.dart';

class AppBarRow extends StatelessWidget {
  const AppBarRow({Key? key}) : super(key: key);

  @override
  Widget build(BuildContext context) {
    return Row(
      mainAxisAlignment: MainAxisAlignment.spaceBetween,
      children: const <Widget>[
        Icon(
          Icons.circle_outlined,color: Constants.appBarTextColor
        ),
        Text(
          'My Spending',
          style: TextStyle(color: Constants.appBarTextColor, fontSize: 20.0),
        ),
        Icon(
          Icons.calendar_today,color: Constants.appBarTextColor
        ),
      ],
    );
  }
}
In the build() method we use the normal Row widget, adding an icon at the beginning and at the end of the row while also having a title in the middle:

The FlexibleBar() is also a stateless widget, with the following code:
import 'package:flutter/material.dart';
import 'package:sliver_tutorial/constants.dart';
class FlexibleBar extends StatelessWidget {
const FlexibleBar({Key? key}) : super(key: key);
@override
Widget build(BuildContext context) {
return Padding(
padding: const EdgeInsets.only(bottom: 20),
child: Column(
mainAxisAlignment: MainAxisAlignment.end,
children: <Widget>[
Text(
'Total Balance',
style: TextStyle(color: Constants.appBarTextColor, fontSize: 15.0),
),
Text(
"\$3,048",
style: TextStyle(
color: Constants.appBarTextColor,
fontSize: 30.0,
fontWeight: FontWeight.bold),
),
Icon(Icons.more_horiz),
Padding(
padding: const EdgeInsets.only(left: 40.0, right: 40.0,bottom: 5.0),
child: Row(
children: [
Text(
"\$3,048",
style: TextStyle(
color: Constants.appBarTextColor,
fontSize: 20.0,
fontWeight: FontWeight.bold),
),
Text(
"USD",
style: TextStyle(
color: Constants.appBarTextColor,
),
),
Spacer(),
Text(
"AUS \$3,800",
style: TextStyle(
color: Constants.appBarTextColor,
),
),
],
),
),
Padding(
padding: const EdgeInsets.only(left: 40.0, right: 40.0,bottom: 10.0),
child: LinearProgressIndicator(
minHeight: 5,
backgroundColor: Constants.linearProgressIndicatorColor,
valueColor: AlwaysStoppedAnimation<Color>(
Constants.appBarTextColor,
),
value: 0.8,
),
),
],
),
);
}
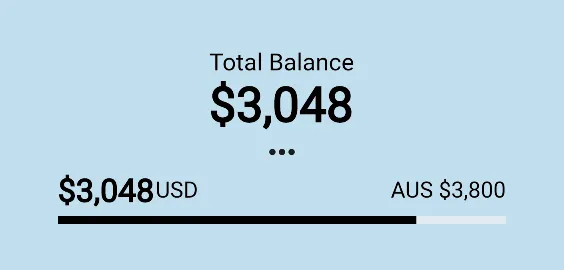
}So since the FlexibleSpaceBar() will be behind the title widget, then in this case I used the Column widget having MainAxisAlignment.end that way the children will be placed at the end of the main axis and not behind the widget used in the title property. The above code will give you the following UI:
Now that the SliverAppBar is done, we can add the SliverList widget.
Using the SliverList
Under the SliverAppBar, declare the SliverList which is a scrollable list with the following properties:
SliverList(
delegate:
    SliverChildBuilderDelegate((BuildContext context, int index) {
    return FutureBuilder(
    future: response,
    builder: (BuildContext context,
        AsyncSnapshot<TransactionResponse> snapshot) {
        if (snapshot.connectionState == ConnectionState.done) {
        Transactions response =
            snapshot.data!.transactionsList[index];
        return Padding(
            padding: const EdgeInsets.all(10.0),
            child: ListTile(
            title: Text(
                response.name,
                style: const TextStyle(
                    fontWeight: FontWeight.bold, fontSize: 20),
            ),
            subtitle: Text(response.type),
            trailing: response.amount.isNegative
                ? Text(
                    "${response.amount.toString()}\$",
                    style: const TextStyle(
                        color: Colors.red,
                        fontWeight: FontWeight.bold,
                        fontSize: 20),
                    )
                : Text(
                    "${response.amount.toString()}\$",
                    style: const TextStyle(color: Colors.green),
                    ),
            ),
        );
        } else {
        return const Center(
            child: CircularProgressIndicator(),
        );
        }
    },
    );
}, childCount: 17),
),
Thw two main properties of the SliverList is the delegate and the childCount. The delegate property will take a widget that would have the responsibility to show the children of the SliverList on the screen. In the above code, we give that responsibility to the widget called SliverChildBuilderDelegate which will lazily construct the list.
The SliverChildBuilderDelegate contains a property called builder of type NullableIndexedWidgetBuilder which is a typedef having the following function:
 Widget? Function(
BuildContext context,
int index
)
The index is used to return the index number of each item in the list. Since the function returns a value of type Widget therefore in the above code we return a FutureBuilder that will fetch the data from the future that we did in the beginning of this article and show the data when connectionState is done.
The childCount property in the SliverList will contain the number of children inside the list.
References
I hope you enjoyed reading this flutter tutorial, please feel free to leave any comments or feedback on this post!