Using Firebase Queries in Flutter

Software Developer | Technical Writer | Actively helping users with their questions on Stack Overflow.

In this article, we will go more in depth in using firebase realtime database in flutter, and we will also see how easily you can query, retrieve the data, and add it to a listview.
Creating a Form
This is the second article related to Firebase in Flutter, you can check the other articles in the below links:
- Get Started With Firebase in Flutter
- Using Firebase Auth In Flutter
- Using Cloud Firestore In Flutter
- Using Firebase Storage In Flutter
- Using Google Sign-in With Firebase In Flutter
- Using Twitter Authentication With Firebase In Flutter
- Using Facebook Authentication With Firebase In Flutter
Since, we need to add a list of data to the firebase realtime database, then first we will create a form and when clicking submit, we will send the data to the database.
If you did not setup firebase, please check the previous tutorial.
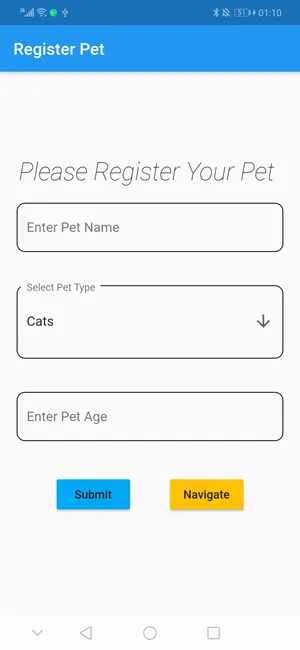
So, first to create a form you need to use the widget Form(). The reason why we use a Form() is because it contains validation which is different than just using normal TextFields. Let’s take this step by step:
import 'package:firebase_core/firebase_core.dart';
import 'package:firebase_database/firebase_database.dart';
import 'package:firebase_test/home.dart';
import 'package:flutter/material.dart';

void main() async {
  WidgetsFlutterBinding.ensureInitialized();
  await Firebase.initializeApp(options: DefaultFirebaseOptions.currentPlatform);
  runApp(MyApp());
}

class MyApp extends StatelessWidget {
  // This widget is the root of your application.
  @override
  Widget build(BuildContext context) {
    return MaterialApp(
      debugShowCheckedModeBanner: false,
      title: 'Pets',
      theme: ThemeData(
        primarySwatch: Colors.blue,
      ),
      home: MyHomePage(title: 'Register Pet'),
    );
  }
}
So first, we create a StatelessWidget, that will return a MaterialApp widget and inside of it we call the MyHomePage widget.
class MyHomePage extends StatefulWidget {
  MyHomePage({Key key, this.title}) : super(key: key);
  final String title;

  @override
  _MyHomePageState createState() => _MyHomePageState();
}
Then we declare, the MyHomePage class which will extend the StatefulWidget class, which also means that this widget will have mutable state. Then we override the method createState which creates the mutable state for this widget at a given location in the tree.
class _MyHomePageState extends State<MyHomePage> {
  @override
  Widget build(BuildContext context) {
    return Scaffold(
      appBar: AppBar(
        title: Text(widget.title),
      ),
      body: Center(
        child: SingleChildScrollView(child: Column(
            mainAxisAlignment: MainAxisAlignment.center,
            children: <Widget>[
              Text("Please Register Your Pet ",
                  style: TextStyle(
                      fontWeight: FontWeight.w200,
                      fontSize: 30,
                      fontFamily: 'Roboto',
                      fontStyle: FontStyle.italic)),
                      RegisterPet(),
            ]),)
      ),
    );
  }
}
Inside the _HomePageState, we override the method build, and we wrap the Column widget with the SingleChildScrollView which will enable us to scroll this whole Column (it is the same as using ScrollView in android). Inside the Column widget we add a Text widget with the text Please Register Your Pet, and the RegisterPet() widget.
class _RegisterPetState extends State<RegisterPet> {
  final _formKey = GlobalKey<FormState>();
  final listOfPets = ["Cats", "Dogs", "Rabbits"];
  String dropdownValue = 'Cats';
  final nameController = TextEditingController();
  final ageController = TextEditingController();
  final dbRef = FirebaseDatabase.instance.ref().child("pets");
So ofcourse first we use createState to create a mutable state and here we declare the class _RegisterPetState. Inside of the class, we use a GlobalKey, which uniquely identifies the Form, and allows validation of the form in a later step. We also create a reference to the node pets in the firebase realtime database. Then inside the form widget, we use a TextFormField:
            child: TextFormField(
              controller: nameController,
              decoration: InputDecoration(
                labelText: "Enter Pet Name",
                enabledBorder: OutlineInputBorder(
                  borderRadius: BorderRadius.circular(10.0),
                ),
              ),
              // The validator receives the text that the user has entered.
              validator: (value) {
                if (value.isEmpty) {
                  return 'Enter Pet Name';
                }
                return null;
              },
            ),
The TextFormField will let us, use the validator property that validates an input.
The full code for main.dart:
import 'package:firebase_core/firebase_core.dart';
import 'package:firebase_database/firebase_database.dart';
import 'package:firebase_database_tutorial/home.dart';
import 'package:flutter/material.dart';

void main() async {
  WidgetsFlutterBinding.ensureInitialized();
  await Firebase.initializeApp(options: DefaultFirebaseOptions.currentPlatform);
  runApp(MyApp());
}

class MyApp extends StatelessWidget {
  // This widget is the root of your application.
  @override
  Widget build(BuildContext context) {
    return MaterialApp(
      debugShowCheckedModeBanner: false,
      title: 'Pets',
      theme: ThemeData(
        primarySwatch: Colors.blue,
      ),
      home: MyHomePage(title: 'Register Pet'),
    );
  }
}

class MyHomePage extends StatefulWidget {
  MyHomePage({Key key, this.title}) : super(key: key);
  final String title;

  @override
  _MyHomePageState createState() => _MyHomePageState();
}

class _MyHomePageState extends State<MyHomePage> {
  @override
  Widget build(BuildContext context) {
    return Scaffold(
      appBar: AppBar(
        title: Text(widget.title),
      ),
      body: Center(
          child: SingleChildScrollView(
        child: Column(
            mainAxisAlignment: MainAxisAlignment.center,
            children: <Widget>[
              Text("Please Register Your Pet ",
                  style: TextStyle(
                      fontWeight: FontWeight.w200,
                      fontSize: 30,
                      fontFamily: 'Roboto',
                      fontStyle: FontStyle.italic)),
              RegisterPet(),
            ]),
      )),
    );
  }
}

class RegisterPet extends StatefulWidget {
  RegisterPet({Key key}) : super(key: key);

  @override
  _RegisterPetState createState() => _RegisterPetState();
}

class _RegisterPetState extends State<RegisterPet> {
  final _formKey = GlobalKey<FormState>();
  final listOfPets = ["Cats", "Dogs", "Rabbits"];
  String dropdownValue = 'Cats';
  final nameController = TextEditingController();
  final ageController = TextEditingController();
  final dbRef = FirebaseDatabase.instance.ref().child("pets");

  @override
  Widget build(BuildContext context) {
    return Form(
        key: _formKey,
        child: SingleChildScrollView(
            child: Column(children: <Widget>[
          Padding(
            padding: EdgeInsets.all(20.0),
            child: TextFormField(
              controller: nameController,
              decoration: InputDecoration(
                labelText: "Enter Pet Name",
                enabledBorder: OutlineInputBorder(
                  borderRadius: BorderRadius.circular(10.0),
                ),
              ),
              // The validator receives the text that the user has entered.
              validator: (value) {
                if (value.isEmpty) {
                  return 'Enter Pet Name';
                }
                return null;
              },
            ),
          ),
          Padding(
            padding: EdgeInsets.all(20.0),
            child: DropdownButtonFormField(
              value: dropdownValue,
              icon: Icon(Icons.arrow_downward),
              decoration: InputDecoration(
                labelText: "Select Pet Type",
                enabledBorder: OutlineInputBorder(
                  borderRadius: BorderRadius.circular(10.0),
                ),
              ),
              items: listOfPets.map((String value) {
                return new DropdownMenuItem<String>(
                  value: value,
                  child: new Text(value),
                );
              }).toList(),
              onChanged: (String newValue) {
                setState(() {
                  dropdownValue = newValue;
                });
              },
              validator: (value) {
                if (value.isEmpty) {
                  return 'Please Select Pet';
                }
                return null;
              },
            ),
          ),
          Padding(
            padding: EdgeInsets.all(20.0),
            child: TextFormField(
              keyboardType: TextInputType.number,
              controller: ageController,
              decoration: InputDecoration(
                labelText: "Enter Pet Age",
                enabledBorder: OutlineInputBorder(
                  borderRadius: BorderRadius.circular(10.0),
                ),
              ),
              // The validator receives the text that the user has entered.
              validator: (value) {
                if (value.isEmpty) {
                  return 'Please Pet Age';
                }
                return null;
              },
            ),
          ),
          Padding(
              padding: EdgeInsets.all(20.0),
              child: Row(
                mainAxisAlignment: MainAxisAlignment.spaceEvenly,
                children: <Widget>[
                  ElevatedButton(
                    onPressed: () {
                      if (_formKey.currentState.validate()) {
                        dbRef.push().set({
                          "name": nameController.text,
                          "age": ageController.text,
                          "type": dropdownValue
                        }).then((_) {
                          ScaffoldMessenger.of(context).showSnackBar(
                              SnackBar(content: Text('Successfully Added')));
                          ageController.clear();
                          nameController.clear();
                        }).catchError((onError) {
                          ScaffoldMessenger.of(context)
                              .showSnackBar(SnackBar(content: Text(onError)));
                        });
                      }
                    },
                    child: Text('Submit'),
                  ),
                  ElevatedButton(
                    onPressed: () {
                      Navigator.push(
                        context,
                        MaterialPageRoute(
                            builder: (context) => Home(title: "Home Page")),
                      );
                    },
                    child: Text('Navigate'),
                  ),
                ],
              )),
        ])));
  }

  @override
  void dispose() {
    super.dispose();
    ageController.dispose();
    nameController.dispose();
  }
}
The result:
Saving the List to Firebase
To save the list to firebase, we first need an random id that can seperate the data. Fortunately, firebase provides the method push() which will do just that:
if (_formKey.currentState.validate()) {
dbRef.push().set({
"name": nameController.text,
"age": ageController.text,
"type": dropdownValue
}).then((_) {
ScaffoldMessenger.of(context).showSnackBar(
SnackBar(content: Text('Successfully Added')));
ageController.clear();
nameController.clear();
}).catchError((onError) {
ScaffoldMessenger.of(context)
.showSnackBar(SnackBar(content: Text(onError)));
});
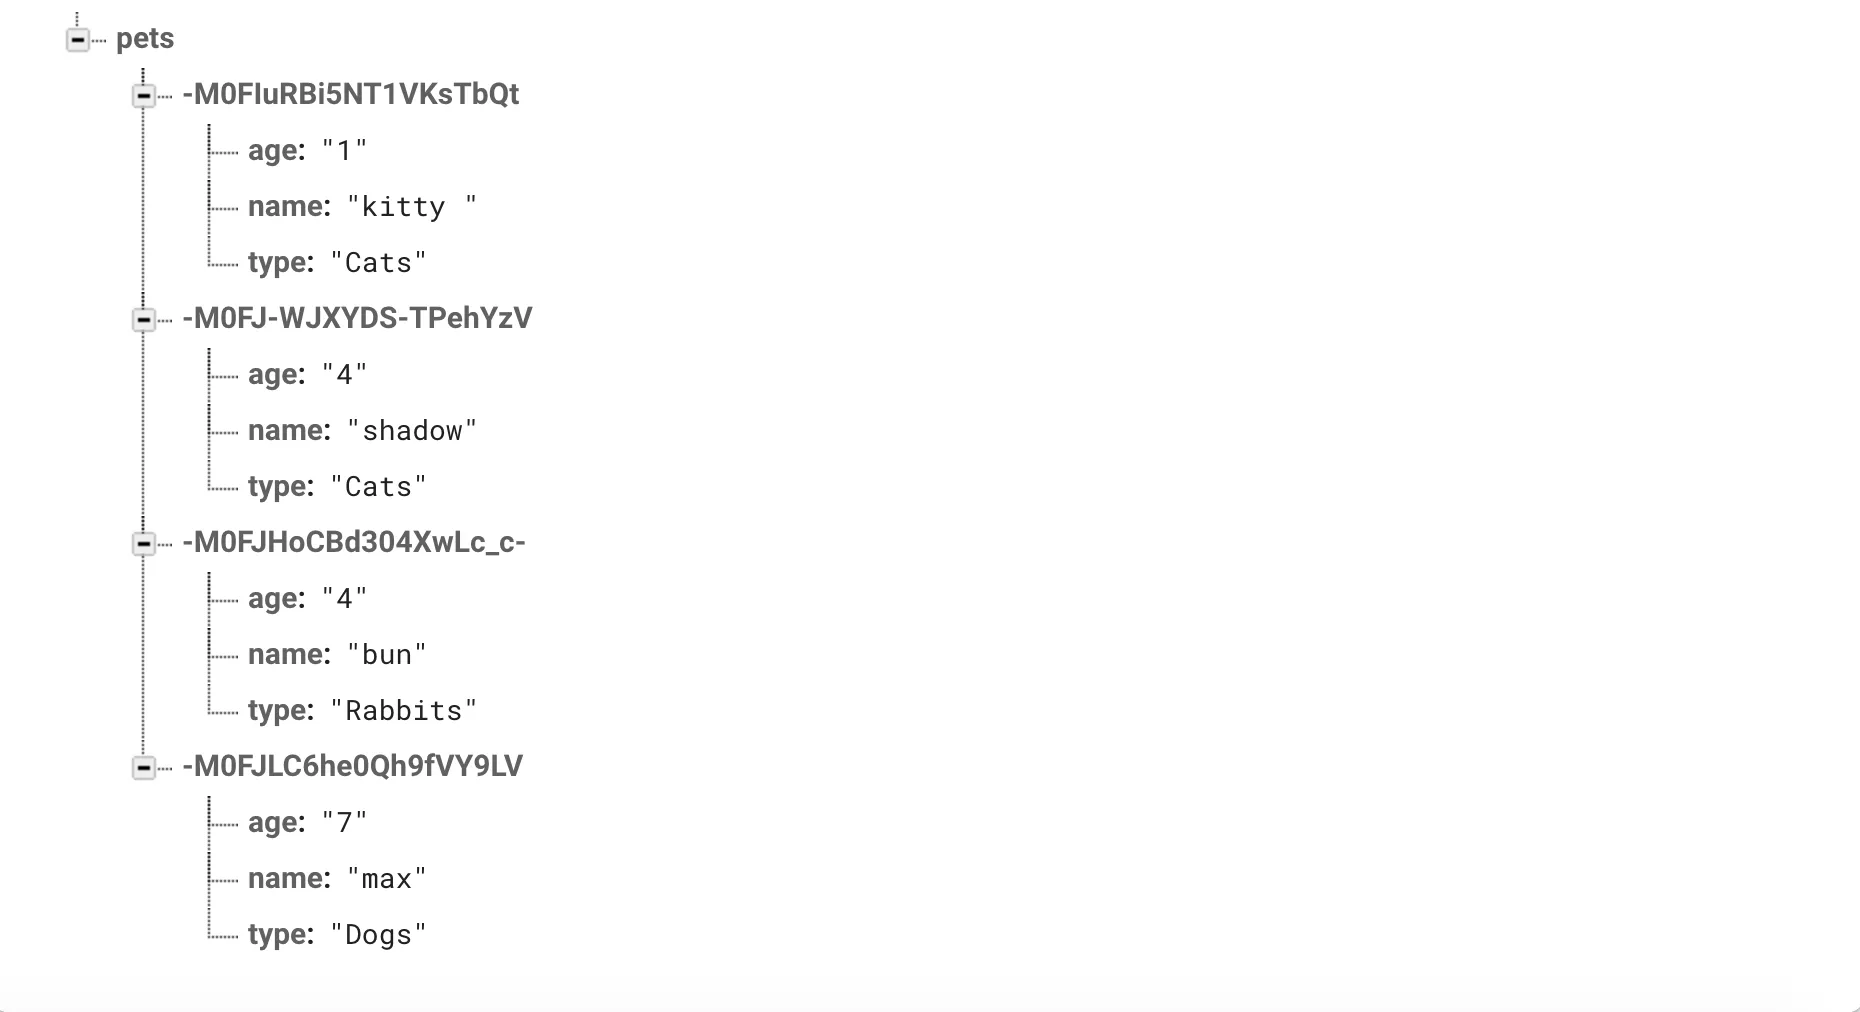
}So here dbRef refers to the node pets, the push() method will create a random id, and the set method will contain the data from the form. The then() callback will execute after the data is added in the Firebase database, and you can use the catchError which will handle errors emitted by this Future. (This is the asynchronous equivalent of a “catch” block). The firebase realtime database:
Retrieving The Firebase Data in a ListView
To retrieve the list, first we need to get a reference to the node. We do that by using the method child():
final dbRef = FirebaseDatabase.instance.ref().child("pets");Then we use the FutureBuilder widget. You can learn more about it here, basically the FutureBuilder will make it easily to use the result of an asynchronous call with a flutter widget.
FutureBuilder(
future: dbRef.once(),
builder: (context, AsyncSnapshot<DatabaseEvent> snapshot) {
if (snapshot.hasData) {
lists.clear();
Map<dynamic, dynamic> values = snapshot.data!.snapshot.value as Map<dynamic,dynamic>;
values.forEach((key, values) {
lists.add(values);
});
return new ListView.builder(
shrinkWrap: true,
itemCount: lists.length,
itemBuilder: (BuildContext context, int index) {
return Card(
child: Column(
crossAxisAlignment: CrossAxisAlignment.start,
children: <Widget>[
Text("Name: " + lists[index]["name"]),
Text("Age: "+ lists[index]["age"]),
Text("Type: " +lists[index]["type"]),
],
),
);
});
}
return CircularProgressIndicator();
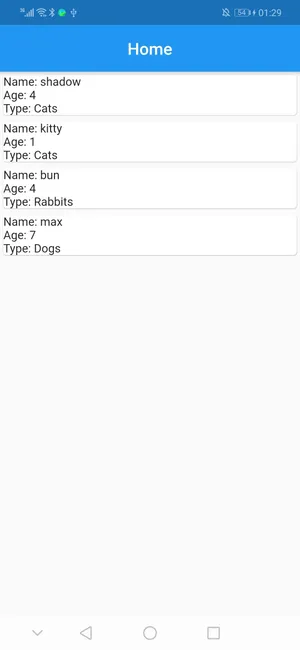
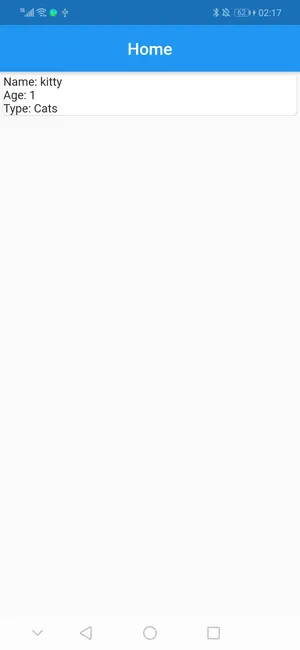
})We assign dbRef.once() which returns a Future<DatabaseEvent> to the future property, this will retrieve the data only once. Since this is asychronous, then first the widget CirculareProgressIndicator will be executed, then if the snapshot has data, the code inside the if block will get executed. Inside the if block, we use the property value of type DataSnapshot that will retrieve the whole returned data. Then using forEach, we can iterate and add the property values to the list. After that, we declare a listview using ListView.builder constructor, we also use the card widget to be used on the list.
Another way to retrieve data, is to use the StreamBuilder widget:
body: StreamBuilder(
    stream: dbRef.onValue,
    builder: (context, AsyncSnapshot<Event> snapshot) {
        if (snapshot.hasData) {
        lists.clear();
        DataSnapshot dataValues = snapshot.data.snapshot;
        Map<dynamic, dynamic> values = dataValues.value;
        values.forEach((key, values) {
            lists.add(values);
        });
In this case, you need to use the event onValue, which fires when the data at this location is updated. So, if you update the database, then automtically the listview will get updated.
Executing Different Firebase Queries
So first you need to order the data by something specific, in the firebase_database we have the following methods:
orderByValue: Generate a view of the data sorted by value, intended to be used in combination with startAt, endAt, or equalTo.
orderByPriority: Generate a view of the data sorted by priority, intended to be used in combination with startAt, endAt, or equalTo.
orderByChild: Generate a view of the data sorted by values of a particular child key, intended to be used in combination with startAt, endAt, or equalTo.
orderByKey: Generate a view of the data sorted by key, intended to be used in combination with startAt, endAt, or equalTo.
Note: You cannot use two orderBy.. methods in the same query. Also the firebase queries are returning in ascending order(if they are numerical), and if they are Strings then they are sorted lexicographically in ascending order. Since it returns in ascending order, so if you use limitToFirst(2), then the smallest 2 numbers of a specific child will be returned, while limitToLast(2) will return the largest 2 numbers of a specific child.
The method orderBy.., can be used with the following methods:
startAt: Create a query constrained to only return child nodes with a value greater than or equal to the given value.
endAt: Create a query constrained to only return child nodes with a value less than or equal to the given value.
limitToFirst: Create a query with limit and anchor it to the start of the window.
limitToLast : Create a query with limit and anchor it to the end of the window.
Now, if you use the following query:
dbRef.orderByChild("age").equalTo("4").once(),Then you will get only the nodes that have age equal to 4:
dbRef.orderByKey().equalTo("-M0FIuRBi5NT1VKsTbQt").once(),If you use the above query, then you will retrieve the node that contains the key -M0FIuRBi5NT1VKsTbQt
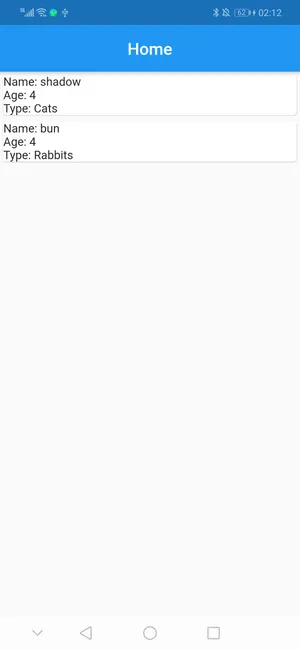
dbRef.orderByChild("name").startAt("s").once()Then you will retrieve all the data that has a node name with first letter equal to s or greater than s:
  "-M0FJ-WJXYDS-TPehYzV" : {
    "age" : "4",
    "name" : "shadow",
    "type" : "Cats"
},ref.orderByChild("name").startAt("bun").endAt("bun" + "\uf8ff").once()or
ref.orderByChild("name").startAt("bun").endAt("bun" + "\uf8ff").limitToFirst(1).once()limitToFirst will only return the first element that satisfies the condition above.
Here its like you are using SQL like. The character \uf8ff used in the query is a very high code point in the Unicode range. Because it is after most regular characters in Unicode, the query matches all values that start with “bun”.
In this case, it will return the following:
 "-M0FJHoCBd304XwLc_c-" : {
      "age" : "4",
      "name" : "bun",
      "type" : "Rabbits"
},ref.orderByChild("name").endAt("n").once()So here, it is like you are saying find all pets whose names come before n lexicographically. In this case, it will return the following:
  "-M0FIuRBi5NT1VKsTbQt" : {
    "age" : "1",
    "name" : "kitty",
    "type" : "Cats"
  },
  "-M0FJHoCBd304XwLc_c-" : {
    "age" : "4",
    "name" : "bun",
    "type" : "Rabbits"
  },
  "-M0FJLC6he0Qh9fVY9LV" : {
    "age" : "7",
    "name" : "max",
    "type" : "Dogs"
}ref.orderByChild("name").startAt("la").once()So, here we use startAt("la"), remember startAt returns child nodes with a value greater than or equal to the given value. So in this case, it will return the following:
"-M0FJ-WJXYDS-TPehYzV" : {
    "age" : "4",
    "name" : "shadow",
    "type" : "Cats"
  },
    "-M0FJLC6he0Qh9fVY9LV" : {
    "age" : "7",
    "name" : "max",
    "type" : "Dogs"
  }
Since both s and m are alphabetically higher than l.
You can find the source code here: Firebase Database Tutorial
I hope you enjoyed this Flutter/Firebase article, in the next article I will use firebase authentication with realtime database