Using Firebase Storage in Flutter

Software Developer | Technical Writer | Actively helping users with their questions on Stack Overflow.

In this article, we will use Firebase Storage to add images and retrieve them, we will also connect the images with Firestore.
Get Started With Firebase Storage
This is the fifth article related to Firebase in Flutter, you can check the previous articles in the below links:
- Get Started With Firebase in Flutter
- Using Firebase Queries In Flutter
- Using Firebase Auth In Flutter
- Using Cloud Firestore In Flutter
- Using Google Sign-in With Firebase In Flutter
- Using Twitter Authentication With Firebase In Flutter
- Using Facebook Authentication With Firebase In Flutter
To know how to integrate Firebase with Flutter, you can check the first article in the above list. In this article, I will add images to the assets folder, so we can then add those images to Firebase Storage, link them with Firestore and then retrieve those images, and we will also use the image picker plugin to get an image from gallery and save it to Firebase Storage.
Add Firebase Storage To Flutter
As I said before, to check how to create a flutter project and add Firebase, then please check this article Get Started With Firebase in Flutter. Next, you need to add the following dependency to the pubspec.yaml file:
dependencies:
  cloud_firestore: ^5.2.1
  cupertino_icons: ^1.0.8
  firebase_core: ^3.3.0
  firebase_storage: ^12.1.3
  flutter:
    sdk: flutter
  image_picker: ^1.1.2
Click CTRL + S to save, and you have successfully added Cloud Firestore + Firebase Storage to your Flutter application!
Since we are not using Firebase Authentication, you need to change the rules for Firebase Storage to public:
rules_version = '2';
service firebase.storage {
  match /b/{bucket}/o {
    match /{allPaths=**} {
      allow read, write: if true;
    }
  }
}
But only use the above rules in the development phase and not in production.
Note : I would advise to read the previous articles related to Firebase with Flutter before this one.
Adding Images to Flutter
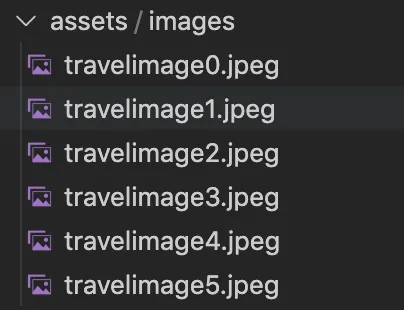
So, since we are going to use images inside the assets folder and add them to Firebase Storage, therefore first we can create a folder called images under the assets folder and inside the images folder we can add the images.
Then to access them inside the Flutter application, we need to declare them inside the pubspec.yaml:
  # To add assets to your application, add an assets section, like this:
  assets:
  - assets/images/
Now, you can access all images inside the assets/images/ in your application.
Implementing Multiple Select in GridView
To display those images inside the Flutter application, we can use a gridView widget. So first inside the main.dart file, create a StatelessWidget that will call a StatefulWidget:
void main() async {
  WidgetsFlutterBinding.ensureInitialized();
  await Firebase.initializeApp(options: DefaultFirebaseOptions.currentPlatform);
  runApp(MyApp());
}

class MyApp extends StatelessWidget {
  @override
  Widget build(BuildContext context) {
    return MaterialApp(
      title: 'Firebase Demo',
      debugShowCheckedModeBanner: false,
      theme: ThemeData(
        primarySwatch: Colors.blue,
      ),
      home: MyHomePage(title: 'Firebase Storage Tutorial'),
    );
  }
}
So main() method will be called first and, it will call the runApp() method which will take a widget and make it the root widget. The build() method will contain the layout of the application. The home property will take a widget, in this case we created a StatefulWidget called myHomePage. Then we need to declare this widget:
class MyHomePage extends StatefulWidget {
  MyHomePage({Key? key, this.title}) : super(key: key);

  final String? title;

  @override
  _MyHomePageState createState() => _MyHomePageState();
}
So myHomePage extends StatefulWidget, we override the method createState and create a State class called _myHomePageState. In the State class we declare the following variables:
class _MyHomePageState extends State<MyHomePage> {
  var storage = FirebaseStorage.instance;
  late List<AssetImage> listOfImage;
  bool clicked = false;
  List<String?> listOfStr = [];
  String? images;
  bool isLoading = false;
We first create an instance of FirebaseStorage:
var storage = FirebaseStorage.instance;Also, we create a list of images, that will contain our images. The State class contains the initState() method which is called once when the StatefulWidget is loaded, therefore override the initState() method:
@override
void initState() {
  super.initState();
  getImages();
}

void getImages() {
  listOfImage = [];
  for (int i = 0; i < 6; i++) {
    listOfImage.add(
        AssetImage('assets/images/travelimage' + i.toString() + '.jpeg'));
  }
}
}getImages() will retrieve all the images inside the assets/images directory and adds them all to the listOfImage. Then inside the build() method we add the GridView.builder widget:
child: Column(
  children: <Widget>[
    GridView.builder(
      shrinkWrap: true,
      padding: const EdgeInsets.all(0),
      itemCount: listOfImage.length,
      gridDelegate: SliverGridDelegateWithFixedCrossAxisCount(
          crossAxisCount: 3,
          mainAxisSpacing: 3.0,
          crossAxisSpacing: 3.0),
      itemBuilder: (BuildContext context, int index) {
So here the itemCount will take the number of images inside the list. The SliverGridDelegateWithFixedCrossAxisCount will design the gridView so on every line we will have 3 images. The mainAxisSpacing and the crossAxisSpacing is the number of logical pixels between each child.
Creating The GridView
So now inside the callback (BuildContext context, int index), we return a GridTile widget:
return GridTile(
  child: Material(
    child: GestureDetector(
      child: Stack(children: <Widget>[
        this.images == listOfImage[index].assetName ||
                listOfStr.contains(listOfImage[index].assetName)
            ? Positioned.fill(
                child: Opacity(
                opacity: 0.7,
                child: Image.asset(
                  listOfImage[index].assetName,
                  fit: BoxFit.fill,
                ),
              ))
            : Positioned.fill(
                child: Opacity(
                opacity: 1.0,
                child: Image.asset(
                  listOfImage[index].assetName,
                  fit: BoxFit.fill,
                ),
              )),
        this.images == listOfImage[index].assetName ||
                listOfStr.contains(listOfImage[index].assetName)
            ? Positioned(
                left: 0,
                bottom: 0,
                child: Icon(
                  Icons.check_circle,
                  color: Colors.green,
                ))
            : Visibility(
                visible: false,
                child: Icon(
                  Icons.check_circle_outline,
                  color: Colors.black,
                ),
              )
      ]),
      onTap: () {
        setState(() {
          if (listOfStr
              .contains(listOfImage[index].assetName)) {
            this.clicked = false;
            listOfStr.remove(listOfImage[index].assetName);
            this.images = null;
          } else {
            this.images = listOfImage[index].assetName;
            listOfStr.add(this.images);
            this.clicked = true;
          }
        });
      },
    ),
  ),
);
Let’s explain step by step here, first the GridTile takes a Material child, and then the Material widget takes a GestureDetector widget, which we will use to detects gestures. Then inside the GestureDetector widget, we use the onTap property:
onTap: () {
  setState(() {
    if (listOfStr
        .contains(listOfImage[index].assetName)) {
      this.clicked = false;
      listOfStr.remove(listOfImage[index].assetName);
      this.images = null;
    } else {
      this.images = listOfImage[index].assetName;
      listOfStr.add(this.images);
      this.clicked = true;
    }
  });
},
So inside the onTap() we use the setState() which will rebuild the layout by calling the build() method. We first check if the listOfStr contains the image, if it does then we remove it from the list, and if it doesnt contain then we add it to the list.
So here the user is tapping on the image, if the image is already tapped then it is inside the list, if the user taps again then we remove it from the list and build again. Now we use the child Stack inside the GestureDetector. The reason we use Stack is because we want to add an icon if the user chose an image. We also use the ternary operator to check if the image is inside the list or not. Check the image below, to see how the layout would be:
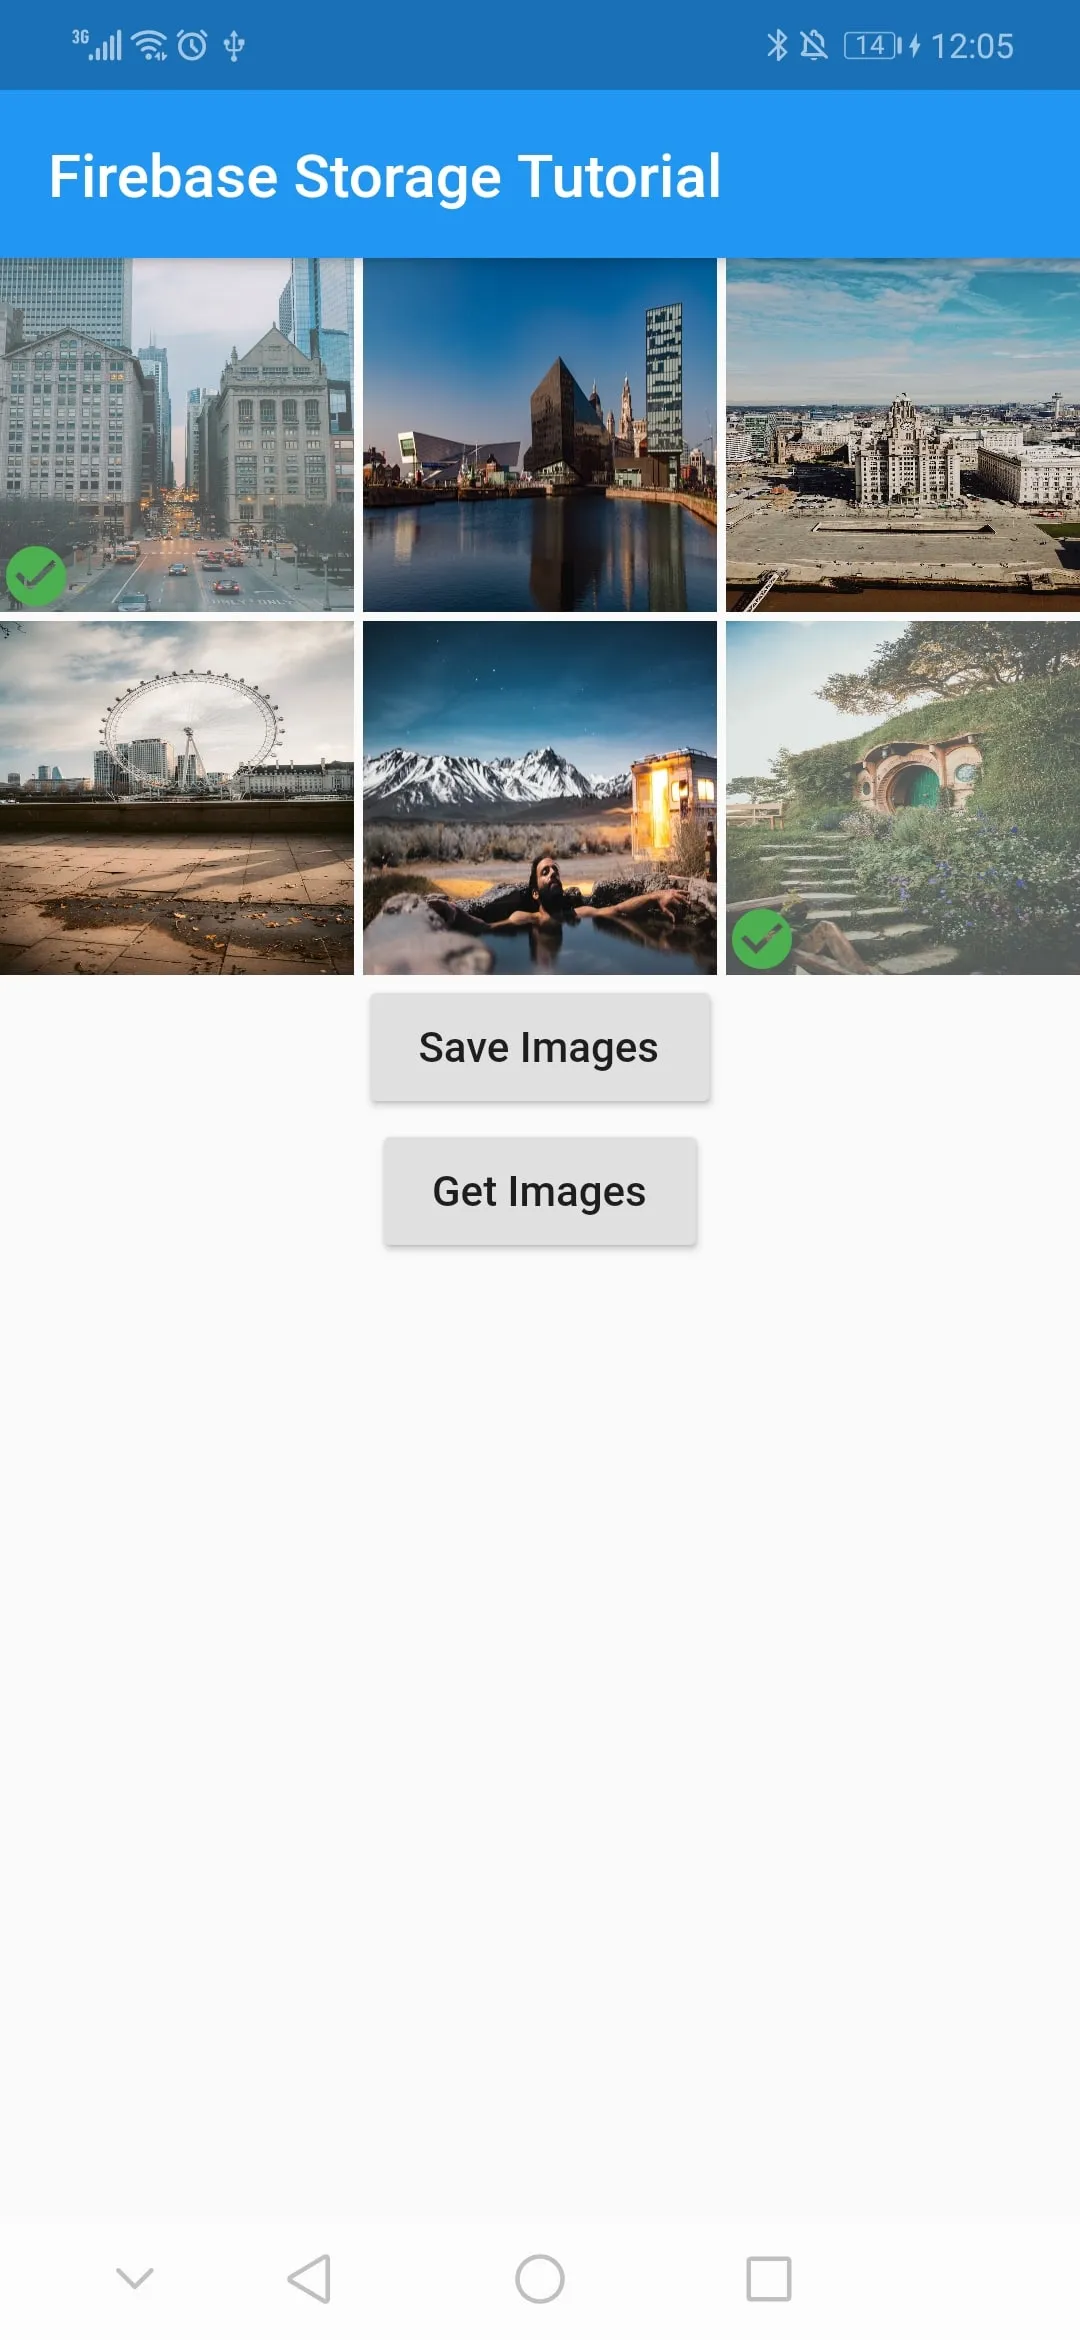
So as you can see, when we select an image, we use the Opacity widget and decrease the opacity and we also add a check icon.
Adding Images to Firebase Storage
So to add the selected images to Firebase Storage, we can create a ElevatedButton to save the images to storage:
Builder(builder: (context) {
  return ElevatedButton(
      child: Text("Save Images"),
      onPressed: () {
        setState(() {
          this.isLoading = true;
        });
        listOfStr.forEach((img) async {
          String imageName = img!
              .substring(img.lastIndexOf("/"), img.lastIndexOf("."))
              .replaceAll("/", "");

          final Directory systemTempDir = Directory.systemTemp;
          final byteData = await rootBundle.load(img);

          final file =
              File('${systemTempDir.path}/$imageName.jpeg');
          await file.writeAsBytes(byteData.buffer.asUint8List(
              byteData.offsetInBytes, byteData.lengthInBytes));
          TaskSnapshot snapshot = await storage
              .ref()
              .child("images/$imageName")
              .putFile(file);
          if (snapshot.state == TaskState.success) {
            final String downloadUrl =
                await snapshot.ref.getDownloadURL();
            await FirebaseFirestore.instance
                .collection("images")
                .add({"url": downloadUrl, "name": imageName});
            setState(() {
              isLoading = false;
            });
            final snackBar =
                SnackBar(content: Text('Yay! Success'));
            ScaffoldMessenger.of(context).showSnackBar(snackBar);
          } else {
            print(
                'Error from image repo ${snapshot.state.toString()}');
            throw ('This file is not an image');
          }
        });
      });
}),
We wrap the ElevatedButton inside a Builder because we want to use a Snackbar later, which contains Scaffold.of(context), without the Builder method then the Scaffold widget will not be inside the context.
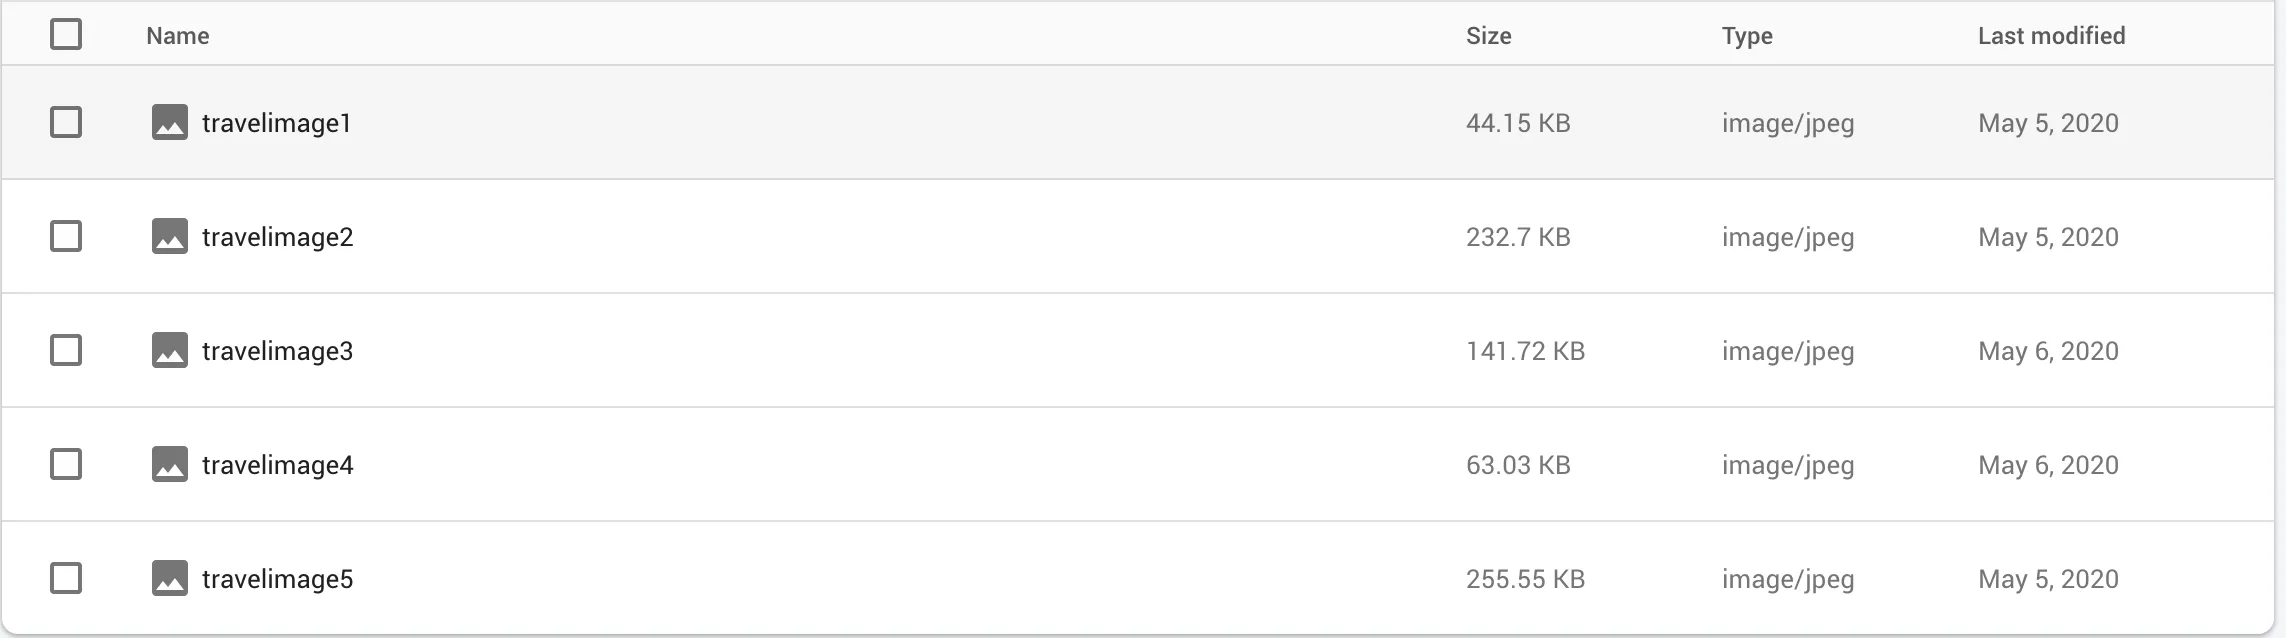
So since we might select multiple images, then we iterate inside the listOfStr and retrieve the name of the images, then we get the temporary directory inside the phone OS. We also use the rootBundle which is a top level property inside the AssetBundle and we use load() to retrieve a binary resource from the asset bundle as a data stream. After that we create a new file inside the temporary directory, and we write the bytes to the file. Then we can finally save the images to Firebase Storage:
TaskSnapshot snapshot = await storage
    .ref()
    .child("images/$imageName")
.putFile(file);ref() will give you a reference to Firebase Storage, child() will create a folder called images and inside of the folder we will have all the images, lastly putFile() will take the file as an arugument and add it to Firebase Storage. We use await to wait until it adds the image to storage and then continue execution.
Linking Firebase Storage With Firestore
After calling putFile() method, we can check if the image were successfully added or not:
if (snapshot.state == TaskState.success) {
  final String downloadUrl =
      await snapshot.ref.getDownloadURL();
  await FirebaseFirestore.instance
      .collection("images")
      .add({"url": downloadUrl, "name": imageName});
  setState(() {
    isLoading = false;
  });
  final snackBar =
      SnackBar(content: Text('Yay! Success'));
  ScaffoldMessenger.of(context).showSnackBar(snackBar);
} else {
  print(
      'Error from image repo ${snapshot.state.toString()}');
  throw ('This file is not an image');
}
});
});
If there is no error, then we successfully added the image to Firebase Storage, we can then use getDownloadUrl() which returns Future<dynamic> and thats why we use await. The getDownloadUrl() will give us the url of the image inside Firebase Storage. After that we can finally add both the url and the image to Firestore, inside the images collection. We also assign isLoading to false to stop the CircularProgressIndicator() from loading. The CircularProgressIndicator() is used inside the Column widget:
isLoading
    ? CircularProgressIndicator()
    : Visibility(visible: false, child: Text("test")),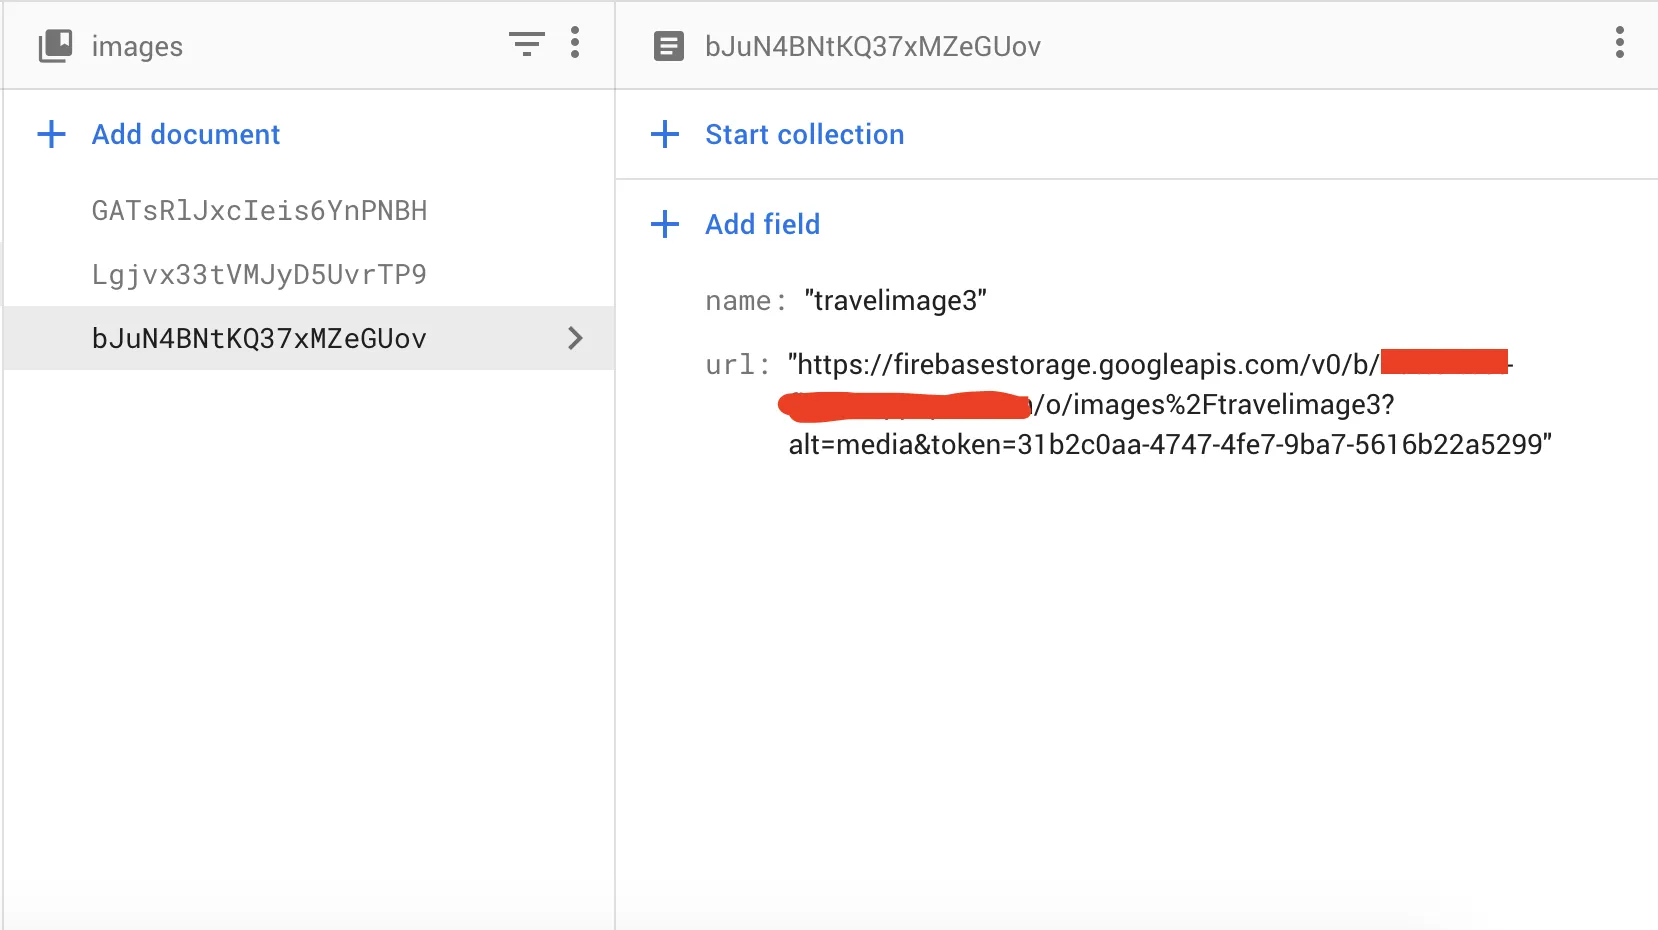
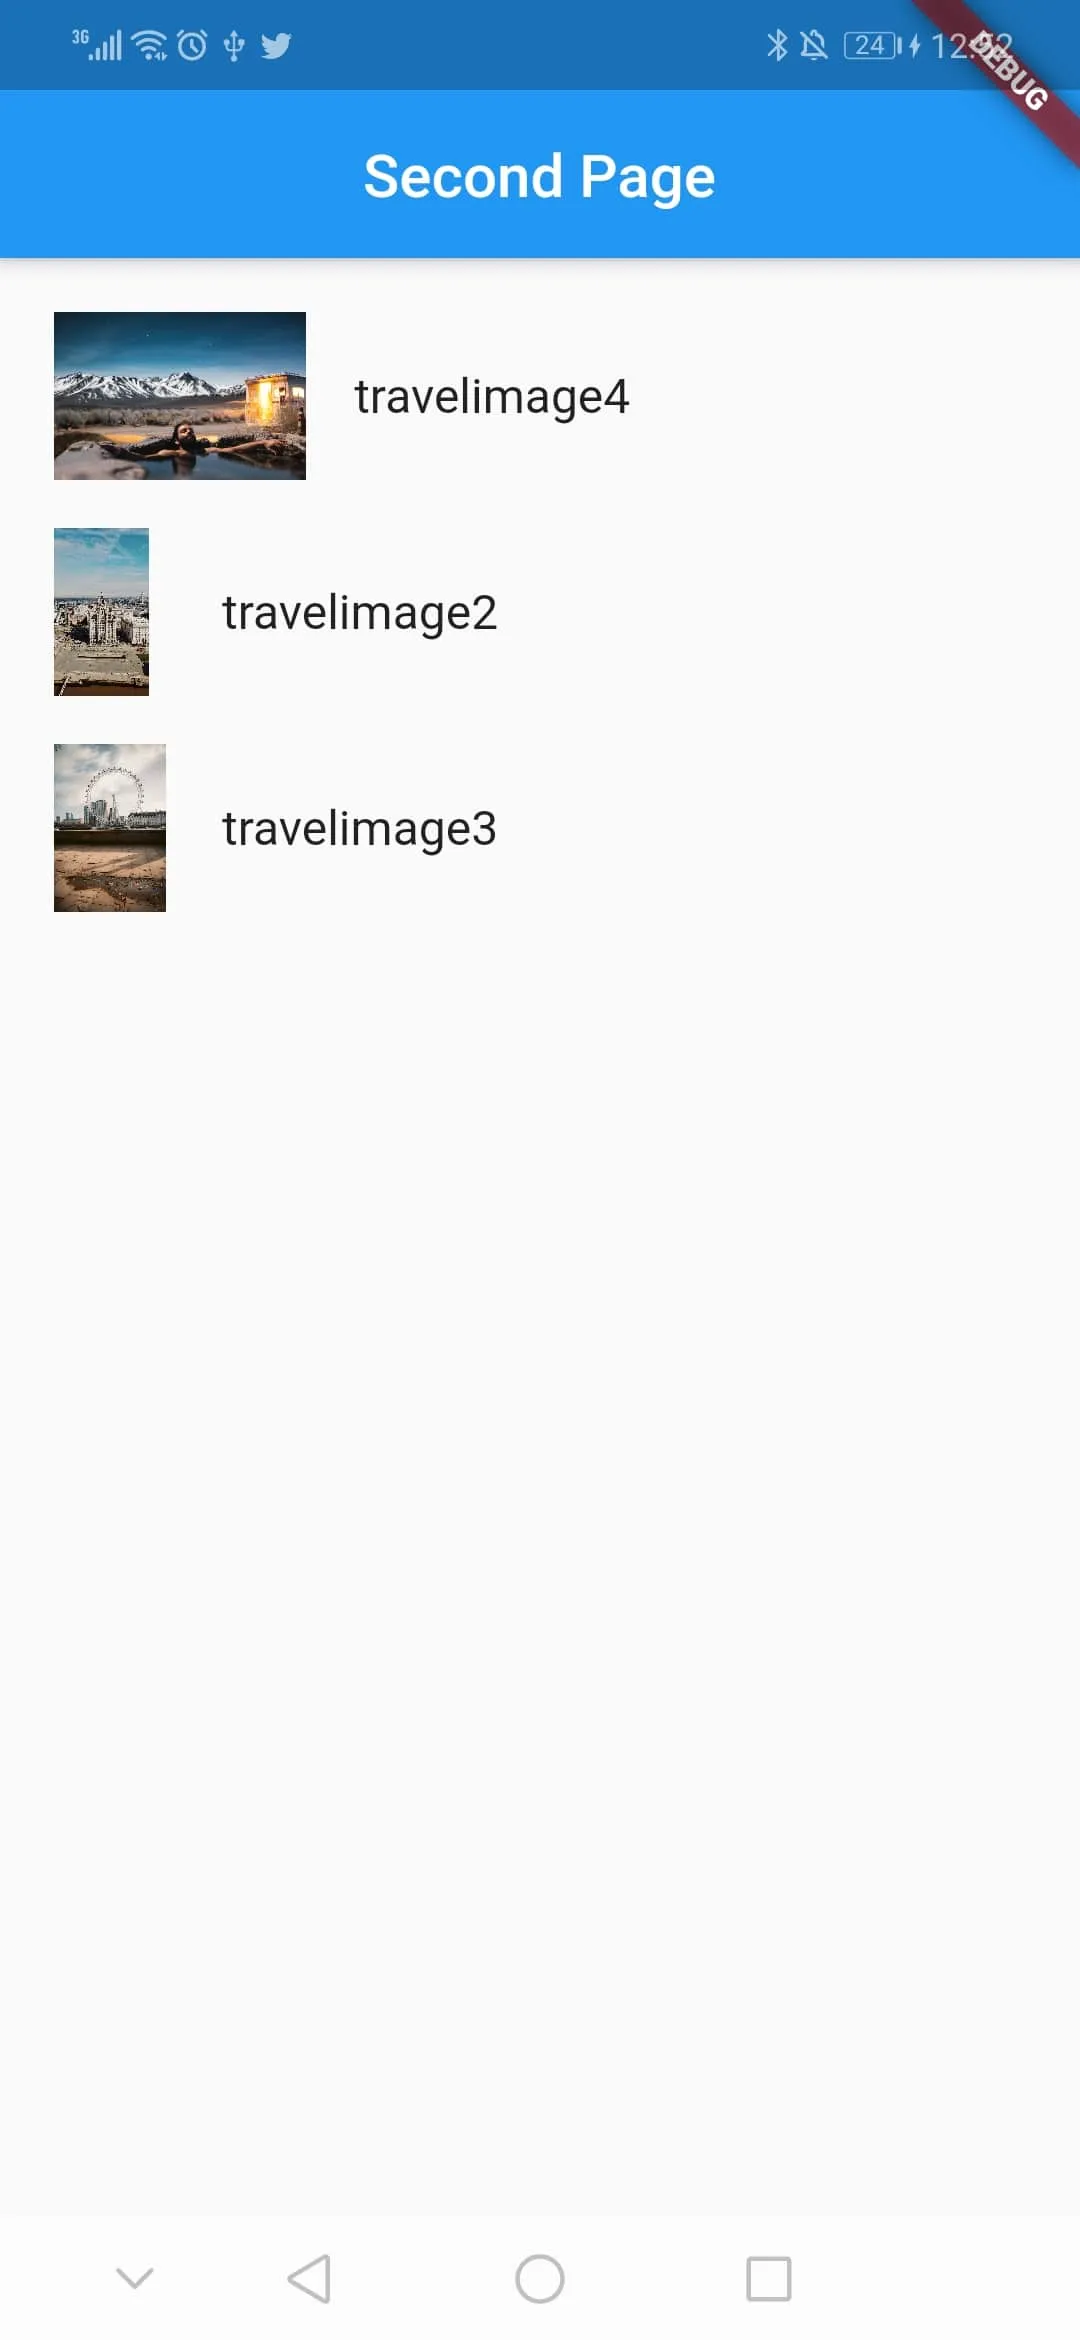
Retrieving Images From Firestore
So, to retrieve the images we create another ElevatedButton:
ElevatedButton(
  child: Text("Get Images"),
  onPressed: () {
    Navigator.push(
      context,
      MaterialPageRoute(builder: (context) => SecondPage()),
    );
  },
),
onPressed of the button we, navigate to the SecondPage. Therefore we create another dart file and call it second_page.dart. Inside the State class in the we retrieve an instance of Firestore:
final FirebaseFirestore fb = FirebaseFirestore.instance;Then we use a FutureBuilder to get the images and add them in a listView:
body: Container(
  padding: EdgeInsets.all(10.0),
      FutureBuilder(
        future: getImages(),
        builder: (context, AsyncSnapshot<QuerySnapshot<Map<String, dynamic>>> snapshot) {
          if (snapshot.connectionState == ConnectionState.done) {
            return ListView.builder(
                shrinkWrap: true,
                itemCount: snapshot.data.docs.length,
                itemBuilder: (BuildContext context, int index) {
                  return ListTile(
                    contentPadding: EdgeInsets.all(8.0),
                    title: Text(snapshot.data.docs[index].data()["name"]),
                    leading: Image.network(
                        snapshot.data.docs[index].data()["url"],
                        fit: BoxFit.fill),
                  );
                });
          } else if (snapshot.connectionState == ConnectionState.none) {
            return Text("No data");
          }
          return CircularProgressIndicator();
        },
    ),
),
/// code here


  Future<QuerySnapshot<Map<String, dynamic>>> getImages() {
    return fb.collection("images").get();
  }
So in the FutureBuilder we use the method getImages() which will return all the documents inside the collection images. Then we use the ConnectionState, if the connectionState is equal to done, then the asychronous operation is finished. If it is equal to none then the operation finished but didnt return anything. Outside the if/else we return CircularProgressIndicator(); which will before getting the result from the Future.
Using Image Picker Plugin
The second way to add images to Firebase Storage, is to get an image from the gallery, so to do that, navigate to the pubspec.yaml file and add the following dependency:
image_picker: ^0.8.4+3Then in the second_page.dart, add a ElevatedButton below the FutureBuilder:
ElevatedButton(child: Text("Pick Image"), onPressed: getImage)onPressed it will call the method getImage:
Future getImage() async {
  final _picker = ImagePicker();
  var image = await _picker.pickImage(source: ImageSource.gallery);

  setState(() {
    _image = File(image!.path);
  });
}
The getImage() method will get an image from gallery, and call setState to rebuild the layout. Therefore under the ElevatedButton we add the image:
_image == null
    ? Text('No image selected.')
    : Image.file(
        _image,
        height: 300,
      ),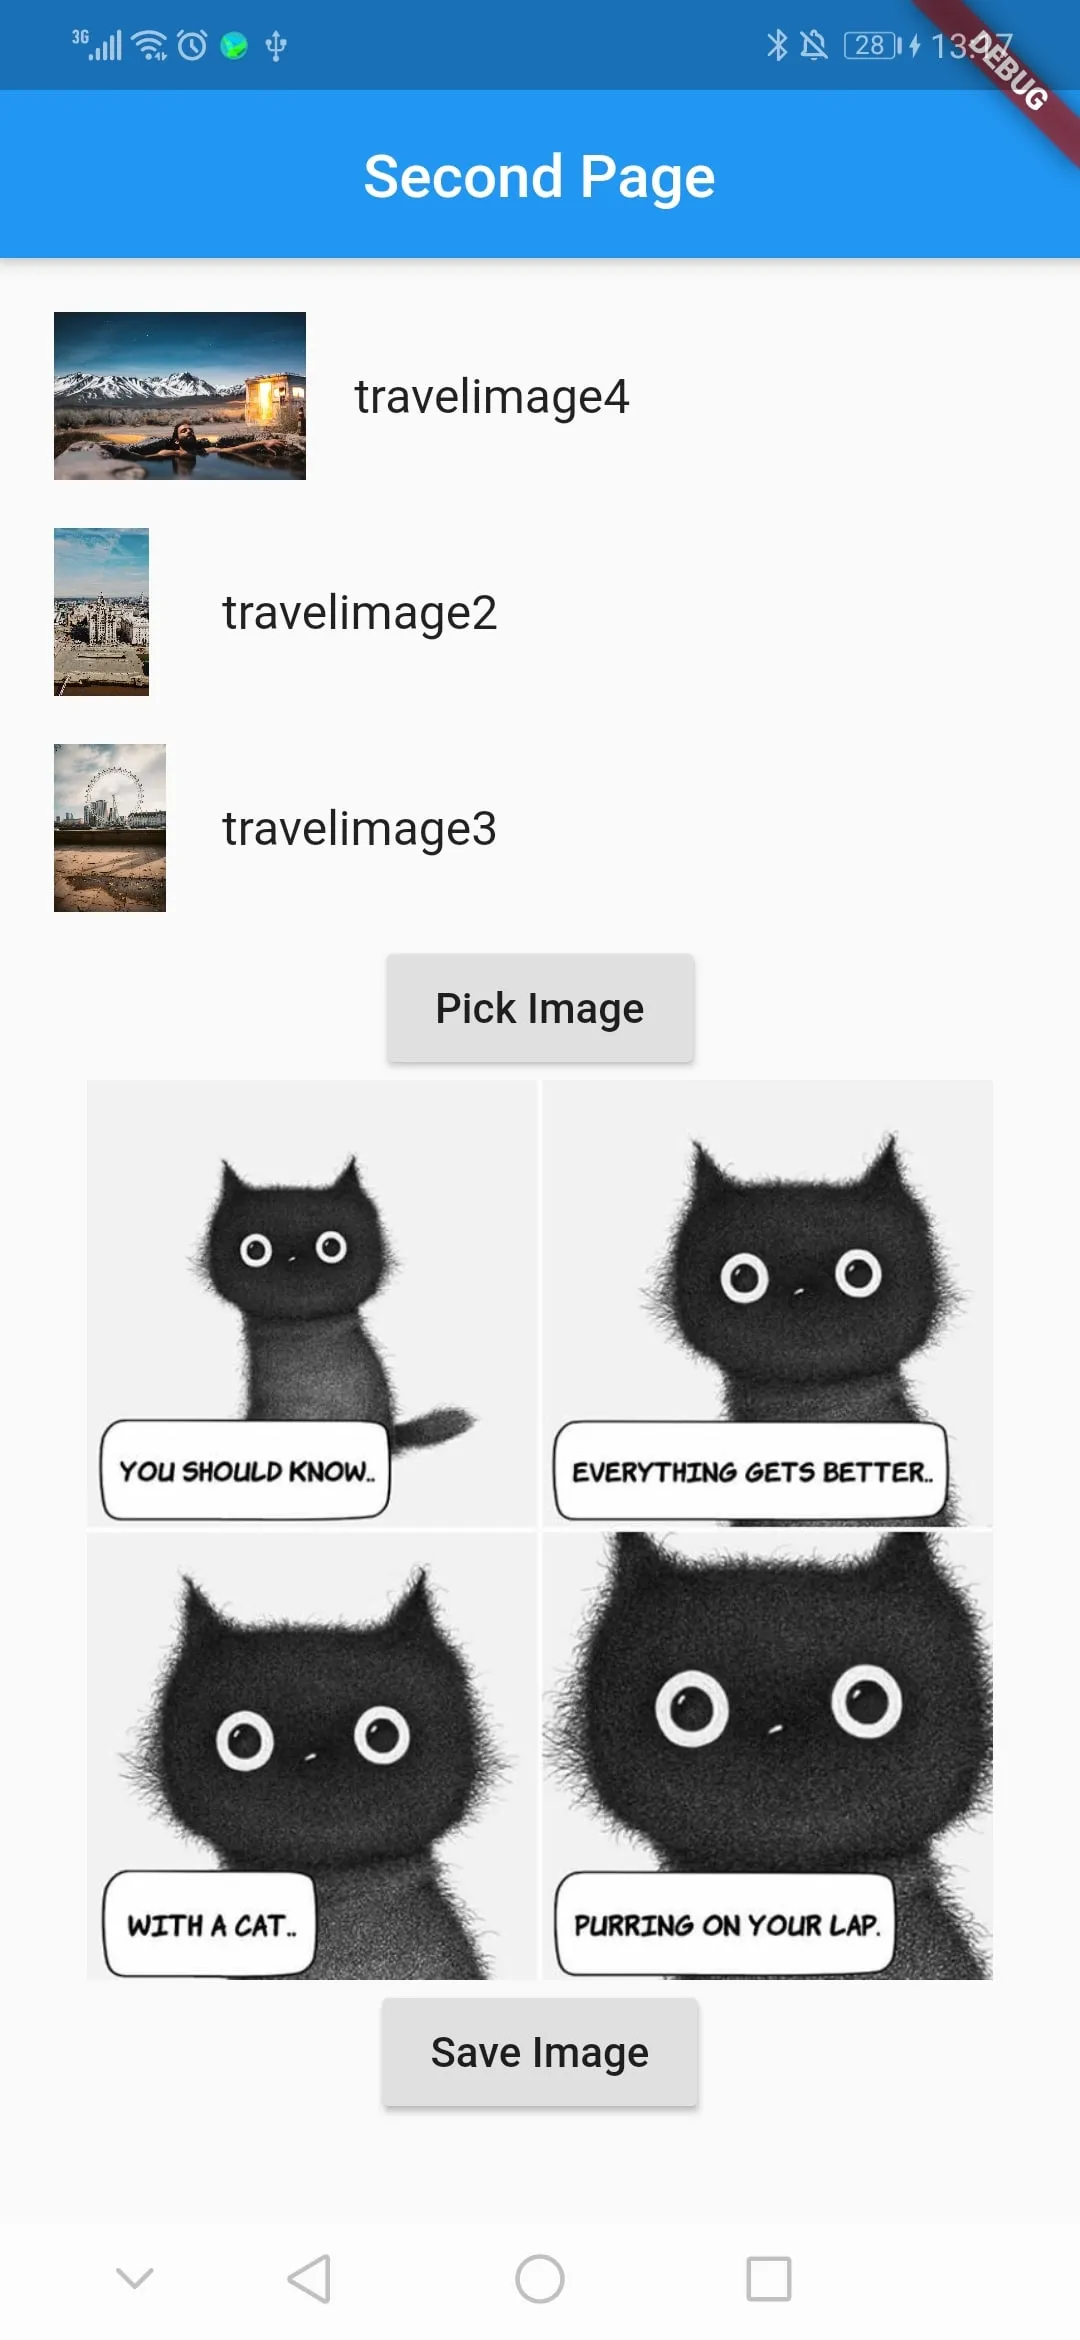
Under the image, we create a ElevatedButton and save the data to Firebase Storage under folder image:
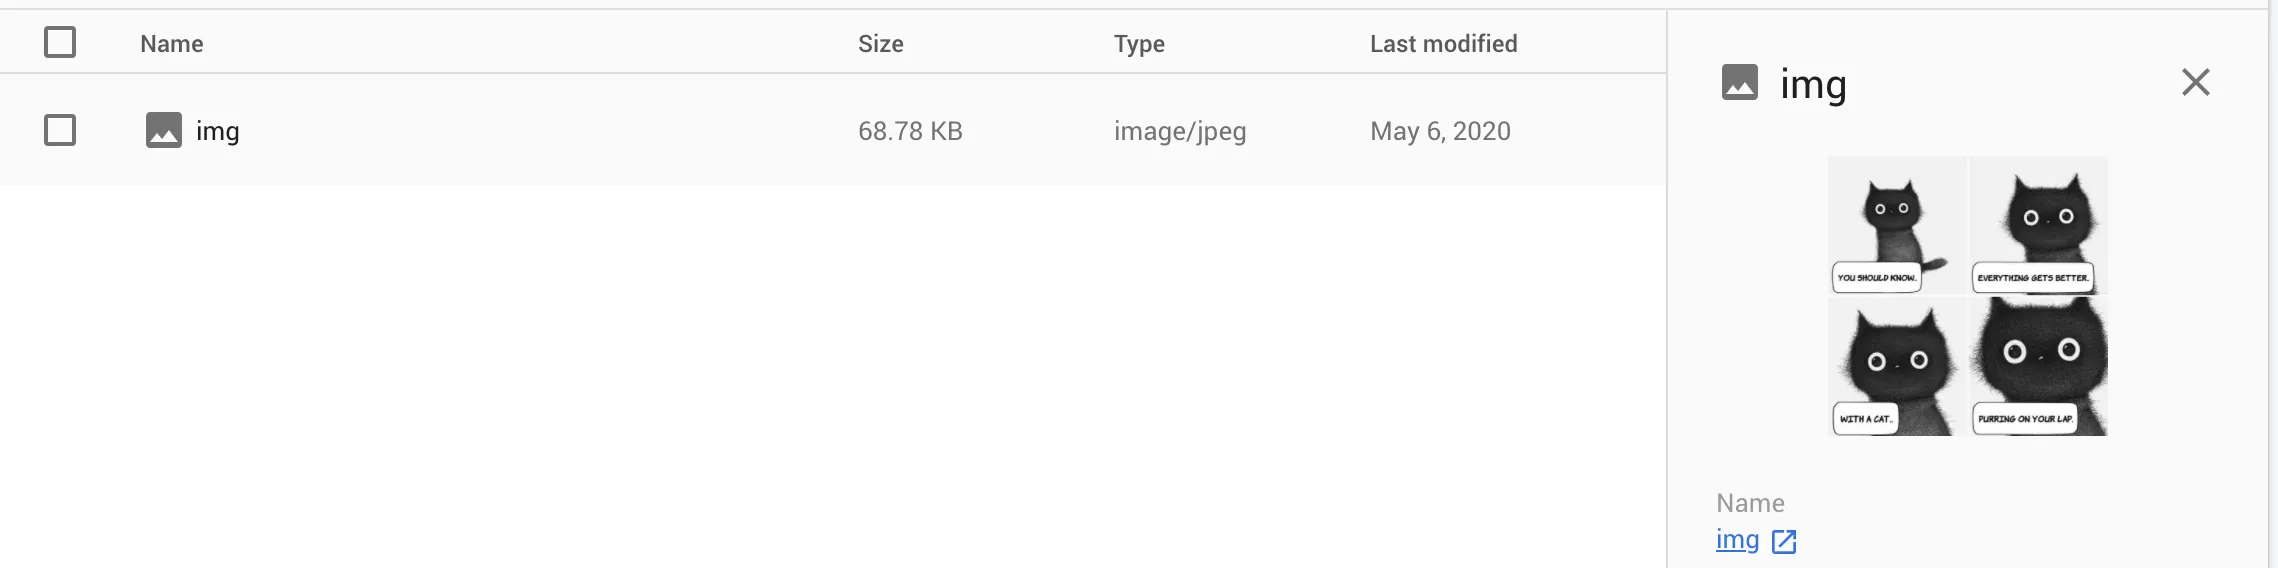
ElevatedButton(
child: Text("Save Image"),
onPressed: () async {
  if (_image != null) {
    setState(() {
      this.isLoading = true;
    });
    Reference ref = FirebaseStorage.instance.ref();
    TaskSnapshot addImg =
        await ref.child("image/img").putFile(_image!);
    if (addImg.state == TaskState.success) {
      setState(() {
        this.isLoading = false;
      });
      print("added to Firebase Storage");
    }
  }
})
Deleting an Image
Now, let’s say you have users in your application, each user will have a profile image, if a user gets deleted then you want to delete the image also from Firebase Storage. In that case you can do the following, for example:
    FirebaseFirestore.instance
      .collection("images")
      .where("name", isEqualTo: "travelimage4")
      .get()
      .then((res) {
    res.docs.forEach((result) {
      FirebaseStorage.instance
          .getReferenceFromUrl(result.data()["url"])
          .then((res) {
        res.delete().then((res) {
          print("Deleted!");
        });
      });
    });
  });
Using getReferenceFromUrl() you will get URL pointing to a Firebase Storage location, and then you can call delete().
You can find the source code here: Firebase Storage Tutorial
I hope you enjoyed this Flutter/Firebase article, in the next article I will use Firebase messaging.