Using Firebase Cloud Messaging In Flutter

Software Developer | Technical Writer | Actively helping users with their questions on Stack Overflow.

In this article, we will add Firebase Cloud Messaging (FCM) to a Flutter application, which will enable us to send notifications to one user or a group of users.
Get Started With Firebase Cloud Messaging
This is the fifth article related to Firebase in Flutter, you can check the previous articles in the below links:
- Get Started With Firebase in Flutter
- Using Firebase Queries In Flutter
- Using Firebase Auth In Flutter
- Using Firebase Storage In Flutter
- Using Cloud Firestore In Flutter
- Using Google Sign-in With Firebase In Flutter
To know how to integrate Firebase with Flutter, you can check the first article in the above list. In the other two articles, I created a form using Flutter performed queries for the realtime database and authenticated users with Firebase, and in the last article, it was different code snippet related to Firestore and explaining each one. This article is aimed for the android phones.
Introduction
What is Firebase Cloud Messaging?
Firebase Cloud Messaging or FCM is used to easily send notifications to different users. To be able to send messages, you can retrieve the registration token of each user or you can subscribe a group of users to different topics. After doing that you can either use Firebase Cloud Functions or your own server to be able to send the notifications.
Types Of Messages
FCM has two different messages, notification message and data message.
The notification message, is handled by the FCM SDK. It goes directly to the Android Notification’s tray, if the application is in background/killed state, while if the application is in foreground then it will get delivered to the onMessage callback in the firebase_messaging plugin.
The data message, is handled by the client application. The data message will call onMessage or onBackgroundMessage callback if the application is in foreground, background, or killed. If you use only data message in the request, you can then use flutter_local_notification to display the notification.
In this article, we will use the Firebase console which sends notification messages and postman to send data messages.
Adding FCM To Flutter
As I said before, to check how to create a flutter project and add Firebase, then please check this article Get Started With Firebase in Flutter. Next, you need to add the following dependency to the pubspec.yaml file:
dependencies:
  cupertino_icons: ^1.0.2
  firebase_analytics: ^8.3.4
  firebase_core: ^1.8.0
  firebase_messaging: ^10.0.9
  flutter:
    sdk: flutter
Click CTRL + S to save, and you have successfully added Firebase Cloud Messaging to your Flutter application!
Sending Messages Using Token
As I said before, to send messages to individual users, then you need to get the registration token of the device. Therefore navigate to the main.dart file and add the following:
class _MyHomePageState extends State<MyHomePage> {

    late FirebaseMessaging messaging;
    @override
    void initState() {
    super.initState();
    messaging = FirebaseMessaging.instance;
    messaging.getToken().then((value){
        print(value);
    });
FirebaseMessaging is the class provided by the firebase_messaging plugin. First you need to get an instance of that class, you can do that by calling instance property. Then using getToken() we can get the registration token of the device, which we can save to a database to use later on, but to make this tutorial simple I just printed the token.
Note: The token can change if the following happens, therefore you need to also call the property onTokenRefresh to get the new token.
Handling Message In Foreground
Now, if you have the application in foreground, you need to add the following in initState():
    FirebaseMessaging.onMessage.listen((RemoteMessage event) {
        print("message recieved");
        print(event.notification!.body);
    });
    FirebaseMessaging.onMessageOpenedApp.listen((message) {
      print('Message clicked!');
    });
The onMessage property will return a Stream that is called when an incoming FCM payload is received when the application is in foreground.
Now execute flutter run on the terminal, and copy the token. Then navigate to the Firebase console -> Cloud Messaging and click on Send your first message. In the notification composer page, add the notification title, text:
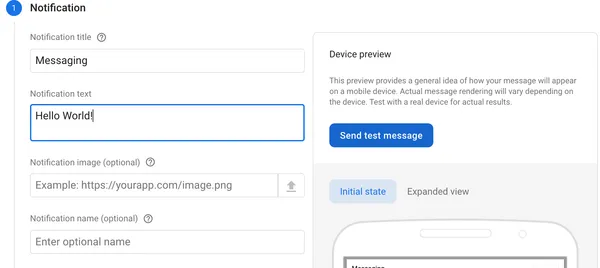
And then click on Send Test Message , which will open the following modal:
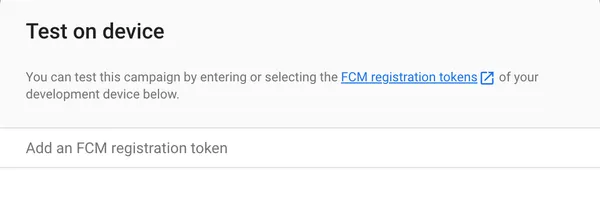
Here you can add the registration token that was printed to the terminal. Now if you send a message while the application is in foreground then the onMessage callback will be called and it will print:
/flutter (23133): message recieved
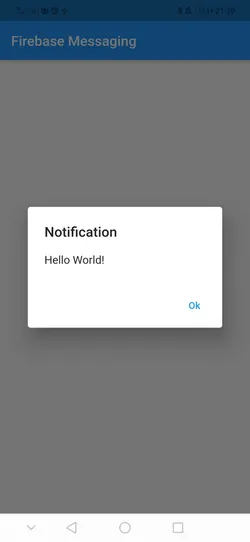
I/flutter (23133): Hello World!You can also add a dialog that will show the information of that message, for example:
    FirebaseMessaging.onMessage.listen((RemoteMessage event) {
      print("message recieved");
      print(event.notification!.body);
      showDialog(
          context: context,
          builder: (BuildContext context) {
            return AlertDialog(
              title: Text("Notification"),
              content: Text(event.notification!.body!),
              actions: [
                TextButton(
                  child: Text("Ok"),
                  onPressed: () {
                    Navigator.of(context).pop();
                  },
                )
              ],
            );
          });
    });
Which will give you the following:
Handling Message In Background
If the application is in background state, you need to use the onBackgroundMessage method to access the data, for example:
Future<void> _messageHandler(RemoteMessage message) async {
  print('background message ${message.notification!.body}');
}

void main() async {
  WidgetsFlutterBinding.ensureInitialized();
  await Firebase.initializeApp(options: DefaultFirebaseOptions.currentPlatform);
  FirebaseMessaging.onBackgroundMessage(_messageHandler);
  runApp(MessagingTutorial());
}
Here the _messageHandler callback, will be called when application is in background or terminated state, and the callback function has to be a top level function. Therefore when you recieve the message on your device:
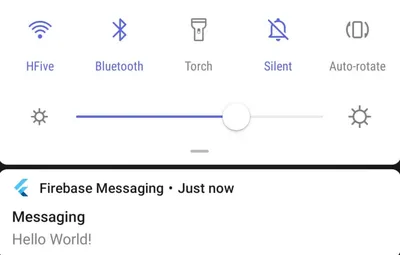
The following will be printed to the terminal:
I/flutter (30603): background message Hello World!Also, if you are sending a notification message, and you clicked the notification then the onMessageOpenedApp will be called. For example:
    FirebaseMessaging.onMessageOpenedApp.listen((message) {
      print('Message clicked!');
    });
When clicking the message, the above will print Message clicked.
Sending Messages Using Topics
To send messages to multiple users, you can use topics. For example two users can subscribe to a topic called test, then using REST API or the Firebase admin sdk, you can send messages to that topic and all the users that are subscribed will recieve a notification. To subscribe to a topic you can do:
messaging.subscribeToTopic("messaging");You can also unsubscribe by executing:
messaging.unsubscribeFromTopic("messaging");To test the message, you can open postman and create the following request:
POST https://fcm.googleapis.com/fcm/send
Authoritzation key="your_server_key"

{
  "to": "/topics/messaging",
  "notification": {
    "title": "FCM",
    "body": "messaging tutorial"
  },
  "data": {
    "msgId": "msg_12342"
  }
}
If the device was in foreground state, then this will call onMessage callback. You can get the values of the data payload using the following:
FirebaseMessaging.onMessage.listen((RemoteMessage event) {
    print("message recieved");
    print(event.notification!.body);
    print(event.data.values);
You can also send to multiple devices by using registration_ids:
POST https://fcm.googleapis.com/fcm/send
Authoritzation key="your_server_key"

{
  "registration_ids": ["device_token"],
  "notification": {
    "title": "FCM",
    "body": "messaging tutorial"
  },
  "data": {
    "msgId": "msg_12342"
  }
}
I hope you enjoyed reading this flutter tutorial, please feel free to leave any comments or feedback on this post!