Using Firebase With Bloc Pattern In Flutter

Software Developer | Technical Writer | Actively helping users with their questions on Stack Overflow.

In this guide we will see how we can use both Firebase Authentication and Cloud Firestore with the Bloc Pattern.
Get Started With Firebase
This is the twelveth article related to Firebase in Flutter, you can check the previous articles in the below links:
- Get Started With Firebase in Flutter
- Using Firebase Queries In Flutter
- Using Firebase Auth In Flutter
- Using Firebase Storage In Flutter
- Using Cloud Firestore In Flutter
- Using Firebase Cloud Messaging In Flutter
- Using Google Sign-in With Firebase In Flutter
- Using Twitter Authentication With Firebase In Flutter
- Using Facebook Authentication With Firebase In Flutter
- Using Phone Authentication With Firebase In Flutter
- How to Model your Firebase Data Class In Flutter
To know how to integrate Firebase with Flutter, you can check the first article in the above list. In the other two articles, I created a form using Flutter performed queries for the realtime database and authenticated users with Firebase, in the cloud firestore article, it was different code snippet related to Firestore and explaining each one. In the last four articles I demonstrated how to use twitter_login, google_sign_in, flutter_facebook_auth, and phone authentication.
The aim of this article is to show how to setup Bloc Pattern With Firebase. For specific details related to Firebase or Bloc alone, then you can check the above articles for Firebase and this article for Bloc. Alternatively, you can check the references at the end of this article.
Also, the design of this application is based on this dribbble design by Ashlee Mckay which was also used and explained in the Using Google Sign in with Firebase in Flutter article.
Adding Bloc And Firebase to Flutter
As I said before, to check how to create a Flutter project and integrate Firebase, then please check this article Get Started With Firebase in Flutter.
Next, you need to add the following dependencies to the pubspec.yaml file:
dependencies:
  cloud_firestore: ^5.2.1
  cupertino_icons: ^1.0.8
  equatable: ^2.0.5
  firebase_auth: ^5.1.4
  firebase_core: ^3.3.0
  flutter:
    sdk: flutter
  flutter_bloc: ^8.1.6
  font_awesome_flutter: ^10.7.0

dev_dependencies:
  flutter_lints: ^4.0.0
  flutter_test:
    sdk: flutter
So, here I add the flutter_bloc, equatable, cloud_firestore, and firebase_auth.
Click CTRL + S to save, and you have successfully added the above dependencies to your Flutter application!
Observing Bloc Changes
So now that we setup everything, we can finally start coding! So first remove all the code from the main.dart file and add the following:
import 'package:firebase_bloc_tutorial/features/authentication/authentication_repository_impl.dart';
import 'package:firebase_core/firebase_core.dart';
import 'package:flutter/material.dart';
import 'package:flutter_bloc/flutter_bloc.dart';
import 'app.dart';
import 'app_bloc_observer.dart';
import 'features/authentication/bloc/authentication_bloc.dart';
import 'features/database/bloc/database_bloc.dart';
import 'features/database/database_repository_impl.dart';
import 'features/form-validation/bloc/form_bloc.dart';

void main() async {
  WidgetsFlutterBinding.ensureInitialized();
  await Firebase.initializeApp(options: DefaultFirebaseOptions.currentPlatform);
  Bloc.observer = AppBlocObserver();
  runApp(MultiBlocProvider(
      providers: [
        BlocProvider(
          create: (context) =>
              AuthenticationBloc(AuthenticationRepositoryImpl())
                ..add(AuthenticationStarted()),
        ),
        BlocProvider(
          create: (context) => FormBloc(
              AuthenticationRepositoryImpl(), DatabaseRepositoryImpl()),
        ),
        BlocProvider(
          create: (context) => DatabaseBloc(DatabaseRepositoryImpl()),
        )
      ],
      child: const App(),
   ));
}
Since, I’m using Firebase than as usual in the main I call await Firebase.initializeApp(options: DefaultFirebaseOptions.currentPlatform); to be able to use Firebase services. Then I set the Bloc.observer to the AppBlocObserver() which will let us observe any change that is happening in the Bloc.
I also use The MultiBlocProvider to declare multiple Blocs, if you only have/need one Bloc then you can just use BlocProvider. So, first you declare the Blocs and then you consume them as we will see later on.
In the above code, I have the AuthenticationBloc which will be used for authentication, I also immediately add the event AuthenticationStarted which will trigger the event handler inside the Bloc class. I also created a FormBloc for form validation and DatabaseBloc for database operations.
Now in the AppBlocObserver, we will have the following code:
// ignore_for_file: avoid_print

import 'package:bloc/bloc.dart';

class AppBlocObserver extends BlocObserver {
  @override
  void onEvent(Bloc bloc, Object? event) {
    super.onEvent(bloc, event);
    print('onEvent $event');
  }

  @override
  void onChange(BlocBase bloc, Change change) {
    super.onChange(bloc, change);
    print('onChange $change');
  }

  @override
  void onTransition(Bloc bloc, Transition transition) {
    super.onTransition(bloc, transition);
    print('onTransition $transition');
  }

  @override
  void onError(BlocBase bloc, Object error, StackTrace stackTrace) {
    print('onError $error');
    super.onError(bloc, error, stackTrace);
  }
}
The above code is really important for debugging, because you can simply know what is the next/current state and which event is currently active.
Creating the Authentication Bloc
As, you can see in the MultiBlocProvider, the child property has a widget called App(). So, create a file called app.dart and add the following:
class App extends StatelessWidget {
  const App({Key? key}) : super(key: key);

  @override
  Widget build(BuildContext context) {
    return MaterialApp(
        debugShowCheckedModeBanner: false,
        home: const BlocNavigate(),
        title: Constants.title,
        theme: ThemeData(
          primarySwatch: Colors.blue,
        ));
  }
}

class BlocNavigate extends StatelessWidget {
  const BlocNavigate({Key? key}) : super(key: key);

  @override
  Widget build(BuildContext context) {
    return BlocBuilder<AuthenticationBloc, AuthenticationState>(
      builder: (context, state) {
        if (state is AuthenticationSuccess) {
          return const HomeView();
        } else {
          return const WelcomeView();
        }
      },
    );
  }
}
Inside the BlocNavigate class, we use the BlocBuilder providing it with both the AuthenticationBloc and it’s state. The BlocBuilder will check if you declared the AuthenticationBloc before using it, that’s why first we declare it in the MultiBlocProvider.
As, you can see in the above code if currently the state is AuthenticationSuccess then it means the user is authenticated so we go immediately to the HomeView(), if it’s not then the user has to signup or login so we go to the WelcomeView(). So using the above code, the user can navigate to the correct page depending on the authentication state.
Now, for the authentication bloc. First, create a folder called features and then inside of it create a folder called authentication. Then right click on the authentication folder and click Bloc: new Bloc which will create a new bloc for you.
Note: Download this vscode extension to be able to get Bloc: new Bloc when right clicking.
If you read this article, then you already know that events are sent from the UI to the Bloc class and then in the Bloc class we call the repository class which calls the data layer which will usually contain calls to a web service or a database, and then after recieving the result we emit the new state with the result.
AuthenticationEvent
So now after generating the files, inside the authentication_event add the following:
part of 'authentication_bloc.dart';

abstract class AuthenticationEvent extends Equatable {
  const AuthenticationEvent();

  @override
  List<Object> get props => [];
}

class AuthenticationStarted extends AuthenticationEvent {
      @override
  List<Object> get props => [];
}

class AuthenticationSignedOut extends AuthenticationEvent {
      @override
  List<Object> get props => [];
}
As, you can see here we have two events AuthenticationStarted and AuthenticationSignedOut. If you remember in the main.dart we immediately added the event AuthenticationStarted to start the authentication process.
AuthenticationState
Then in the authentication_state, we add the following:
part of 'authentication_bloc.dart';

abstract class AuthenticationState extends Equatable {
  const AuthenticationState();

  @override
  List<Object?> get props => [];
}

class AuthenticationInitial extends AuthenticationState {
      @override
  List<Object?> get props => [];
}

class AuthenticationSuccess extends AuthenticationState {
  final String? displayName;
  const AuthenticationSuccess({this.displayName});

    @override
  List<Object?> get props => [displayName];
}

class AuthenticationFailure extends AuthenticationState {
      @override
  List<Object?> get props => [];
}
Here we have 3 states, the initial one, the success state and the failure state. The success state will contain the displayName of the user also.
AuthenticationBloc
Now to the main class which is the AuthenticationBloc class:
class AuthenticationBloc
    extends Bloc<AuthenticationEvent, AuthenticationState> {
  final AuthenticationRepository _authenticationRepository;

  AuthenticationBloc(this._authenticationRepository)
      : super(AuthenticationInitial()) {
    on<AuthenticationEvent>((event, emit) async {
      if (event is AuthenticationStarted) {
        UserModel user = await _authenticationRepository.getCurrentUser().first;
        if (user.uid != "uid") {
          String? displayName = await _authenticationRepository.retrieveUserName(user);
          emit(AuthenticationSuccess(displayName: displayName));
        } else {
          emit(AuthenticationFailure());
        }
      }
      else if(event is AuthenticationSignedOut){
        await _authenticationRepository.signOut();
        emit(AuthenticationFailure());
      }
    });
  }
}
Here AuthenticationBloc will extend the Bloc class providing it with both the event and the state. We will also pass an instance of the AuthenticationRepository to the constructor of the AuthenticationBloc and initially it will have the state AuthenticationInitial.
The on() method is the Event handler of type AuthenticationEvent, so when we called add(AuthenticationStarted) in the main.dart file we triggered this event, since the AuthenticationStarted event extends the AuthenticationEvent class.
As, you can see above inside the if block if (event is AuthenticationStarted) {, I retrieve the uid if it’s a valid uid then I emit the state AuthenticationSuccess with the displayName of the user, else if it failed then I emit AuthenticationFailure. Since, we emitted a new state then the BlocBuilder<AuthenticationBloc, AuthenticationState> in the file app.dart, will rebuild the widget and navigate to the correct page.
AuthenticationRepository
As you saw in the AuthenticationBloc, we passed an instance of the AuthenticationRepository. Therefore create a file called authentication_repository and add the following:
class AuthenticationRepositoryImpl implements AuthenticationRepository {
  AuthenticationService service = AuthenticationService();
  DatabaseService dbService = DatabaseService();

  @override
  Stream<UserModel> getCurrentUser() {
    return service.retrieveCurrentUser();
  }

  @override
  Future<UserCredential?> signUp(UserModel user) {
    try {
      return service.signUp(user);
    } on FirebaseAuthException catch (e) {
      throw FirebaseAuthException(code: e.code, message: e.message);
    }
  }

  @override
  Future<UserCredential?> signIn(UserModel user) {
    try {
      return service.signIn(user);
    } on FirebaseAuthException catch (e) {
      throw FirebaseAuthException(code: e.code, message: e.message);
    }
  }

  @override
  Future<void> signOut() {
    return service.signOut();
  }

  @override
  Future<String?> retrieveUserName(UserModel user) {
    return dbService.retrieveUserName(user);
  }
}

abstract class AuthenticationRepository {
  Stream<UserModel> getCurrentUser();
  Future<UserCredential?> signUp(UserModel user);
  Future<UserCredential?> signIn(UserModel user);
  Future<void> signOut();
  Future<String?> retrieveUserName(UserModel user);
}
The repository class will act as a layer above the service class. So, here we have the normal operations regarding authentications like signUp, signIn, and signOut`. We also create a method to retrieve the user name and another one to get the current user.
The AuthenticationRepository class will also have dependency on both the DatabaseService and the AuthenticationService class. For simplicity of the tutorial I didn’t use any dependency injection to inject those services, but in a prod app it’s better to use DI.
AuthenticationService
Now inside the AuthenticationService we finally use Firebase API!
class AuthenticationService {
  FirebaseAuth auth = FirebaseAuth.instance;

  Stream<UserModel> retrieveCurrentUser() {
    return auth.authStateChanges().map((User? user) {
      if (user != null) {
        return UserModel(uid: user.uid, email: user.email);
      } else {
        return  UserModel(uid: "uid");
      }
    });
  }

  Future<UserCredential?> signUp(UserModel user) async {
    try {
      UserCredential userCredential = await FirebaseAuth.instance
          .createUserWithEmailAndPassword(email: user.email!,password: user.password!);
          verifyEmail();
      return userCredential;
    } on FirebaseAuthException catch (e) {
      throw FirebaseAuthException(code: e.code, message: e.message);
    }
  }

  Future<UserCredential?> signIn(UserModel user) async {
    try {
      UserCredential userCredential = await FirebaseAuth.instance
          .signInWithEmailAndPassword(email: user.email!, password: user.password!);
      return userCredential;
    } on FirebaseAuthException catch (e) {
      throw FirebaseAuthException(code: e.code, message: e.message);
    }
  }

  Future<void> verifyEmail() async {
    User? user = FirebaseAuth.instance.currentUser;
    if (user != null && !user.emailVerified) {
      return await user.sendEmailVerification();
    }
  }

  Future<void> signOut() async {
    return await FirebaseAuth.instance.signOut();
  }
}
So, first we retrieve an instance of FirebaseAuth. Then in the method retrieveCurrentUser() we use the authStateChanges() which will keep listening for any change regarding the authentication state of the user. If the user is not null, then we return an instance of UserModel with a valid userId, else we return an instance of UserModel with the string uid which means that user is not logged in.
Then in the method signUp(), we call createUserWithEmailAndPassword() to create a new user in the Firebase authentication console, we also call verifyEmail() which will validate the email that the user added in the signup form.
Then we create the signIn() method that will contain signInWithEmailAndPassword() method which will sign in the user or return an error if for example the email is not authenticated. We also create a signOut() method to sign out the user.
Ofcourse, if you add all of those you would have an error on the UserModel class saying that it doesn’t exist. Therefore create a model folder and inside of it a file called user_model and add the following:
import 'package:cloud_firestore/cloud_firestore.dart';

class UserModel {
  String? uid;
  bool? isVerified;
  final String? email;
  String? password;
  final String? displayName;
  final int? age;
  UserModel({this.uid, this.email, this.password, this.displayName, this.age,this.isVerified});

  Map<String, dynamic> toMap() {
    return {
      'email': email,
      'displayName': displayName,
      'age': age,
    };
  }

  UserModel.fromDocumentSnapshot(DocumentSnapshot<Map<String, dynamic>> doc)
      : uid = doc.id,
        email = doc.data()!["email"],
        age = doc.data()!["age"],
        displayName = doc.data()!["displayName"];


  UserModel copyWith({
    bool? isVerified,
    String? uid,
    String? email,
    String? password,
    String? displayName,
    int? age,
  }) {
    return UserModel(
      uid: uid ?? this.uid,
      email: email ?? this.email,
      password: password ?? this.password,
      displayName: displayName ?? this.displayName,
      age: age ?? this.age,
      isVerified: isVerified ?? this.isVerified
    );
  }
}
Here, we create a toMap() method that will be used to save data to the database, and fromDocumentSnapshot() to map the retrieved data to the class UserModel. We also use the copyWith() method to update specific fields and return an instance with the updated fields.
Now since we explained the AuthenticationBloc, in the next section we will learn how to create a Form with Validation.
Creating the Form Bloc
Inside the features folder, create a form-validation folder and then right click and click Bloc: new Bloc and create a bloc with the name form. The whole point of creating this Bloc is to add validation to the Sign up and Sign in forms.
FormEvent
Now navigate to the form_event.dart file and add the following:
part of 'form_bloc.dart';

enum Status { signIn, signUp }

abstract class FormEvent extends Equatable {
  const FormEvent();

  @override
  List<Object> get props => [];
}

class EmailChanged extends FormEvent {
  final String email;
  const EmailChanged(this.email);

  @override
  List<Object> get props => [email];
}

class PasswordChanged extends FormEvent {
  final String password;
  const PasswordChanged(this.password);

  @override
  List<Object> get props => [password];
}

class NameChanged extends FormEvent {
  final String displayName;
  const NameChanged(this.displayName);

  @override
  List<Object> get props => [displayName];
}

class AgeChanged extends FormEvent {
  final int age;
  const AgeChanged(this.age);

  @override
  List<Object> get props => [age];
}

class FormSubmitted extends FormEvent {
  final Status value;
  const FormSubmitted({required this.value});

  @override
  List<Object> get props => [value];
}

class FormSucceeded extends FormEvent {
  const FormSucceeded();

  @override
  List<Object> get props => [];
}
Here, we create an enum called Status to differentiate between the sign-in and the sign-up. Then we create an event for each field, for example we have EmailChanged event which will also contain a field called email. We will add these events on the onChanged() of each TextFormField, that way whenever the user types anything, the event will be added and then the event handler inside the Bloc class would be called which will then emit a new state and according to that state we would show an error for the user. For example:
FormState
After adding the events, navigate to the form_state.dart class and add the following:
part of 'form_bloc.dart';

abstract class FormState extends Equatable {
  const FormState();
}

class FormInitial extends FormState {
  @override
  List<Object?> get props => [];
}

class FormsValidate extends FormState {
  const FormsValidate(
      {required this.email,
      required this.password,
      required this.isEmailValid,
      required this.isPasswordValid,
      required this.isFormValid,
      required this.isLoading,
      this.errorMessage = "",
      required this.isNameValid,
      required this.isAgeValid,
      required this.isFormValidateFailed,
      this.displayName,
      required this.age,
      this.isFormSuccessful = false});

  final String email;
  final String? displayName;
  final int age;
  final String password;
  final bool isEmailValid;
  final bool isPasswordValid;
  final bool isFormValid;
  final bool isNameValid;
  final bool isAgeValid;
  final bool isFormValidateFailed;
  final bool isLoading;
  final String errorMessage;
  final bool isFormSuccessful;

  FormsValidate copyWith(
      {String? email,
      String? password,
      String? displayName,
      bool? isEmailValid,
      bool? isPasswordValid,
      bool? isFormValid,
      bool? isLoading,
      int? age,
      String? errorMessage,
      bool? isNameValid,
      bool? isAgeValid,
      bool? isFormValidateFailed,
      bool? isFormSuccessful}) {
    return FormsValidate(
        email: email ?? this.email,
        password: password ?? this.password,
        isEmailValid: isEmailValid ?? this.isEmailValid,
        isPasswordValid: isPasswordValid ?? this.isPasswordValid,
        isFormValid: isFormValid ?? this.isFormValid,
        isLoading: isLoading ?? this.isLoading,
        errorMessage: errorMessage ?? this.errorMessage,
        isNameValid: isNameValid ?? this.isNameValid,
        age: age ?? this.age,
        isAgeValid: isAgeValid ?? this.isAgeValid,
        displayName: displayName ?? this.displayName,
        isFormValidateFailed: isFormValidateFailed ?? this.isFormValidateFailed,
        isFormSuccessful: isFormSuccessful ?? this.isFormSuccessful);
  }

  @override
  List<Object?> get props => [
        email,
        password,
        isEmailValid,
        isPasswordValid,
        isFormValid,
        isLoading,
        errorMessage,
        isNameValid,
        displayName,
        age,
        isFormValidateFailed,
        isFormSuccessful
      ];
}
Since this bloc will only be used for validation, therefore we create only one state other than the initial one. We update the state FormsValidate by using the copyWith() method. Here, it is very important to use the Equatable package. The Equatable package overrides both the === and the hashcode internally which save us from doing that manually. Therefore when you use props and add all the fields then whenever one of those fields changes then we will have a state change.
FormBloc
Now inside the file form_bloc.dart, add the following code:
class FormBloc extends Bloc<FormEvent, FormsValidate> {
  final AuthenticationRepository _authenticationRepository;
  final DatabaseRepository _databaseRepository;
  FormBloc(this._authenticationRepository, this._databaseRepository)
      : super(const FormsValidate(
            email: "[email protected]",
            password: "",
            isEmailValid: true,
            isPasswordValid: true,
            isFormValid: false,
            isLoading: false,
            isNameValid: true,
            age: 0,
            isAgeValid: true,
            isFormValidateFailed: false)) {
    on<EmailChanged>(_onEmailChanged);
    on<PasswordChanged>(_onPasswordChanged);
    on<NameChanged>(_onNameChanged);
    on<AgeChanged>(_onAgeChanged);
    on<FormSubmitted>(_onFormSubmitted);
    on<FormSucceeded>(_onFormSucceeded);
  }
Here, the FormBloc will have a dependency on both the AuthenticationRepository and the DatabaseRepository. We also use the on event handler assigning it a type of each event that can occur. For example in the onEmailChanged we do the following:
  final RegExp _emailRegExp = RegExp(
    r'^[a-zA-Z0-9.!#$%&’*+/=?^_`{|}~-]+@[a-zA-Z0-9-]+(?:\.[a-zA-Z0-9-]+)*$',
  );

  bool _isEmailValid(String email) {
    return _emailRegExp.hasMatch(email);
  }

  _onEmailChanged(EmailChanged event, Emitter<FormsValidate> emit) {
    emit(state.copyWith(
      isFormSuccessful: false,
      isFormValid: false,
      isFormValidateFailed: false,
      errorMessage: "",
      email: event.email,
      isEmailValid: _isEmailValid(event.email),
    ));
  }
Here, I use the copyWith() to update the state and emit a new state which will get observed by either the BlocBuilder, BlocListener or BlocConsumer of type FormsBloc. Inside the copyWith(), I initialize all the fields of this state again and I use the _isEmailValid() method to check if the email is a valid one according to the regex. The same thing is done with the other methods, you can check the source code from the link at the beginning of the article.
The only different method is the _onFormSubmitted:
  _onFormSubmitted(FormSubmitted event, Emitter<FormsValidate> emit) async {
    UserModel user = UserModel(
        email: state.email,
        password: state.password,
        age: state.age,
        displayName: state.displayName);

    if (event.value == Status.signUp) {
      await _updateUIAndSignUp(event, emit, user);
    } else if (event.value == Status.signIn) {
      await _authenticateUser(event, emit, user);
    }
  }
Here, I use the event FormSubmitted which has an instance variable of type Status. So, first I initialize the UserModel class and then according to the value of Status I either called _updateUIAndSignUp() or _authenticateUser().
Inside _updateUIAndSignUp(), I do the following:
  _updateUIAndSignUp(
      FormSubmitted event, Emitter<FormsValidate> emit, UserModel user) async {
    emit(
      state.copyWith(errorMessage: "",
        isFormValid: _isPasswordValid(state.password) &&
            _isEmailValid(state.email) &&
            _isAgeValid(state.age) &&
            _isNameValid(state.displayName),
        isLoading: true));
    if (state.isFormValid) {
      try {

        UserCredential? authUser = await _authenticationRepository.signUp(user);
        UserModel updatedUser = user.copyWith(
            uid: authUser!.user!.uid, isVerified: authUser.user!.emailVerified);
        await _databaseRepository.saveUserData(updatedUser);
        if (updatedUser.isVerified!) {
          emit(state.copyWith(isLoading: false, errorMessage: ""));
        } else {
          emit(state.copyWith(isFormValid: false,errorMessage: "Please Verify your email, by clicking the link sent to you by mail.",isLoading: false));
        }
      } on FirebaseAuthException catch (e) {
        emit(state.copyWith(
            isLoading: false, errorMessage: e.message, isFormValid: false));
      }
    } else {
      emit(state.copyWith(
          isLoading: false, isFormValid: false, isFormValidateFailed: true));
    }
  }
So, here first emit() a new state that will check if the form is valid and that will assign true to isLoading which will show a CircularProgressIndicator on the screen. Then if the form is valid, I call the signUp() method that we saw before in the AuthenticationRepository, I then call the copyWith() method and return a new instance of UserModel. After that, I call saveUserData() which will add the data to Cloud Firestore, we will see that in the next section.
If the user is verified, then we remove the CircularProgressIndicator by assigning false to isLoading and removing any errorMessage, else we show an error with the above message.
The method _authenticateUser() is also the same as _updateUIAndSignUp() except that we call signIn() and we only check if the password and email are valid.
SignUpView
Now inside the SignUpView which will contain the form, we need to observe all these changes that are being emitted from the Bloc, therefore we do the following:
class SignUpView extends StatelessWidget {
  const SignUpView({Key? key}) : super(key: key);

  @override
  Widget build(BuildContext context) {
    Size size = MediaQuery.of(context).size;
    return MultiBlocListener(
        listeners: [
          BlocListener<FormBloc, FormsValidate>(
            listener: (context, state) {
              if (state.errorMessage.isNotEmpty) {
                showDialog(
                    context: context,
                    builder: (context) =>
                        ErrorDialog(errorMessage: state.errorMessage));
              } else if (state.isFormValid && !state.isLoading) {
                context.read<AuthenticationBloc>().add(AuthenticationStarted());
                context.read<FormBloc>().add(const FormSucceeded());
              } else if (state.isFormValidateFailed) {
                ScaffoldMessenger.of(context).showSnackBar(
                    const SnackBar(content: Text(Constants.textFixIssues)));
              }
            },
          ),
          BlocListener<AuthenticationBloc, AuthenticationState>(
            listener: (context, state) {
              if (state is AuthenticationSuccess) {
                Navigator.of(context).pushAndRemoveUntil(
                    MaterialPageRoute(builder: (context) => const HomeView()),
                    (Route<dynamic> route) => false);
              }
            },
          ),
        ],
        child: Scaffold(
            backgroundColor: Constants.kPrimaryColor,
            body: Center(
              child: SingleChildScrollView(
                child: Column(
                    mainAxisAlignment: MainAxisAlignment.center,
                    children: [
                      Image.asset("assets/images/sign-in.png"),
                      const Text(Constants.textRegister,
                          textAlign: TextAlign.center,
                          style: TextStyle(
                            color: Constants.kBlackColor,
                            fontWeight: FontWeight.bold,
                            fontSize: 30.0,
                          )),
                      Padding(
                          padding: EdgeInsets.only(bottom: size.height * 0.02)),
                      const _EmailField(),
                      SizedBox(height: size.height * 0.01),
                      const _PasswordField(),
                      SizedBox(height: size.height * 0.01),
                      const _DisplayNameField(),
                      SizedBox(height: size.height * 0.01),
                      const _AgeField(),
                      SizedBox(height: size.height * 0.01),
                      const _SubmitButton()
                    ]),
              ),
            )));
Here I use the MultiBlocListener and inside of it I listen to any change inside the FormBloc and inside the AuthenticationBloc.
First, if the errorMessage in the FormsValidate class is not empty, then it means either the email is not validated or the signUp method is throwing an error therefore we show a dialog with that error.
If isFormValid is true and isLoading is false, then it means the signUp worked therefore, we add the event AuthenticationStarted() which will trigger the event handler in the AuthenticationBloc and it will return AuthenticationSuccess state. After AuthenticationSuccess is emitted, it will then trigger the Bloclistener of type AuthenticationBloc and navigate to the HomeView() page.
To see how to add an event inside the onChanged then check the following:
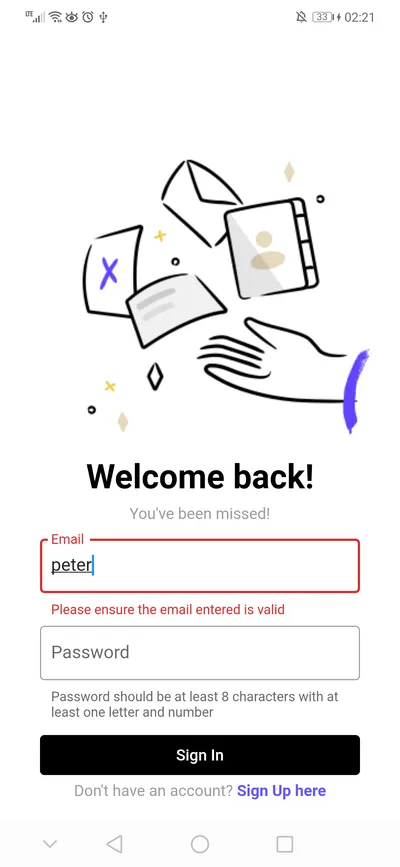
class _EmailField extends StatelessWidget {
  const _EmailField({Key? key}) : super(key: key);

  @override
  Widget build(BuildContext context) {
    Size size = MediaQuery.of(context).size;
    return BlocBuilder<FormBloc, FormsValidate>(
      builder: (context, state) {
        return SizedBox(
          width: size.width * 0.8,
          child: TextFormField(
              onChanged: (value) {
                context.read<FormBloc>().add(EmailChanged(value));
              },
              keyboardType: TextInputType.emailAddress,
              decoration: InputDecoration(
                labelText: 'Email',
                helperText: 'A complete, valid email e.g. [email protected]',
                errorText: !state.isEmailValid
                    ? 'Please ensure the email entered is valid'
                    : null,
                hintText: 'Email',
                contentPadding: const EdgeInsets.symmetric(
                    vertical: 15.0, horizontal: 10.0),
                border: border,
              )),
        );
      },
    );
  }
}
Here inside the onChanged of the _EmailField, I add the event EmailChanged(), and according to the field isEmailValid, I either show an error below the field or return null.
The other fields and the SignInView widget are also the same concept as the _EmailField and the SignUpView, therefore you check them in the source code at Github.
Creating the Database Bloc
Inside the features folder, create a database folder and then right click and click Bloc: new Bloc and create a bloc with the name Database. In this Bloc we would use Cloud Firestore to save and retrieve data.
DatabaseEvent
Now inside the file database_event.dart, add the following:
part of 'database_bloc.dart';

abstract class DatabaseEvent extends Equatable {
  const DatabaseEvent();

  @override
  List<Object?> get props => [];
}

class DatabaseFetched extends DatabaseEvent {
  final String? displayName;
  const DatabaseFetched(this.displayName);
  @override
  List<Object?> get props => [displayName];
}
Here we create the event DatabaseFetched that will get called to fetch the data from Cloud Firestore.
DatabaseState
Then inside the file database_state.dart, add the following:
part of 'database_bloc.dart';

abstract class DatabaseState extends Equatable {
  const DatabaseState();

  @override
  List<Object?> get props => [];
}

class DatabaseInitial extends DatabaseState {}

class DatabaseSuccess extends DatabaseState {
  final List<UserModel> listOfUserData;
  final String? displayName;
  const DatabaseSuccess(this.listOfUserData,this.displayName);

    @override
  List<Object?> get props => [listOfUserData,displayName];
}

class DatabaseError extends DatabaseState {
      @override
  List<Object?> get props => [];
}
Here, we have 3 states: the initial state, the success state which will contain the data and the error state.
DatabaseBloc
Now inside the database_bloc.dart, add the following:
class DatabaseBloc extends Bloc<DatabaseEvent, DatabaseState> {
  final DatabaseRepository _databaseRepository;
  DatabaseBloc(this._databaseRepository) : super(DatabaseInitial()) {
    on<DatabaseFetched>(_fetchUserData);
  }

  _fetchUserData(DatabaseFetched event, Emitter<DatabaseState> emit) async {
      List<UserModel> listofUserData = await _databaseRepository.retrieveUserData();
      emit(DatabaseSuccess(listofUserData,event.displayName));
  }
}
Here, if the event DatabaseFetched is triggered, then it will call the method _fetchUserData(), which will then call the method retrieveUserData() and after getting the response, it will emit a new state with the data that it got from Cloud Firestore.
DatabaseRepository
Inside the file database_repository_impl.dart, add the following:
class DatabaseRepositoryImpl implements DatabaseRepository {
  DatabaseService service = DatabaseService();

  @override
  Future<void> saveUserData(UserModel user) {
    return service.addUserData(user);
  }

  @override
  Future<List<UserModel>> retrieveUserData() {
    return service.retrieveUserData();
  }
}

abstract class DatabaseRepository {
  Future<void> saveUserData(UserModel user);
  Future<List<UserModel>> retrieveUserData();
}
Here, we have two methods saveUserData() to add the data to Firestore and retrieveUserData() to retrieve the data from the database.
DatabaseService
Then inside the DatabaseService class we finally use Cloud Firestore:
class DatabaseService {
  final FirebaseFirestore _db = FirebaseFirestore.instance;

    addUserData(UserModel userData) async {
    await _db.collection("Users").doc(userData.uid).set(userData.toMap());
  }

    Future<List<UserModel>> retrieveUserData() async {
    QuerySnapshot<Map<String, dynamic>> snapshot =
        await _db.collection("Users").get();
    return snapshot.docs
        .map((docSnapshot) => UserModel.fromDocumentSnapshot(docSnapshot))
        .toList();
    }

        Future<String> retrieveUserName(UserModel user) async {
    DocumentSnapshot<Map<String, dynamic>> snapshot =
        await _db.collection("Users").doc(user.uid).get();
    return snapshot.data()!["displayName"];
    }
}
First, we get an instance of Firestore and then in the addUserData() we create a collection called Users and then assign the userId as a document id and use the set() method to add the userData under the document.
In the retrieveUserData(), we use the get() method to retrieve all the documents inside the Users collection and then we use map to return a list of type UserModel that will contain all the data. We also create a method called retrieveUserName() to retrieve the displayName of the user.
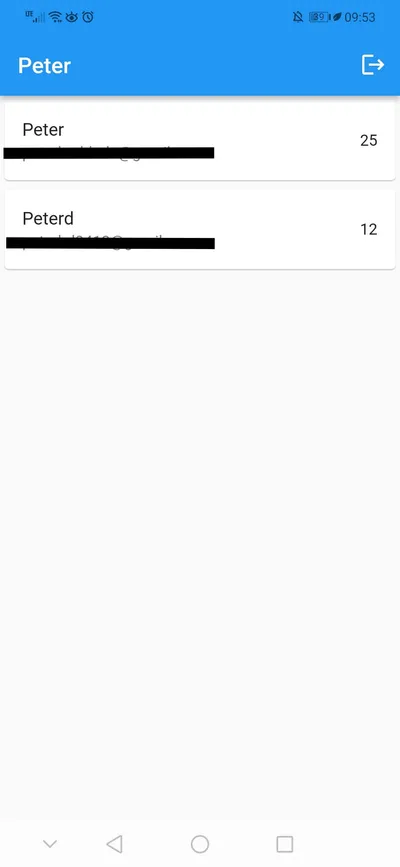
HomeView
In the HomeView widget we use the two Blocs. The AuthenticationBloc and the DatabaseBloc. So, first we do the following:
class HomeView extends StatelessWidget {
  const HomeView({Key? key}) : super(key: key);

  @override
  Widget build(BuildContext context) {
    return BlocConsumer<AuthenticationBloc, AuthenticationState>(
      listener: (context, state) {
        if (state is AuthenticationFailure) {
          Navigator.of(context).pushAndRemoveUntil(
              MaterialPageRoute(builder: (context) => const WelcomeView()),
              (Route<dynamic> route) => false);
        }
      },
      buildWhen: ((previous, current) {
        if (current is AuthenticationFailure) {
          return false;
        }
        return true;
      }),
      builder: (context, state) {
        return Scaffold(
            appBar: AppBar(
              automaticallyImplyLeading: false,
              actions: <Widget>[
                IconButton(
                    icon: const Icon(
                      Icons.logout,
                      color: Colors.white,
                    ),
                    onPressed: () async {
                      context
                          .read<AuthenticationBloc>()
                          .add(AuthenticationSignedOut());
                    })
              ],
              systemOverlayStyle:
                  const SystemUiOverlayStyle(statusBarColor: Colors.blue),
              title: Text((state as AuthenticationSuccess).displayName!),
            ),
Here we use the BlocConsumer which enables us to combine both the listener and the builder. So, on the onPressed button we add the event AuthenticationSignedOut() which will emit the state AuthenticationFailure and then we would navigate to the WelcomeView(). In the property title we use the displayName to show the name of the user and we get the displayName if the state is AuthenticationSuccess.
Inside the body property, we do the following:
            body: BlocBuilder<DatabaseBloc, DatabaseState>(
              builder: (context, state) {
                String? displayName = (context.read<AuthenticationBloc>().state
                        as AuthenticationSuccess)
                    .displayName;
                if (state is DatabaseSuccess &&
                    displayName !=
                        (context.read<DatabaseBloc>().state as DatabaseSuccess)
                            .displayName) {
                  context.read<DatabaseBloc>().add(DatabaseFetched(displayName));
                }
                if (state is DatabaseInitial) {
                  context.read<DatabaseBloc>().add(DatabaseFetched(displayName));
                  return const Center(child: CircularProgressIndicator());
                } else if (state is DatabaseSuccess) {
                  if (state.listOfUserData.isEmpty) {
                    return const Center(
                      child: Text(Constants.textNoData),
                    );
                  } else {
                    return Center(
                      child: ListView.builder(
                        itemCount: state.listOfUserData.length,
                        itemBuilder: (BuildContext context, int index) {
                          return Card(
                            child: ListTile(
                              title: Text(
                                  state.listOfUserData[index].displayName!),
                              subtitle:
                                  Text(state.listOfUserData[index].email!),
                              trailing: Text(
                                  state.listOfUserData[index].age!.toString()),
                            ),
                          );
                        },
                      ),
                    );
                  }
                } else {
                  return const Center(child: CircularProgressIndicator());
                }
              },
            ));
First, we get the displayName from the AuthenticationSuccess state and check if the state is DatabaseSuccess and the displayName is different than the one inside DatabaseSuccess then we call DatabaseFetched event to update the list.
If state is DatabaseInitial, then we add the event DatabaseFetched, which will emit a state of type DatabaseSuccess and will show the list.
References
I hope you enjoyed reading this flutter/firebase tutorial, please feel free to leave any comments or feedback on this post!